Author: prospeedguy@gmail.com

  • How Search Engine Work 

    Learn what search engines do and how they work. Easy step-by-step tutorial with a video for beginners.

    If you are a developer, designer, small business owner, marketing professional, website owner, or thinking of creating a personal blog or website for your business, then you need to understand how search engines work.

    Having a clear understanding of how search works, can help you create a website that search engines can understand, and this has a number of added benefits.

    It’s the first step you need to take before even dealing with Search Engine Optimization (SEO) or any other SEM (Search Engine Marketing) tasks.

    In this guide, you’ll learn the three main processes (crawling, indexing, and ranking) that search engines follow to find, organize, and present information to users.

    What does a Search Engine Do?

    Have you ever wondered how many times per day you use Google or any other search engine to search the web?

    Is it 5 times, 10 times or even sometimes more? Did you know that Google alone handles more than 2 trillion searches per year?

    The numbers are huge. Search engines have become part of our daily life. We use them as a learning tool, a shopping tool, for fun and leisure but also for business.

    It’s not an exaggeration to say that we reached a point that we depend on search engines for almost anything we do.

    And the reason this is happening is very simple. We know that search engines and in particular, Google has answers to all our questions and queries.

    What happens though when you type a query and click search? How do search engines work internally and how do they decide what to show in the search results and in what order?

    How Do Search Engines Work

    Search engines are complex computer programs.

    Before they even allow you to type a query and search the web, they have to do a lot of preparation work so that when you click “Search”, you are presented with a set of precise and quality results that answer your question or query.

    What does ‘preparation work’ includes? Three main stages. The first stage is the process of discovering the information, the second stage is organizing the information, and the third stage is ranking.

    This is generally known in the Internet World as Crawling, Indexing, and ranking.
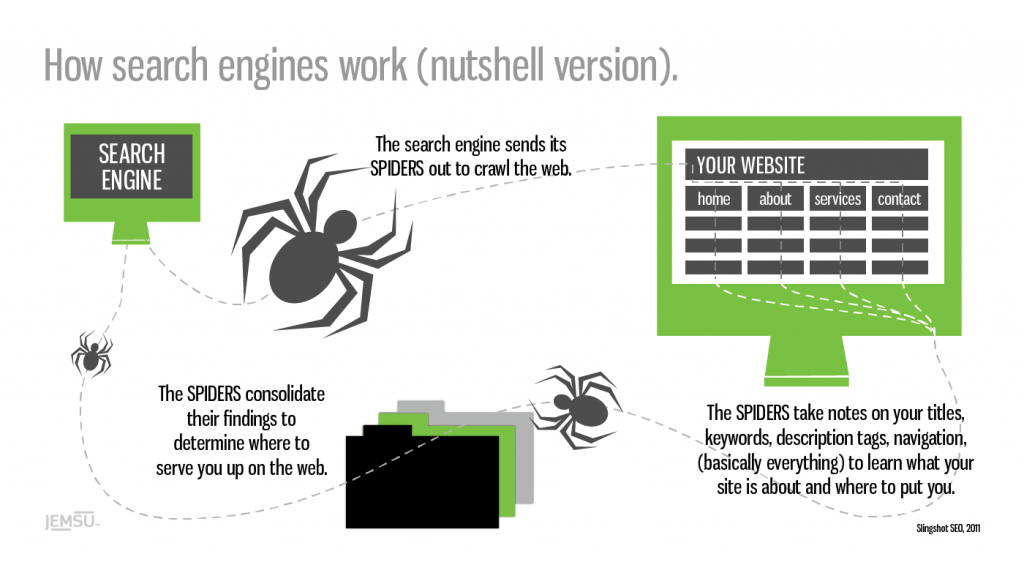
    How Search Engines Work (Overview)

    Step 1: Crawling

    Search engines have a number of computer programs called web crawlers (thus the word Crawling), that are responsible for finding information that is publicly available on the Internet.

    To simplify a complicated process, it’s enough for you to know that the job of these software crawlers (also known as search engine spiders), is to scan the Internet and find the servers (also known as webservers) hosting websites.

    They create a list of all the web servers to crawl, the number of websites hosted by each server, and then start work.

    They visit each website and by using different techniques, they try to find out how many pages they have, whether it is text content, images, videos, or any other format (CSS, HTML, javascript, etc).

    When visiting a website, besides taking note of the number of pages they also follow any links (either pointing to pages within the site or to external websites), and thus they discover more and more pages.

    They do this continuously and they also keep track of changes made to a website so that they know when new pages are added or deleted, when links are updated, etc.

    If you take into account that there are more than 130 trillion individual pages on the Internet today and on average thousands of new pages are published on a daily basis, you can imagine that this is a lot of work.

    Why care about the crawling process?

    Your first concern when optimizing your website for search engines is to ensure that they can access it correctly otherwise if they cannot ‘read’ your website, you shouldn’t expect much in terms of high rankings or search engine traffic.

    As explained above, crawlers have a lot of work to do and you should try and make their job easier.

    There are a number of things to do to make sure that crawlers can discover and access your website in the fastest possible way without problems.

    1. Use Robots.txt to specify which pages of your website you don’t want crawlers to access. For example, pages like your admin or backend pages and other pages you don’t want to be publicly available on the Internet.
    2. Big search engines like Google and Bing, have tools (aka Webmaster tools),  you can use to give them more information about your website (number of pages, structure, etc) so that they don’t have to find it themselves.
    3. Use an XML sitemap to list all important pages of your website so that the crawlers can know which pages to monitor for changes and which to ignore.

    Step 2: Indexing

    Crawling alone is not enough to build a search engine.

    Information identified by the crawlers needs to be organized, sorted and stored so that it can be processed by the search engine algorithms before being made available to the end-user.

    This process is called Indexing.

    Search engines don’t store all the information found on a page in their index but they keep things like: when it was created/updated, title and description of the page, type of content, associated keywords, incoming and outgoing links, and a lot of other parameters that are needed by their algorithms.

    Google likes to describe its index as the back of a book (a really big book).

    Why care about the indexing process?

    It’s very simple, if your website is not in their index, it will not appear for any searches.

    This also implies that the more pages you have in the search engine indexes, the more your chances of appearing in the search results when someone types a query.

    Notice that I mentioned the word ‘appear in the search results’, which means in any position and not necessarily on the top positions or pages.

    In order to appear in the first 5 positions of the SERPs (search engine results pages), you have to optimize your website for search engines using a process called Search Engine Optimization, or SEO in short.

    How to find how many pages of your website are included in the Google index?

    There are two ways to do that.

    Open Google and use the site operator followed by your domain name. For example site:reliablesoft.net. You will find out how many pages related to the particular domain are included in the Google Index.

    The second way is to create a free Google Search Console account and add your website.

    Then look at the Coverage report and in particular the VALID AND INDEXED pages.

    Valid and Indexed Pages Google Search Console Report

    Step 3: Ranking

    Search Engine Ranking Algorithms

    The third and final step in the process is for search engines to decide which pages to show in the SERPS and in what order when someone types a query.

    This is achieved through the use of search engine ranking algorithms.

    In simple terms, these are pieces of software that have a number of rules that analyze what the user is looking for and what information to return.

    These rules and decisions are made based on what information is available in their index.

    How do search engine algorithms work?

    Over the years search engine ranking algorithms have evolved and become really complex.

    At the beginning (think 2001) it was as simple as matching the user’s query with the title of the page but this is no longer the case.

    Google’s ranking algorithm takes into account more than 255 rules before making a decision and nobody knows for sure what these rules are.

    And this includes Larry Page and Sergey Brin (Google’s founders), who created the original algorithm.

    Things have changed a lot and now machine learning and computer programs are responsible for making decisions based on a number of parameters that are outside the boundaries of the content found on a web page.

    To make it easier to understand, here is a simplified process of how search engine ranking factors work:

    Step 1: Analyze User Query

    The first step is for search engines to understand what kind of information the user is looking for.

    To do that, they analyze the user’s query (search terms) by breaking it down into a number of meaningful keywords.

    A keyword is a word that has a specific meaning and purpose.

    For example, when you type “How to make a chocolate cake”, search engines know from the words how-to that you are looking for instructions on how to make a chocolate cake and thus the returned results will contain cooking websites with recipes.

    If you search for “Buy refurbished ….”, they know from the words buy and refurbished that you are looking to buy something and the returned results will include eCommerce websites and online shops.

    Machine learning has helped them associate related keywords together. For example, they know that the meaning of this query “how to change a light bulb” is the same as this “how to replace a light bulb”.
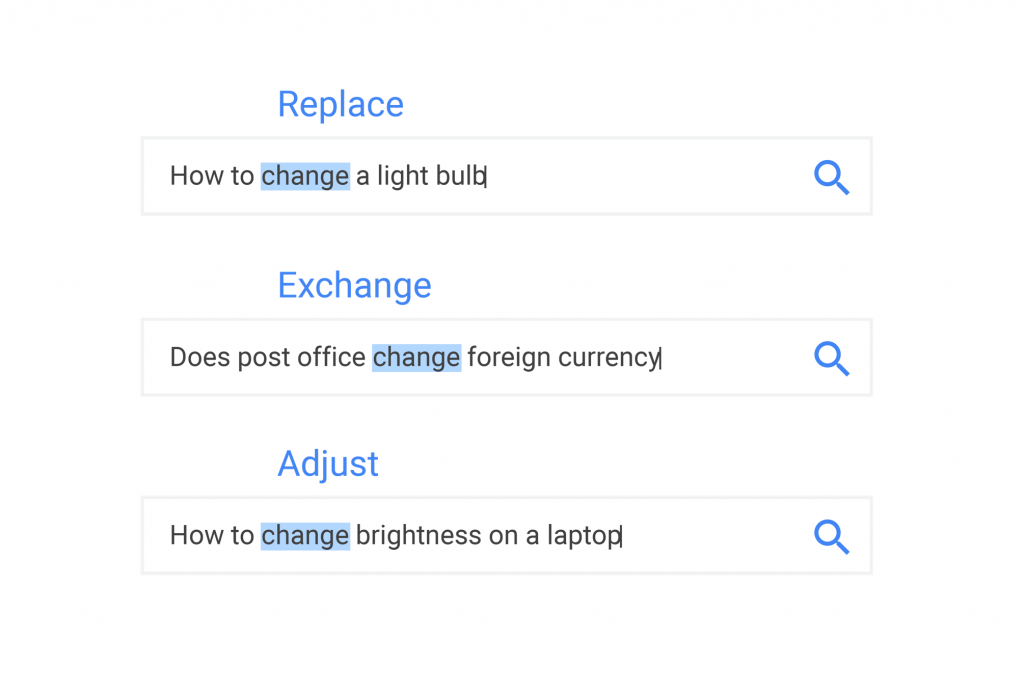
    Google Query Analyzer Example

    They are also clever enough to interpret spelling mistakes, understand plurals and in general extract the meaning of a query from natural language (either written or verbal in case of Voice search).

    Step 2: Finding matching pages

    The second step is to look into their index and decide which pages can provide the best answer for a given query.

    This is a very important stage in the whole process for both search engines and web owners.

    Search engines need to return the best possible results in the fastest possible way so that they keep their users happy and web owners want their websites to be picked up so that they get traffic and visits.

    This is also the stage where good SEO techniques can influence the decision made by the algorithms.

    To give you an idea of how matching works, these are the most important factors:

    Title and content relevancy – how relevant is the title and content of the page with the user query?

    Type of content – if the user is asking for images, the returned results will contain images and not text.

    Quality of the content – content needs to be thorough, useful and informative, unbiased, and cover both sites of a story.

    Quality of the website – The overall quality of a website matters. Google will not show pages from websites that don’t meet their quality standards.

    Date of publication – For news-related queries, Google wants to show the latest results so the date of publication is also taken into account.

    The popularity of a page – This doesn’t have to do with how much traffic a website has but how other websites perceive the particular page.

    A page that has a lot of references (backlinks), from other websites is considered to be more popular than other pages with no links and thus has more chances in getting picked up by the algorithms. This process is also known as Off-Page SEO.

    Language of the page – Users are served pages in their language and it’s not always English.

    Webpage Speed – Websites that load fast (think 2-3 seconds) have a small advantage compared to websites that are slow to load.

    Device Type – Users searching on mobile are served mobile-friendly pages.

    Location – Users searching for results in their area i.e. “Italian restaurants in Ohio” will be shown results related to their location.

    That’s just the tip of the iceberg. As mentioned before, Google uses more than 255 factors in its algorithms to ensure that its users are happy with the results they get.

    Why care how search engine ranking algorithms work?

    In order to get traffic from search engines, your website needs to appear in the top positions on the first page of the results.

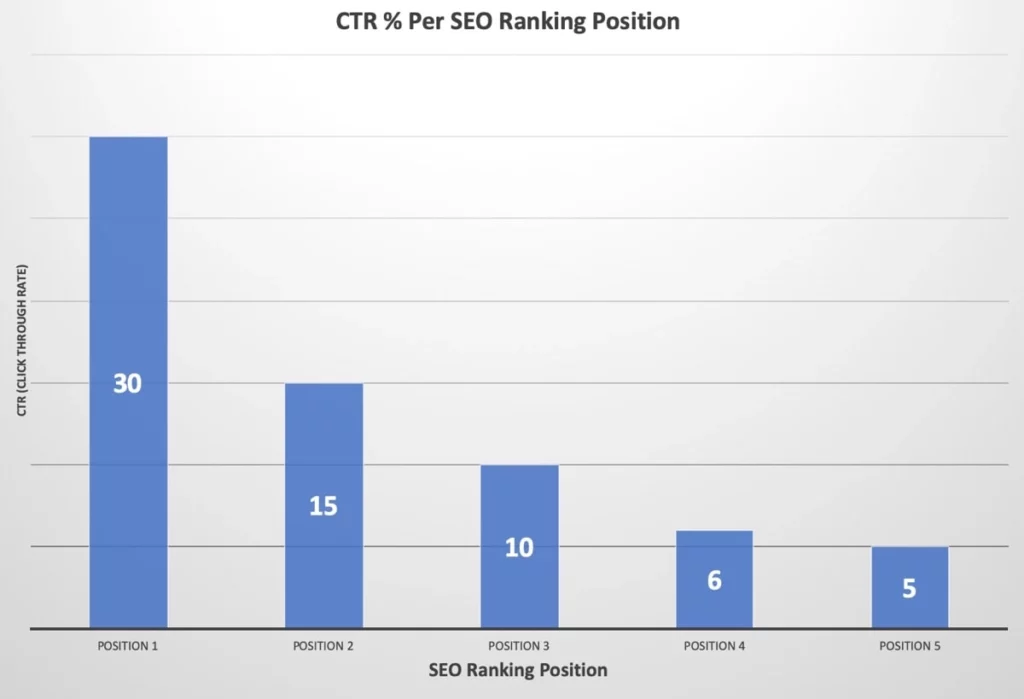
    It is statistically proven that the majority of users click one of the top 5 results (both desktop and mobile).
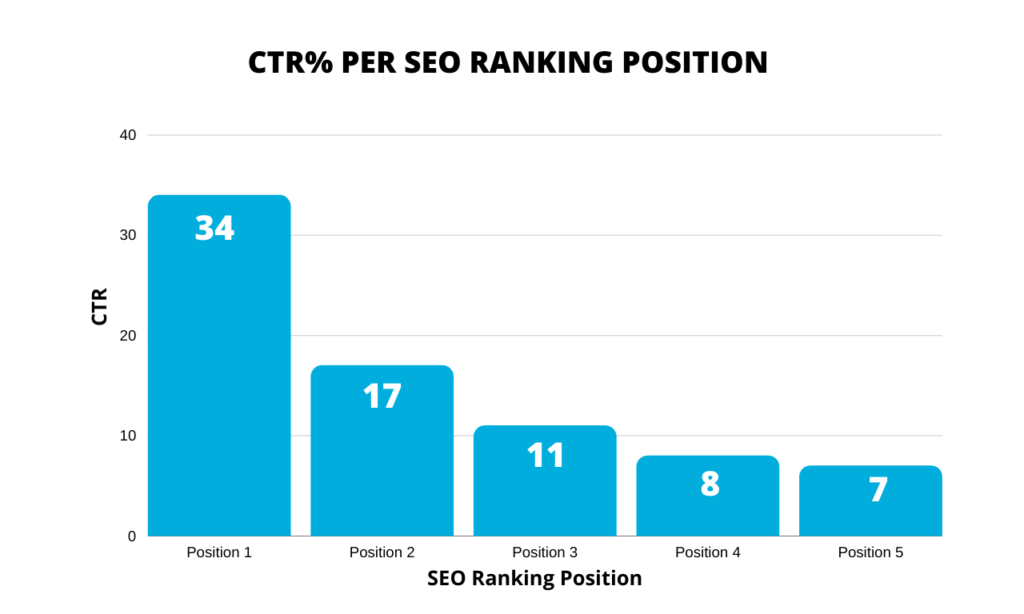
    CTR Per SEO Ranking Position.

    Appearing on the second or third page of the results will not get you any traffic at all.

    Traffic is just one of the benefits of SEO, once you get to the top positions for keywords that make sense for your business, the added benefits are much more.

    Knowing how search engines work can help you adjust your website and increase your rankings and traffic.

    Conclusion

    Search engines have become very complex computer programs. Their interface may be simple but the way they work and make decisions is far from simple.

    The process starts with crawling and indexing. During this phase, the search engine crawlers gather as much information as possible for all the websites that are publicly available on the Internet.

    They discover, process, sort, and store this information in a format that can be used by search engine algorithms to make a decision and return the best possible results back to the user.

    The amount of data they have to digest is enormous and the process is completely automated. Human intervention is only done in the process of designing the rules to be used by the various algorithms but even this step is gradually being replaced by computers through the help of artificial intelligence.

    As a webmaster, your job is to make their crawling and indexing job easier by creating websites that have a simple and straightforward structure.

    Once they can “read” your website without issues, you then need to ensure that you give them the right signals to help their search ranking algorithms, and pick your website when a user types a relevant query (that’s SEO).
  • What is Search Engine Marketing

    Everything you need to know about Search Engine Marketing. Includes examples and additional learning resources.

    Search engine marketing is a very effective digital marketing channel. Through search marketing, you can increase the visibility of your website in search engine results using paid and unpaid methods.

    SEM is important because search traffic is targeted and thus more valuable than any other form of traffic you can get with other promotion methods.

    In this guide, you’ll learn what is search engine marketing, why it’s important, and the different types of SEM.

    Search Engine Marketing

    Search Engine Marketing

    What is Search Engine Marketing?

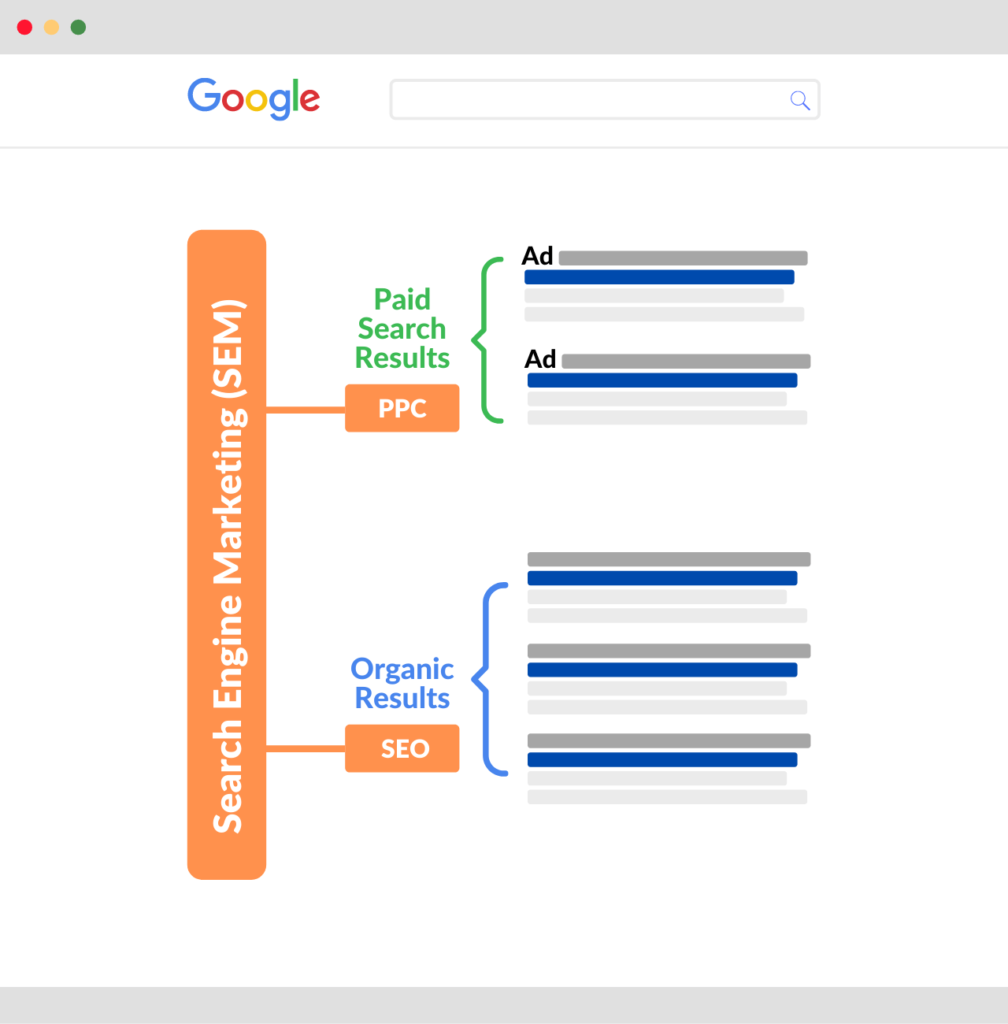
    Search Engine Marketing (also known as Search Marketing) is the process of getting traffic from search engines either organically or paid.

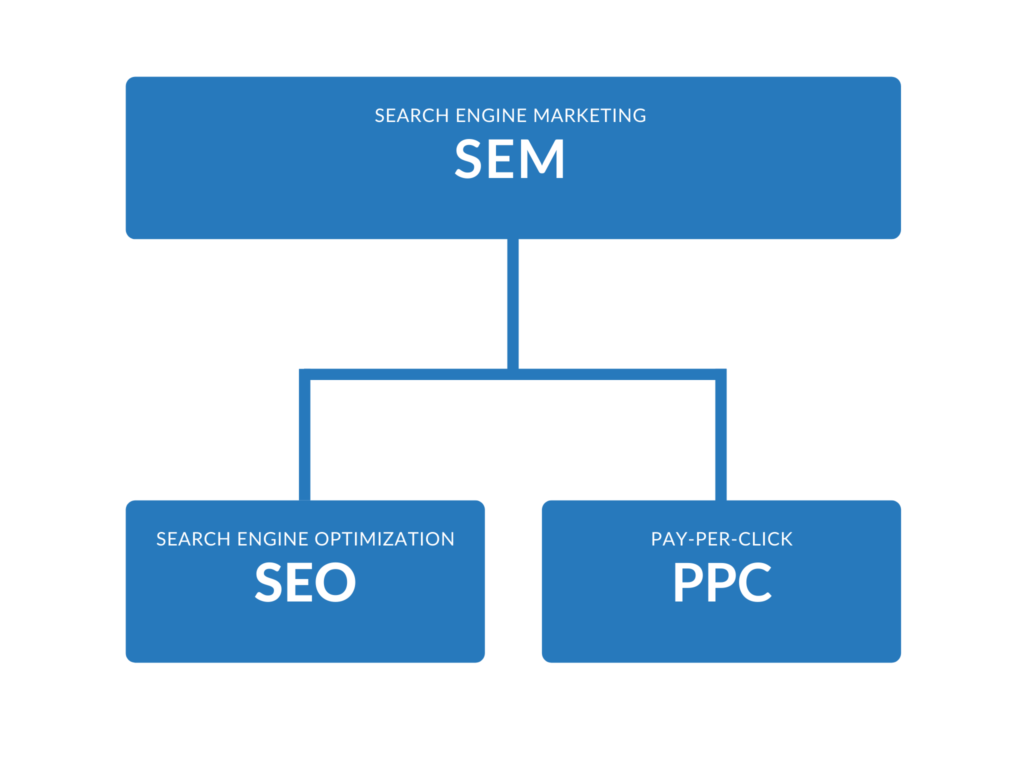
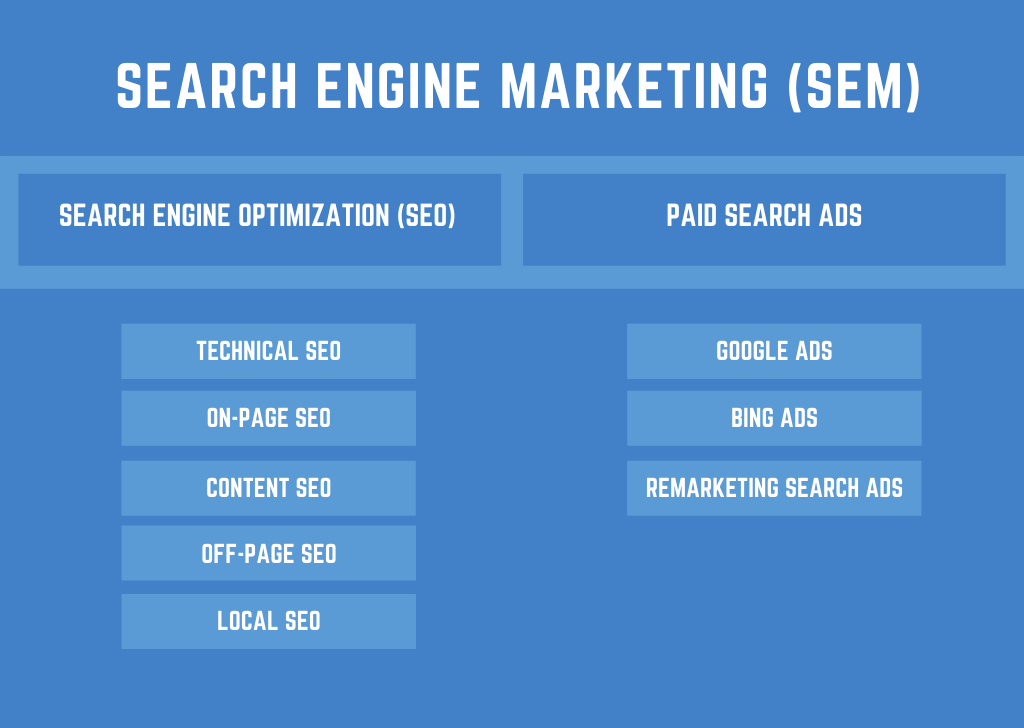
    Search marketing has two main types: SEO (Search Engine Optimization) and PSA (Paid Search Advertising).

    SEO is the way to get free traffic from search engines by achieving high rankings in the SERPs and Paid search ads are the process of paying for your ads to appear on search engine results pages.

    What is the main goal of Search Marketing?

    The overall goal of SEM is to increase visibility in search engines by achieving higher rankings in the SERPs (search engine results pages) or top positions for ad placements.

    Higher ad positions and rankings mean more traffic and this has a number of added advantages.

    As we will see later, each SEM component has a number of processes and tools.

    Importance of Search Marketing

    Before getting into the details on what is SEO and paid search advertising (PSA) and how to use them to get more exposure and traffic from search engines, let’s quickly examine the importance of SEM for the success of a website or online business.

    It is a fact that in today’s world the Internet is the source for everything we need to know, learn, ask, buy or do.

    Whenever we have a question or looking for something, the first thing we do is to turn to a search engine (in the majority of cases Google) and type in our search query.

    When we hit SEARCH, we expect to either get a direct answer to our question or a list of resources (and this list includes both ads and websites), that can satisfy our intent.

    Search engines are working hard to improve the quality of their search results by presenting to the searcher those websites (or ads) that will keep their users happy and come back again for more searches.

    To do that they have developed complex algorithms that take a number of variables into account before they decide which websites (or ads) to show in the top positions.

    Search engine marketing is important because it’s the process to follow to optimize your website or ads so that they appear in the top positions.

    Your goal is not just to have a presence in search engines but to show up in one of the top 5 positions for the search terms (keywords), that matter for your business or website.

    Statistics show that the majority of users click on one of the top ads or one of the first five organic results.

    The majority of Search Engine Traffic goes to the top 5 results.

    Search Marketing Types

    There are a number of techniques you can follow to improve your presence in search engines (organically) and to achieve higher positions for your ads.

    As mentioned above, these are grouped into two main types, SEO and PSA.

    SEM

    Search Engine Optimization (SEO)

    Search engine optimization or SEO is the process of optimizing your website for achieving higher rankings in search engines for certain keywords.

    SEO principles can also help you create high-quality websites with good content and satisfy the user intent.

    Until 10 years ago, SEO was about keyword stuffing, publishing mediocre content, and building links but this is not the case today.

    SEO has become more complex and to get it right, you have to take into account a number of parameters.

    To make the whole process easier, it is broken down into the following SEO types:

    SEO Types

    Technical SEO – optimize your website for the crawling and indexing process so that search engines can discover, read and understand your website.

    On-Page SEO – optimize all pages of your website one by one and give search engines the right signals to understand what your website and individual pages are all about.

    Off-Page SEO – promote your website on the internet, get good quality backlinks and prove to search engine algorithms that your website deserves to be in one of the top spots for the keywords you want.

    You may also come across other terms which describe specific aspects of SEO like:

    • Content SEO – give both users and search engines the content they want and keep them happy
    • Local SEO – optimizes your website so that people can find and visit your brick-and-mortar store
    • eCommerce SEO – SEO rules that are applicable to eCommerce websites only.
    • Mobile SEO – make it easy for users to find and use your website while on the go and from their mobile or tablet devices.

    Why is SEO important?

    Higher rankings, more traffic: If your goal with search marketing is to get traffic to your website without having to pay for ads, then SEO is the way to go.

    As mentioned above, the websites that appear in the top 3 positions of the organic results get more than 60% of the traffic – This statistic alone explains the importance of SEO.

    Search engine traffic is targeted: Open Google and search for anything you want. The websites that appear in the top positions get thousands of visits from Google on a daily basis.

    Depending on the keywords you used, they are probably making thousands of dollars in revenue (from advertising or selling their own products or services), because search engine traffic is highly targeted.

    Unlike traffic coming from Facebook or other social media networks, organic traffic converts better since the users have a clear intent in mind before typing something into Google and it’s not just for curiosity or leisure.

    Besides the traffic, SEO offers a number of other advantages and these can be summarized in the following:

    Trust and recognition: Users trust search engines because they know that they have strict rules as to which websites are shown in the search results, and in turn, they trust websites that rank in the top positions.

    Trust does not only generate more conversions but also increases recognition and brand awareness and this makes your digital marketing efforts in other channels easier.

    SEO can guide you on how to create better websites: SEO is not just about search engines but it’s mainly about users. To have a fully optimized website for search engines, it has to be optimized for users first and this is what SEO is all about.

    Paid Search Advertising (PSA)

    Besides getting organic traffic from Search engines, the other way to take advantage of the millions of users that use search engines on a daily basis and get targeted traffic to your website is through paid ads.

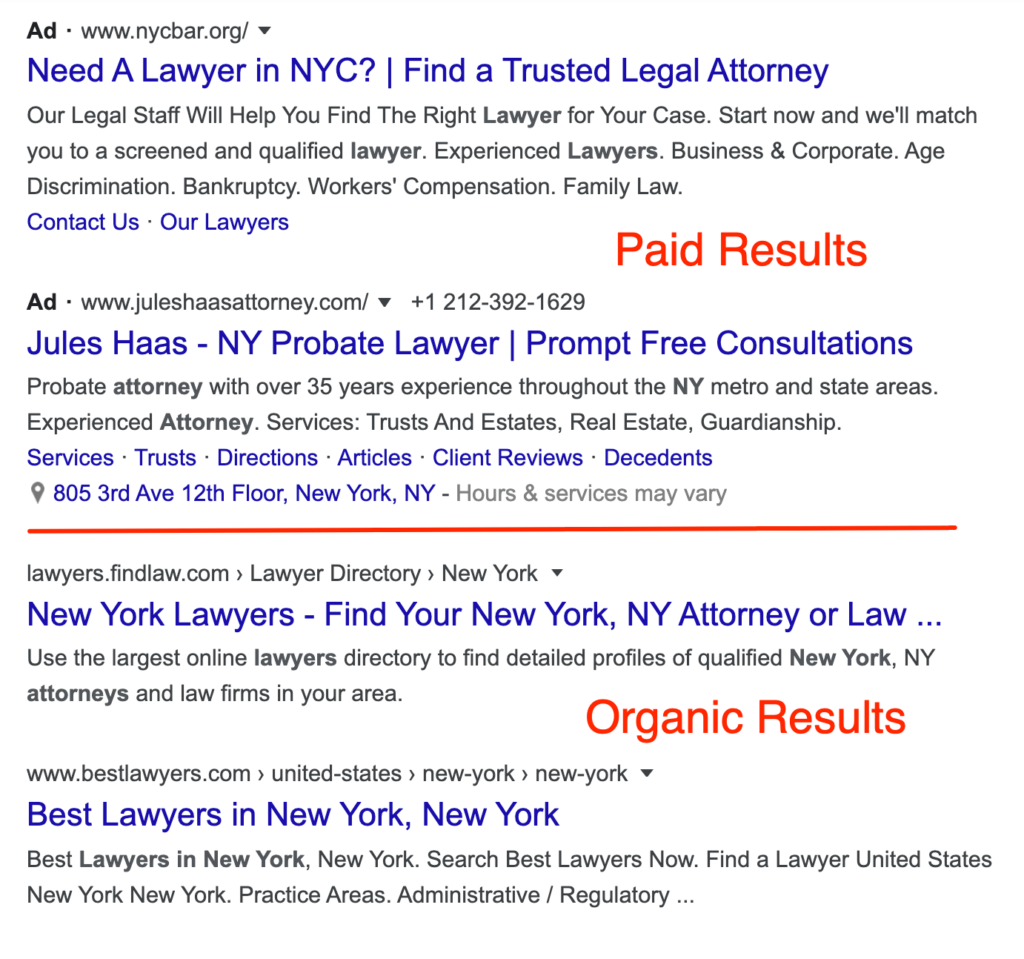
    If you search Google you will notice that above and below the organic results, you are presented with Paid Ads.

    Organic and Paid results in SERPs.

    This is what we mean by paid search advertising. Instead of trying to achieve high rankings through SEO, you can pay your way to the top.

    Of course, as we will see below, that’s not so easy. It gets more complicated when a number of advertisers are competing for one of the top ad positions.

    The most commonly used model is the PPC (Pay Per Click), which means that you pay only when someone clicks on your ad and the most widely used PSA system is Google Ads.

    Google Ads is owned by Google and it is the platform you need to use to show your ads on Google, Youtube, or the thousands of websites that participate in the Google ad network.

    How does PPC Work?

    The way it works is simple but it gets more complicated when you are dealing with niches and keywords that have a lot of competition. Here is an overview of the process:

    • You create a Free account with Google Ads
    • You set up advertising campaigns. Each campaign can contain a number of ad groups, keywords, and ads.
    • You specify your target audience i.e. which people can see your ads (you can narrow down your selection by country, time of day, user location, etc).
    • You start the campaign and you only pay when someone clicks on your ad.
    • You monitor the results of your campaigns and make the necessary changes.

    How much you pay every time someone clicks on your ad depends on a number of factors.

    The system will give you in advance an indication of how much you will be charged per click but the actual amount is decided when it actually happens.

    Google Ads in an auction-based system. This means that the cost of each click and the position your ad will appear depends on ‘demand and supply’.

    Every time a search is made on Google, Google Ads runs an auction for the available ad positions.

    Advertisers that are willing to pay more, and have higher quality ads that are most likely to satisfy the user intent, win the top positions.

    Example:

    To make this easier to understand, let’s say that there are 20 advertisers who sell ‘engagement rings’ and want to have their ads shown on the first page of Google when people search for ‘Buy an Engagement Rings’.

    Google shows 3-4 ads above the organic search results and 2-3 ads at the bottom. This means that there are only 7 ad spots on the first page but there are 20 advertisers.

    Which ads will show on these 7 available positions?

    This is where pay-per-click marketing comes into play. Similar to SEO, the Google Ads system takes into account a number of rules before deciding where each ad is to be shown.

    Some of the factors can be controlled by advertisers such as the price they are willing to pay per click, the quality of the ads, etc, some are decided during the auction and some are only known to Google.

    What you need to understand is that while Paid advertising is a great way to promote your website on Google, it’s not always as simple as setting up an account and running a campaign.

    There is an optimization process in place and if you don’t want to lose your money without any return, it is best to leave this task to professional marketers.

    When to use PPC Ads?

    When you want fast results – One of the disadvantages of SEO is that takes time to work.

    The competition is intense in all niches and it takes time to achieve high rankings for the keywords you want.

    So, while working on your SEO and waiting patiently to get higher rankings and organic traffic, you can start a campaign in Adwords and get the traffic this way.

    You will pay for the traffic but as long as the ROI is positive, then you have more to gain than lose.

    You sell expensive products or services – PPC ads are not for every business. The costs of setting up a campaign and the costs per click are high and unless you sell products at a price that can make you a profit, PPC is not the solution for you.

    Your SEO is already working and you want better results – PPC and SEO can work together in harmony. It’s never the one or the other.

    If you already have some good results with SEO, you can increase your market share by running ads for the same keywords that generate organic traffic for your business.

    You run an online business – when you run an online business without having a physical presence and your only source of customers is the Internet, then you need to make paid search advertising work for you.

    SEO is a fantastic way to get customers but if your business depends on it, then it’s better to have PPC ads as a second way out.

    Difference between SEO and SEM

    As explained above, SEO is one of the major components of SEM (search engine marketing). The other one is PSA (Paid search advertising).

    SEO Vs SEM

    A lot of people tend to confuse SEO and SEM and sometimes when they refer to SEM they actually mean PSA i.e. the paid advertising part and they consider SEO to be a process that it’s outside the boundaries of Search Marketing.

    KEY LEARNINGS

    No business or website can survive online unless it follows solid search engine marketing practices.

    Search engine marketing gives you the framework, tools, and processes to gain more visibility in search engines either by getting higher positions in organic results or better positions for your ads.

    The two main types of SEM, SEO, and PPC can work together in harmony and maximize your results.

    In the online business world, it’s never one or the other. Both are two powerful tools in your digital marketing arsenal, which you can use to boost your online presence.

    If you are new to search marketing then what you need to have clear in your mind is that there are no shortcuts. In order to succeed with either SEO or PPC, you need to put the user experience on top of anything else.

    Your first task is to make sure you have a great website that is functional and easy to use, then to work on your content and deliver the best possible result to your users.

    Once you have this in place, your next step is to start working on your SEO and gradually work your way to the top of the organic results and if applicable, to start working on your PPC campaigns and maximize your Return on Investment (ROI).

    Running successful SEM campaigns is not easy, it requires special skills, a lot of experience, and hard work. Enrolling in a good SEM course is the fastest way to build the necessary skills.

    If you don’t possess those skills then it’s best to leave it to professionals. Save your precious time and time and at the same time increase your chances of getting the results you want in the fastest possible way.

  • What are SEO Keywords and How to Find Them in 2026

    Learn what SEO Keywords are and how to use them in your content to improve your search engine rankings.

    You probably already know that keywords are important for SEO but what do we actually mean when we talk about SEO keywords? How can you find the right keywords for your website and more importantly, how to use those keywords in your content and maximize your SEO?

    These are some of the questions I will answer in this post.

    Let’s start with a definition of what SEO keywords are.

    What are SEO Keywords?

    SEO Keywords are words or phrases (search terms) that people use when searching for information through a search engine.

    By adding those keywords to your content, you increase your chances of appearing in the search results for those terms.

    SEO Keywords make it easier for search engines to understand what your content is all about and help users find the information they need.

    Why are keywords important?

    As you might have already guessed, keywords are very important for SEO.

    Without using the right SEO keywords in your content, search engines have a hard time understanding the meaning of your content. And this diminishes your chances of getting organic traffic to your website.

    The way search engines work is by matching the user search queries with pages available in their index.

    During the crawling and indexing phase, search engine crawlers visit a webpage. They extract the information they need and add it to their index. They use this information later during the ‘matching’ process (also referred to as the ranking process).

    Part of the information they extract is the keywords a web page is associated with.

    If during this process your website is associated with the wrong keywords, then you have no chance of appearing high in the results for the keywords that matter for your website.

    Let me give you an example to understand this better.

    Let’s say you want to rank for [electric bicycles]. You create a page and showcase your products (product name, images of the products, etc.).

    Unless you mention on the page that they are electric, Google will most probably associate your page with bicycles, and this is not what you want.

    What you should do instead is to find out which keywords people use as search terms when they look for electric bicycles and make sure that these keywords are part of your content.

    Different types of SEO keywords

    Keywords are classified in two categories: head keywords and long-tail keywords.

    Head keywords (also known as seed keywords) usually consist of one or two words and have a high search volume.

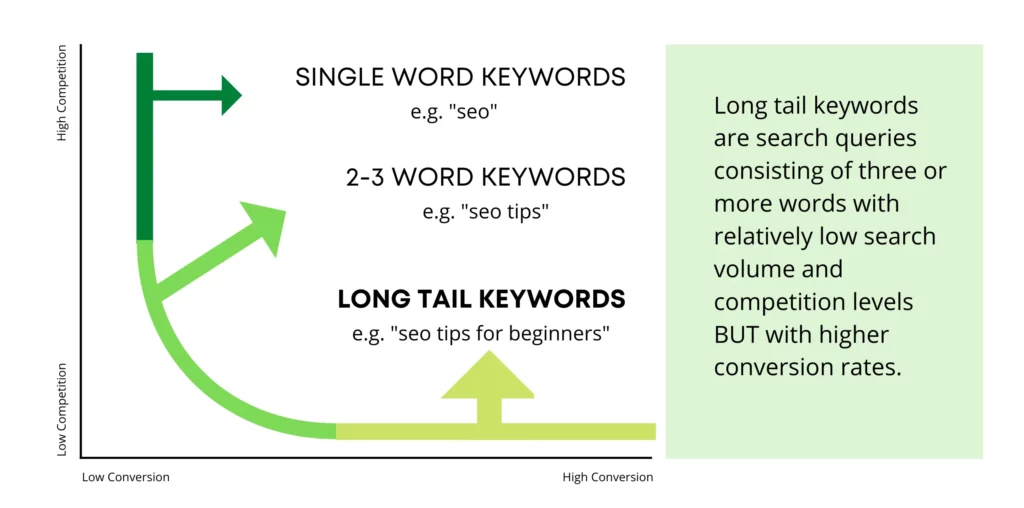
    Long-tail keywords consist of more words and have less search volume compared to head keywords but makeup 70% of all searches.

    Long Tail Keywords – Search Curve

    What is important to understand at this point is that head keywords may have more search volume but they are also highly competitive.

    This means that thousands of websites are competing for one of the top positions in the SERPS and this makes it almost impossible for new websites (or small businesses) to rank for these terms.

    The solution is to focus on long-tail keywords.

    They have less search volume but with the right SEO plan, it is possible to rank in the top positions of Google and get targeted organic traffic to your website.

    How to choose keywords for SEO

    Let’s see how to choose the “right” SEO keywords to use in your content.

    This process is known in SEO as keyword research.

    Step 1: Decide for which ‘search terms’ you want to be known for

    Your first step is to spend some time thinking about the following:

    • For which search terms do you want to be known for online
    • What words or search phrases people might use in the search engines to find you
    • Which words best describe your products or services
    • Which words describe your niche better

    The outcome of the above exercise should be a list of phrases that we’ll use to turn into a keyword list in the next step.

    Step 2: Create a Keyword list

    To create a keyword list, you need to take the list created above and associate it with the actual keywords people type in the search box i.e. SEO Keywords.

    To do that we need the help of keyword research tools. There are a lot of tools you can use but my recommended tools are the Google Keyword Planner (Free) and Semrush (Paid).

    Google Keyword Planner

    The Google Keyword Planner is part of Google Ads and it’s offered by Google for free for Google Ads customers.

    Nevertheless, it’s a great keyword research tool and you can use it to find your SEO keywords.

    Go to Google Ads and create an account. Follow the steps to create a draft campaign so that the system will allow you to access the Keyword Planner.

    Once you are done with the draft campaign, select TOOLS > KEYWORD PLANNER.

    Access the Google Keyword Planner

    Click on FIND NEW KEYWORDS

    For the sake of this example, let’s say that you are a dog trainer selling an online course teaching people how to train their dogs.

    If you enter the relevant keywords in the keyword planner, you will be presented with a list of keyword ideas matching your selected topics.

    How to Find SEO Keywords using the Keyword Planner

    Notice that besides the keywords, the tool has a few more columns.

    The ‘Average Monthly Searches’ shows you how many searches are performed on Google per month for that term and the ‘Competition’ gives you an idea of how competitive a keyword is.

    By ‘competitive’ we mean how many people are bidding to advertise for that keyword on Google Ads.

    Remember that the keyword planner is a tool for Google PPC Ads and not for SEO search results.

    Select some of the keywords that are highly relevant to your website and products, both ‘head’ and ‘long-tail keywords’, add them to a spreadsheet, and move on to the next step.

    Step 3: Find Semantic SEO Keywords

    The next step is to find keywords related to your target keywords. These keywords are known as semantic keywords or LSI keywords.

    A semantic keyword is a keyword that is strongly related to another keyword.

    The reason you want to do this is that Google no longer ranks pages that target individual keywords but it’s more targeted to topics.

    So, by finding LSI keywords for your main keywords and including them in your content, you help Google get a better understanding of your content and this translates to higher rankings.

    The best way to find LSI keywords is to use the LSI Keyword Generator and Google search.

    LSI Keyword Generator

    Go to LSI Graph and your head keywords and click search. Take note of the keywords and add them to the second column in your spreadsheet.

    How to Find Semantic SEO Keywords

    Google Search

    When you search for a keyword in Google, there are 2 ways to find out what Google considers to be the related keywords for a given search term.

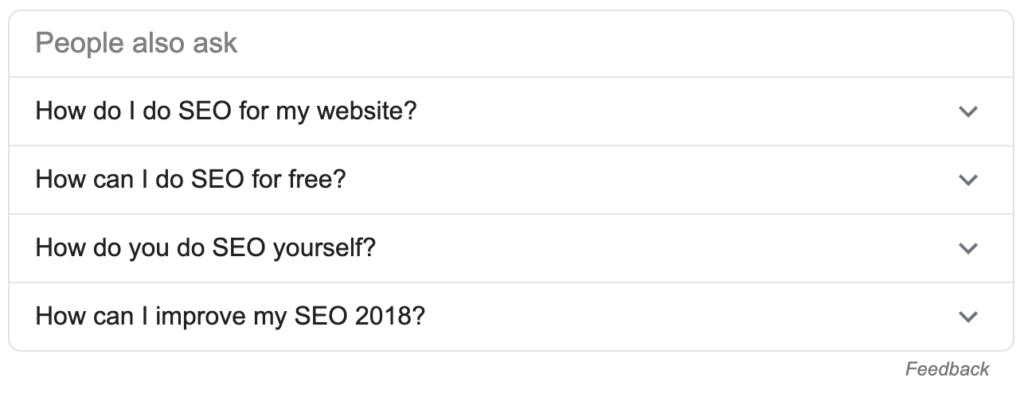
    The first one is to look at the “People also ask” section.

    People Also Ask – Keyword Ideas

    And the second one is the “Searches related to…” section.

    Google Related Searches

    SEMRUSH

    SEMRUSH is my favorite keyword research tool. Among many other useful features, it has two very powerful tools for keyword research.The first is the “Keyword Magic Tool” and the second one is the “Topic Research”.

    With SEMRUSH, you don’t have to go through the process of creating an account with the Google Keyword Planner or going to LSIGraph and Google search to find related keywords.

    Everything is done within SEMRUSH.

    Keyword Magic Tool

    The first step is to create an account (there is a 7 Day Free Trial).

    Then select KEYWORD MAGIC TOOL under KEYWORD ANALYTICS.

    Type in your head keyword and click SEARCH.

    Find SEO keywords with the Keyword Magic Tool

    SEMRUSH will group related keywords together.

    Sort the keywords by volume and KD (Keyword Difficulty). Unlike the Google Keyword Planner, KD refers to how difficult to RANK for a particular keyword in Google.

    This is a very useful metric since what you want is to pick the right SEO keywords that have higher search volume and lower KD scores.

    Topic Research

    Remember what I mentioned above that Google now ranks websites based on Topics and not just keywords?

    The Topic Research tool will help you find long-tail keywords related to a topic.

    Click TOPIC RESEARCH from the left menu and type in our main head keyword.

    Topic Research with SEMRUSH

    What you see on the right (under Interesting Questions), are questions related to your niche. It’s similar to “People also ask” but more comprehensive since it includes questions from various sources.

    How can you take advantage of this?

    These questions can help you build TOPIC RELEVANCY, which is what you want if your goal is to rank higher on Google.

    How can you do this in practice? Optimize your homepage for your head keywords and then create content (through a blog) targeting each of the questions (which in essence it’s the long-tail keywords).

    Make sure that within your blogs, you link to your main pages.

    How to use SEO Keywords in your Content

    Doing good keyword research and having a keyword list, is not enough.

    In order to benefit from this process, you need to know how to use those keywords in your content.

    This is known as SEO Content, which is a subset of On-Page SEO.

    Here are some tips to follow:

    Optimize your Homepage for your main keyword

    Homepage SEO is very important. Search engines start the crawling process from the homepage and follow up on any links from there.

    When it comes to keyword optimization, you should optimize your homepage for your main head keywords (even if their keyword difficulty is very high).

    The reason is that you want to make it clear to both crawlers and users, what your website is all about.

    Create a separate page for each of your main keywords

    Let’s say that your company sells services (like my company), you need to create a page for each of your services, each page to be optimized for the main keyword.

    I have a summary page for all my services and individual pages for each of the services we offer. Each page is optimized for a specific keyword.

    Create pieces of content to target long-tail keywords

    Once you are done with the main keywords, it’s time to utilize the power of blogging and start creating content targeting long-tail keywords.

    You can use the results of topic research to decide which keywords to target in your blog posts.

    Optimize your content with SEO keywords

    When writing the content for both your pages and blog posts, you need to make sure that:

    Use keywords in the URL – you include your target keyword in the page URL.

    Use keywords in the page title – you include your target keyword in the page title.

    Use keywords in the H1 Tag – you include your target keyword (or close variations) in the h1 tag

    Use long-tail keywords as subheadings (h2, h3) – you include related keywords in your subheadings

    Use LSI keywords in your content – you include LSI keywords within your copy.

    SEO Keywords: Final Advice

    Picking up the right keywords for your website is important.

    When choosing keywords, try to think outside the box and consider all possible search phrases people might use in search engines to find your products.

    Add those keywords in a spreadsheet and take advantage of the data provided by the different keyword tools, to expand your keyword list as much as possible.

    Group your keywords into two categories. First are the keywords to use on your homepage and main website pages and second the keywords to use in your blog.

    Follow the on-page SEO tips outlined above to intelligently include keywords in your copy but always make sure that you pay special attention to the quality of the content.

    Publish content related to your target topics to create content relevancy and watch your rankings and traffic increase.

  • Long Tail Keywords

    Learn what long-tail keywords are, how to find them and how to use them in your content to increase your rankings.

    What if I told you that there’s a way to get targeted organic traffic that’s actually easier than driving a ton of random page views?

    We’re all familiar with the race to the top of Google for high-volume keywords, but throughout that race, long tail keywords can get overlooked.

    If you ask me, this makes no sense because long tail keywords make up 70% of all searches. You don’t want to miss out on 70% of the potential traffic, do you?

    In this guide, I’m going to run through everything you need to know about long tail SEO, including:

    What Are Long Tail Keywords?

    Long tail keywords are search queries usually consisting of three or more words that narrow down the focus of the search results and bring up more specific results. Long tail keywords are also often lower difficulty and lower volume.

    To understand this better, let’s also define head keywords. A head keyword is usually a high traffic, high difficulty term that constitutes an entire topic.

    While they’re searched for often, they’re not always 100% specific to what you’re promoting with your content.

    Long Tail Keywords Examples

    I know that beginners to SEO may have trouble understanding what exactly long tail keywords are, so let me demonstrate this with a real example.

    Let’s take the keyword “SEO”.

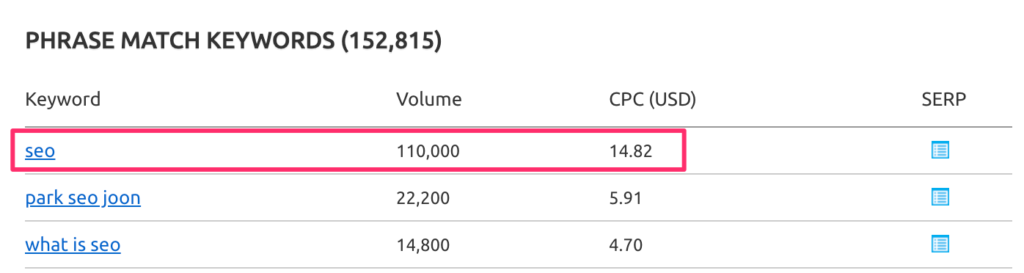
    This is a very popular keyword and according to SEMRUSH it has more than 110,000 exact keyword searches per month.

    Long Tail Keyword Research Example

    It is also a highly competitive keyword with an average CPC of 14.82 USD.

    If you search for this term on Google.com you will find in the first positions websites like Wikipedia.org, moz.com, and Google websites, which makes it almost impossible to outrank them with a normal website or blog.

    So, if it is impossible to rank for “SEO” what is the next step?

    You go one step further by adding tail or tails to the existing keyword so as to narrow down your competition.

    If you add the word ‘tips’ your keyword now becomes “SEO tips”, which is less competitive than the head keyword (SEO), but it is still very difficult to target.

    Long Tail Keyword Research Example

    The top results are dominated by large and well-known websites.

    So, what do you do?

    Add another word and it becomes “SEO tips for beginners”.

    Certainly, the number of people searching for this keyword per month is less compared to “SEO” and “SEO tips” but the benefits gained from ranking long tail keywords are much more than the traffic difference.

    Here is a visual representation of the relationship between head keywords and long tail keywords.

    Long Tail Keywords Definition

    What Are The Benefits of Targeting Long Tail Keywords?

    In summary, these are the main benefits of targeting long tail keywords in your content marketing campaigns:

    • Long tail keywords match the user’s intent
    • Long tail keywords are easier to rank compared to non-long tail keywords
    • There are more long tail keywords than head keywords
    • Long tail keywords have higher conversion rates
    • Long tail keywords help you build website authority and trust
    • You will get more traffic than the suggested search volume

    Long tail keywords match the user’s intent

    To understand the benefits of long tail keywords, you need to understand the concept of intent.

    Put yourself in the shoes of the searcher for a moment while you think about the customer journey.

    A section of it might look something like this:

    1. The prospect becomes aware of their need, and searches head keywords to find out more.
    2. The prospect becomes aware of a potential solution and searches a long tail keyword with the intent to buy it.

    This is a dumbed-down explanation, but it sums up the idea of intent nicely.

    Basically, considering the intent of a keyword is considering the mindset of someone who would search the keyword.

    For example, someone looking for ‘SEO’ is probably looking for a broad definition while someone looking for ‘SEO Services’ has the intent to click on your search snippet listing, and buy your services.

    Through the long tail specificity of their search, they’re expressing their intent to buy exactly what you’re selling (or at least read exactly what you’re writing).

    For this reason, it’s worth targeting long tail keywords because the traffic that they bring in is targeted and will be far more likely to convert.

    The searchers are no longer in the ‘discovery’ mindset. They’re ready to move into buying mode, and even though the volume won’t be as high, it’s well worth it.

    What’s the intent of someone searching ‘marketing’? Who knows. It’s probably to find out a definition or to read some kind of encyclopedic article, which shows why Wikipedia and the Business Dictionary rank highly.

    Narrow it down, however, and target ‘marketing agency London’ (instead of just ‘marketing’) and the intent is much, much clearer. And you’re way more likely to rank for it.

    In fact, the major problem with going after head keywords is that you’ll be putting a ton of work into driving the wrong kind of traffic. And, when you drive traffic that doesn’t stay long on your page, you’re telling Google that you don’t deserve to rank, and that’s all your work wasted.

    A good rule of thumb is to Google the keyword you’re targeting before you target it, and ask yourself whether your article would be out of place in the results. If it would be, then don’t bother.

    Long tail keywords are easier to rank compared to non-long tail keywords

    Provided that you are having a high-quality website long tail keywords are easier to rank especially if you choose low competition keywords.

    There are more long tail keywords than head keywords

    There are nowhere near as many head keywords out there as long tail.

    And that means that at some point, you could theoretically run out of big meaty keywords to target, and find yourself thinking “phew! I’ve targeted ‘marketing’, I’ve targeted ‘SEO’, I’ve targeted ‘business’ … What’s next?”.

    When you’re going after the long tail, you’re not only giving yourself more chances to put optimized content on your site, you’re creating more pages.

    It only makes sense that sites with more pages rank for more keywords and drive more traffic, especially if they’re ranking for juicy long tail keywords.

    This is probably best described simply as covering your bases. Targeting both ‘green tea smoothie ideas’ and ‘green tea smoothie recipes’ in two separate posts and getting both of them ranking is a way to make sure you’re scooping up whichever search term variation that gets typed in.

    Long tail keywords have higher conversion rates

    If you think about it for a second, those users that use long tail keywords to search for something can be considered more targeted because they already made the effort to make their search terms more specific.

    If we are talking about ‘buying’ or ‘action’ keywords then those are more likely to convert or perform an action.

    Consider the following example:

    “Cars” <- General search

    “used cars for sale” <- looking for used cars

    “used cars for sale in florida” <- looking for used cars in florida

    “used ford focus for sale in florida” <-looking for used ford focus cars in florida

    Long tail keywords help you build website authority and trust

    Having a first-page ranking of any keyword is an indication of website authority and trust.

    One of the ways to get your website ready to target more important keywords is to get as many first placements as you can for long tail keywords.

    Of course, this is not the only factor that will help you build authority but a number of first-place placements together with a solid SEO strategy can work towards that direction.

    You will get more traffic than the suggested search volume

    The various keyword research tools give an estimate of the traffic you can get if you secure a top position for a specific keyword.

    When it comes to long tail keywords, their estimates are not 100% correct. This is because the volume for long tail keywords is low and so is their sampling so they under-estimate.

    I have many examples of long tail keywords that bring in 10 times the traffic shown by the keyword tools so never reject a keyword because the traffic in the tools is low.

    How to Find Long Tail Keywords?

    “Ok, ok! I’m sold”, I hear you say. “How do I find these high-converting long tail keywords?”.

    Well, like it always is with keyword research, it’s a mix between a manual and an automated process.

    Manually – Researching suggested terms, reading posts on Quora, Reddit, and forums. Getting together a list of head keywords and commonly mentioned phrases.

    Automatically – Using tools like SEMRush to generate a list of semantically relevant terms and different permutations from your head keyword research.

    How to manually find long tail keywords

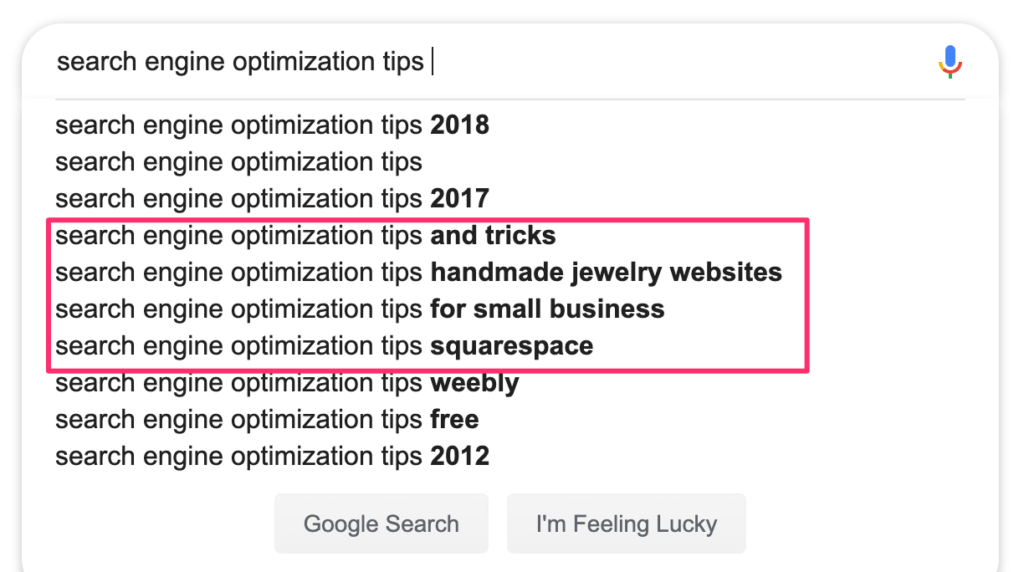
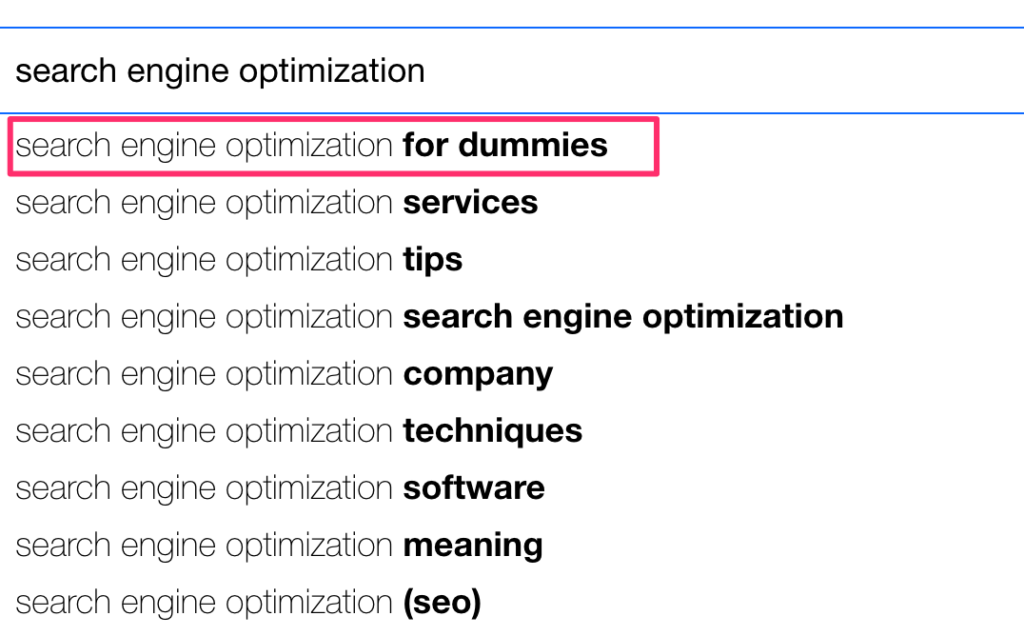
    Google search box suggestions

    Google Search Box Suggestions

    A great way is to start typing keywords in the google search box and see the ideas suggested by Google.

    When you find a nice long tail keyword you can check it with the keyword tool of your choice (I use SEMRUSH) and decide if it is worth targeting or not.

    Google ‘People Also Ask’ and ‘Related Searches’

    Another manual method is to Google the topic you have in mind and check the “People Also Ask Section and the “Related Searches”.

    Google People Also Ask Box

    Bing / Yahoo suggest

    Yahoo Search Box

    Bing and Yahoo also make suggestions as you are typing a search term. You can use that as well since in almost all cases the suggestions made are different from Google so it’s worth exploiting.

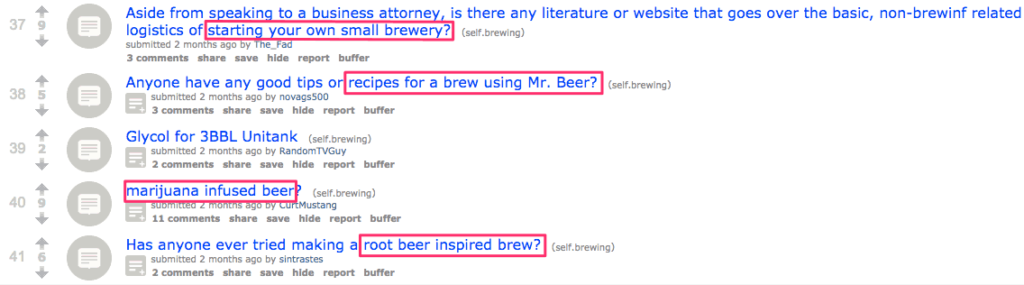
    Reddit

    Another goldmine is reddit. I headed over to /r/brewing to find out what people are talking about.

    If I was blogging about beer brewing, these people are my target audience. I’ve highlighted some viable keywords:

    Using Reddit to Find Long Tail Keywords

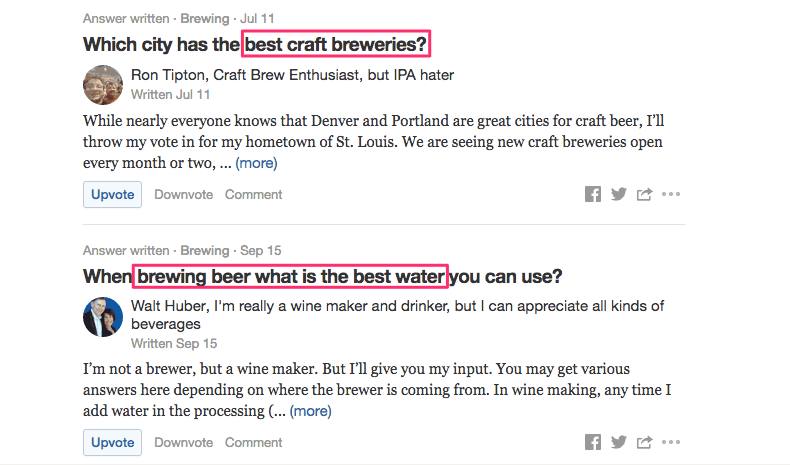
    Quora

    Finally, search for keywords in Quora. People are answering questions that you could answer with your ads or content:

    Using Quora to Find Long Tail Keywords

    Note: Quora is actually a fantastic source of inspiration for blog posts, too. You can usually just grab the questions as a title and use the content in the answer plus your own original research to create winning content.

    Competition analysis

    There is no niche without competition so it’s not a bad idea to take a look at what your competitors are doing in terms of long tail keyword targeting.

    Register to their newsletter and RSS feed and if you like a keyword they have used, check it with SEMRUSH and see if there are any variations or similar keywords you can target.

    To avoid any confusion, competition analysis does not mean copying your competitor’s ideas or stealing their work but simply means keeping an eye on what other websites in your niche are doing.

    How to find long tail keywords using a tool

    Long Tail Keyword Research with SEMRUSH

    As well as being a complete platform for managing organic and paid SEO campaigns, SEMrush has a quality keyword research feature.

    For finding long tail versions of a particular head keyword you’ve researched, use the Keyword Magic Tool.

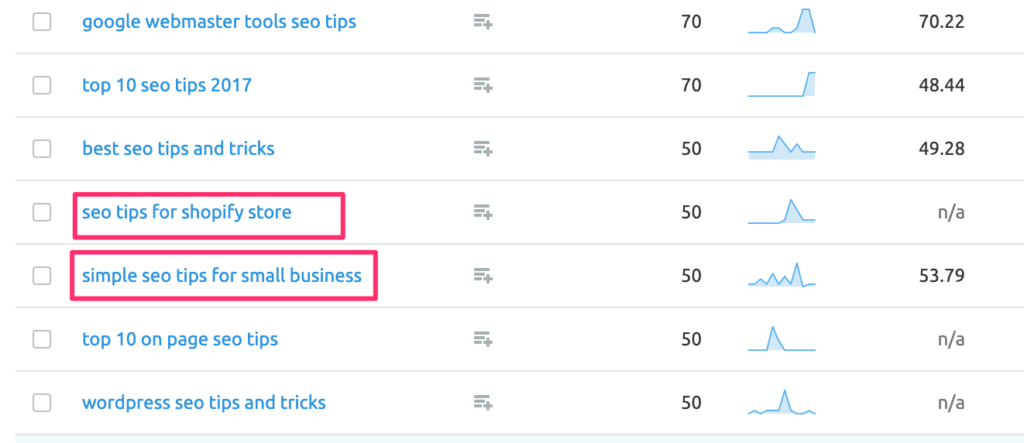
    Look at these great long tail keywords I found in just a few clicks:

    Long Tail SEO with SEMRUSH

    How to Use Long Tail Keywords

    Let’s say you’ve found a long tail keyword and want to start creating content to rank for that term. Great! What now?

    Well, the first thing to do is to choose one major target. As you’ve seen, by ranking for one keyword you scoop up a lot of long tail variants, too, so it isn’t like it’s the one chance you get to rank for a single term.

    Here’s a quick checklist to follow adapted from this post to include only keyword placement:

    1. Put the keyword at the start of the headline (and title tag!)
    2. Use the only the keyword as the slug (the part of the URL after the domain — com/this-is-the-slug)
    3. Make sure your title is in an H1 tag
    4. Use the keyword throughout your H2 subheadings
    5. Use the keyword in the first 100 words
    6. Use a few variations of the keyword throughout the body of the article (you should have plenty from your research)

    And, of course, you should always make sure your entire site is optimized to be SEO-friendly.

    Long Tail SEO tips and tricks

    I have said above that long tail keywords are easier to rank but that does not mean that you just throw text on a page and it will get a top position because it is a low competition long tail keyword.

    You need to do a lot more than that if you want to rank higher in Google or any other search engine.

    Content still matters

    Content not only matters but it’s the most important factor for achieving and maintaining a good ranking in the long term.

    Make sure that your content rocks both in quantity and most importantly in quality. Use proven content marketing tips and try to publish content that answers the question in the long tail.

    Content SEO

    When writing content, you should follow some simple yet effective SEO copywriting rules for making your copy friendlier to search engines and users.

    Thinks like post titles, content freshness, and formatting do matter and once you learn the basics they are very easy to follow.

    On-page SEO is a must

    Don’t forget the rest of the on-page SEO factors that can help you achieve better rankings. Besides the keywords and content, there are other ways to make your website more attractive to search engines.

    Promote, Promote, Promote: When you hit the publish button you don’t sit back and relax but you start promoting your content on social media and using other white hat techniques.

    Getting Started With Your Long Tail SEO Strategy

    What’s the next step you can act on right now?

    Well, I’ve given you a reason to do it, as well as the tools and methods you need to get started.

    The only thing that’s left is to get going.

    Pick a head keyword, find the low-hanging long tail fruit, and get targeting with content or ads that recognize the intent behind the search term.

    For new websites or for not-so-big websites there is no other way to get traffic and good rankings than working with long tail keywords. The competition for high-volume keywords is so huge and it is very difficult to win one of the top positions.

    The best way to start building a strong website is to provide top-quality content for long-tail keywords consistently so as to start gaining rankings and traffic and then gradually move on to more general terms and establish your presence.

  • How to Get AdSense Approval

    In this guide, you’ll learn how to get approved by Google Adsense and what to do if your application is rejected.

    How do you ensure that you get accepted to adsense the first time you apply? What do you need to know about the approval process and what to do if you are not accepted to the program?

    Google adsense is one of the most popular ways to make money online because it’s very easy to use, it’s owned and managed directly by Google and above all it works.

    Before you can take advantage of all the benefits adsense has to offer, you first need to have an Adsense account and what you will read below is how to get one.

    Things to know before applying for an Adsense account

    Before even applying for an adsense account there are a few things you should know:

    • Understand how adsense works and also read adsense policies.
    • Make sure that you have a content rich website that adheres to adsense policies. The website should have not been used previously for an adsense approval.
    • Make sure that your domain is at least a couple of months old. If you are applying for an adsense account from the middle East, China, India or Pakistan you may need a domain that is at least 6 months old.
    • Apply for adsense after your website receives at least 100 unique visitors per day. Rules have become more strict and it may be difficult to get accepted if you don’t have a decent amount of traffic.
    • You need to have a Google account (such as gmail) to use with Adsense. No need to create a new account if you already have one.
    • You are allowed to have only one personal adsense account. If your account is suspended for any reason you cannot create a new one.(in this case you should look for adsense alternatives).
    • You cannot apply if you are not at least 18 years old.

    The Adsense application process

    The application is straightforward and it split up into two phases. The first one is automatic and the second one may involve manual intervention.

    Once you are certain that you meet ALL the above criteria go to www.google.com/adsense and apply for an adsense account.

    The first thing that you need to decide is whether you want to use an existing Google account or create a new one.

    Some people prefer to have a different Google account for adsense which is ok but note that the same Google account should also have administrator access to your Google webmaster tools and Analytics (in order to connect these 3 tools together and share useful statistics and adsense metrics).

    Next you will be asked to enter the URL of the first website you will add Adsense ads on.

    As mentioned above, it has to be a website that is not using adsense, content rich (unique and interesting content), at least 6 months old (for some regions) and with some traffic.

    Once you get approved to adsense, you can add ads on any website that satisfies the program criteria without having to go through the approval process again.

    The final step in the first phase is to fill out your country, timezone, name, account type and address. A few things you should know:

    • The country you enter has to be your country of residence. Adsense will verify your address by sending you a confirmation code by mail.
    • Once you enter a country you cannot change it. In case you have to change it because you changed country of residence, you will have to close your existing account and create a new one.
    • If you have a business that is officially registered and has a valid registration number, you can open a business account. There is no difference in functionality between the two other that the payments are paid to a company and not personal (as is the case with the personal account).
    • Once your account is created you cannot change the account type (i.e. from personal to business and vice versa).

    When you are ready, you can submit the application and you will get a reply back (usually within 1 business day) with the status of your application.

    What they check at this stage, among other things, is that you don’t already have an adsense account and the validity of the information provided.

    In case you are approved, you continue to the second phase which basically includes adding adsense code on your website.

    What you should know to increase your chances of being accepted to adsense the first time you apply are:

    • Add the code above the fold and to all your website pages. Once you add the code the adsense crawler will access the website and start taking statistics. If you place the ads above the fold in as many pages as you can, they will receive more hits.
    • Until you are fully approved, the ads will show blank so don’t worry you did not do anything wrong.
    • This process may take up-to 1 week, during this time adsense specialists will also review the website to make sure that is in accordance with adsense guidelines.

    If everything goes well, you should see live ads on your website and receive a welcome email from Adsense.

    In case your application was not approved, you will also receive an email explaining why you were not approved.

    How to increase your chances of getting approved to Adsense

    I already explained this above but to make it more clear, these 4 things are the most important for getting approved by Adsense.

    • A website that is at least 6 months old
    • A great website with unique and original content.
    • A website with decent traffic.
    • When you add the adsense ads the first time, make sure that you place the ads above the fold.

    What to do if you are not approved

    If you are not approved you should study carefully the email they have send you explaining the reasons of not accepting you into the program.

    You can then go to the adsense forums and see what others have done that faced the same problems.

    Read the adsense guidelines again and create a list of the things you need to correct, wait for a couple of weeks at least and apply again.

    While there is no maximum number of attempts you can make to get accepted, don’t apply if you have not first taken corrective actions.

    Have also mind that there is no way to contact the Adsense team directly and ask why your application was accepted other than the official adsense forums.

    Is adsense the same as adwords?

    I saw in the forums that some people get confused and they apply for adsense although what they really wanted was an adwords account.

    Adsense is not the same as Adwords. Adsense is for web owners who want to show ads on their websites and adwords is for those who want to advertise their products on Google.

    Final thoughts and conclusion

    Getting approved for an adsense account is not difficult provided that you meet the criteria explained above.

    Adsense is a great way to make money but always remember NOT to violate any of their guidelines for any reason.

    Once you break the rules you are out of the program once and for all.

    Play by the rules, try to get more organic traffic (converts better when it comes to adsense) and soon enough you will start seeing the benefits adsense has to offer to publishers.

  • Make Money With Google AdSense

    Learn what does it take to make money online with Google Adsense in 2021. A step-by-step guide with real examples.

    AdSense is perhaps the most popular way to make money online but is it for real? Can you still make money with AdSense? Can you make a living out of AdSense?

    What is Google AdSense?

    The majority of Internet users are probably aware of Google AdSense but for the sake of keeping beginners up-to-date here is a quick overview of the program and major benefits:

    • It is own by Google
    • It’s a major source of income for Google. In 2018 earnings from AdSense were $24.1 billion for Q3 only!
    • It is free for publishers
    • Advertisers use the Google Ads program to advertise their products or services on AdSense websites. They only pay when someone clicks on their ads (PPC – Pay per click)
    • Publishers receive 68% of the revenue and Google 32%. For example, if an advertiser pays $1 for a click then 68 cents will go to the publisher and 32 cents to Google.
    • The cost per click calculation is based on an auction type system
    • It is very easy to use
    • It is the most reliable advertising platform on the Internet  today and can generate the most revenue for publishers (compared to other similar PPC systems)
    • AdSense besides content websites is also available for games, videos, mobiles, and search products.

    You can find out more details about Google AdSense in the AdSense Help Center.

    How to make money with AdSense?

    So, AdSense is free, easy to use, you get 68% of the revenue – what else do you need to make money with AdSense?

    1. You need a content-rich website

    AdSense loves content-rich websites. Content can be of any kind (text, images, videos), and provided that it does not violate the AdSense content policies.

    It is suggested though to have text content on the pages so that the AdSense crawler can understand what the page is all about.

    AdSense is more suitable for websites that publish articles, case studies, how-to guides (like this one), and blogs.

    Having a rich-content blog with content that helps people learn something or accomplish a specific task, is one of the best ways to make money with AdSense. If you don’t already have a blog, the resources below will help you get started.

    2. You need a high-quality website

    It’s not enough to publish content that does not violate AdSense content policies but you also need to provide high-quality content on a high-quality website.

    Google is liable to advertisers for the money they pay so they don’t want their ads to appear on low-quality websites.

    In the past this was possible but in the last couple of years, they have more strict policies on the type of websites you can run AdSense.

    3. You need a LOT of traffic

    AdSense is a good way to make money online and it is perhaps the easiest method provided that you have a good amount of quality traffic coming to your website.

    I cannot give you an exact number because the amount of money you can make depends on the earnings per click (EPC) and click-through rate (CTR), but I don’t usually advise my clients to run AdSense on websites that have less than 300-400 unique visits per day.

    In general, though, the more targeted traffic you have, the more money you can make with AdSense.

    4. You need to target the right keywords

    If you target the right keywords in your content then you can make more money with AdSense or with any other advertising platform.

    What are the right keywords? Keywords that are:

    (1) used by advertisers to promote their products  – so the competition is greater and this raises the earnings per click (EPC)

    (2) action keywords – action keywords are more effective since the users are more likely to ‘take action’ i.e. convert after they click.

    Let’s look at the following example:

    Assume that you have 2 websites in the weight loss niche that are running AdSense. Both websites receive the same amount of organic traffic and they have the ads in the same positions.

    The first one is getting visitors searching for: ‘weight loss tips’, ‘how to lose weight’, ‘lose belly fat’ and the other one is getting traffic from keywords like: ‘why drinking water is important’, ‘what to eat after dinner’, ‘how many meals to eat per day’.

    The first website is likely to make more money with AdSense because more advertisers are interested in those keywords so the number of available relevant ads will be greater.

    Users are also likely to click the ads more often since users looking for tips or solutions to their problem are more likely to click on a relevant ad than users who are searching for general information.

    This is also the reason why organic traffic is considered to be more valuable than any other form of traffic i.e. because it is highly targeted and converts better.

    5. You need to fully comply with AdSense policies

    As I said above, AdSense represents 1/4 of Google’s revenue so they take the whole program very seriously. While it is relatively easy for everyone to get an AdSense account, if you don’t play by their rules 100% you risk losing your account.

    Even if you are an existing or new AdSense publisher make sure that you read their policies before implementing AdSense on your website.

    Remove from your mind any ideas for tricking the system and always remember that they have hired the best people to make sure that nobody will be able to bypass their rules and policies.

    6. You need to have a website with a purpose and not an MFA (made for AdSense) website

    While AdSense is a great way to monetize a website, websites that are made for the sole purpose of running AdSense ads are not favorable by Google.

    I have mentioned this in a previous post: 5 reasons you are not making money online and what is important to understand is that your website or blog needs to have a clear purpose that goes beyond making money with AdSense.

    Yes, you can use AdSense to make money from an established blog that has lots of traffic and visitors.

    You can also use AdSense to make some extra money from your website while selling your own products and services, but it’s not a very good idea to make a blog and start publishing mediocre content for the sole purpose of getting organic visits and then run AdSense to make money.

    In the past this model may have worked, but not anymore.

    Examples of websites making money with AdSense

    To be more precise let me give you a couple of examples from websites that make money with AdSense.

    While reading the examples try to relate these websites with what I have explained above and try to understand how they have applied in practice all the guidelines.

    Example 1: Digital Photography School

    DPS is owned by Darren Rowse, the all famous Australian ProBlogger. Darren was among the first people who managed to make a living online and if you read his story and income spread, AdSense played a very important role especially in the beginning.

    Let’s see how he is utilizing AdSense on DPS.

    Website Using Adsense Ads

    He is using a number of Ads per page. One of the ads is ‘above the fold’ and others are below the fold but in the main content area. He also has an ad in the sidebar.

    Example 2: Calorie Secrets

    I also use Adsense on caloriesecrets.net. Instead of charging for the products we are offering (calorie counter, food tracker, diet plan), we decided to have the products free and use AdSense to monetize our content.

    I am using 3 AdSense ads per page, 1 above the fold, 1 below, and 1 in the sidebar.Adsense Ads on CalorieSecrets

    What is common in all the above websites?

    After seeing the above examples, can you tell what they have in common?

    1. They are content-rich websites, offering top quality content
    2. They have lots of traffic
    3. They fully comply with Adsense policies.
    4. They fully comply with webmaster guidelines
    5. Although they have Ads above the fold, they are not interfering or damaging the user experience
    6. They all have their ads in the main content and sidebar. The reason is simple: Click-through Rate (CTR) in the main content area is greater than the sidebar and this translates to more clicks i.e. more money from AdSense.
    7. They all offer other services/products and are not operating for the sole purpose of running AdSense.

    Can you make a living with AdSense?

    I have explained above what it takes to make money with AdSense but can you also make a living? In other words, can you depend 100% on AdSense for all your expenses?

    The answer is NO. The reason is not that you cannot make thousands of dollars per month with AdSense and make a good living, but because you cannot rely on a single source of income.

    The online world is more dynamic than the offline World and you cannot assume that you will always have thousands of people visiting your website and clicking on Ads and you cannot assume that AdSense will exist forever.

    Maybe it will, but you cannot base your income on it. Diversifying your risks and spreading your revenues is always the best practice either online or offline.

    Conclusion

    AdSense is perhaps the easiest, more reliable, and best way to make money online. Provided that your website meets the criteria explained above, you can enjoy a good monthly revenue by utilizing your content and the hours you spend online in the best possible way.

    On the other hand, you should not rely solely on AdSense if you plan to escape from the 09:00-05:00 and make a living online.

    Take a look at any example you want from people who work online. Everybody agrees that AdSense is great but you should have other income sources as well.

  • How much does Google Adsense pay you

    Learn how much money you can realistically make from Google Ads.

    How much does Google Adsense pay is a very popular question among bloggers (especially beginners) and I will explain below why. Adsense is for some the medium to achieve a better quality of life by increasing their income and for others it’s a total waste of time.

    I am using adsense for almost 10 years now and I am happy to say that I managed to stay in the first group after a lot of effort and hard work. What I can tell you for sure is that Adsense is indeed a great way to make money online. What I cannot give you is a precise figure on how much money you can make with adsense and this is because there are a lot of factors that play a role.

    Let’s take it step by step and you will understand better what I mean.

    How do you make money with Adsense?

    What does it take to make money with Adsense? If you research this on Google you will find a lot of different answers but in reality you need 3 things:

    An Adsense complaint website – A website or blog that meets adsense guidelines. Adsense has a number of policies related to website content, copyright laws, ad placement, traffic sources and many more. To make a career as an Adsense publisher and you need to make sure that you will never violate these rules.

    A website with a lot of hiqh quality content – Besides being compliant with adsense policies you need to have a lot of content published on your website. Although content can mean a number of things (videos, images, etc) what you need is original and unique TEXT content (blog pots, articles, how-to guides). Of course with the text you can have images and videos but text has to be the main part of the website.

    A lot of traffic – To make serious money with Adsense you need a LOT of traffic. In my opinion adsense is not suitable for websites that only receive a few hundreds of visits per day. You can still run adsense if you meet the other 2 guidelines but you should not expect to make a living out of it.

    So, if you want to become a ‘professional’ adsense publisher you need a good website, a lot of original content and many people visiting your website on a daily basis. If all these are true then how much money will you make from Adsense?

    Hint: Read my 10 Adsense tips for maximizing your revenue.

    What factors affect how much you will make from Adsense?

    For every click a user makes on an Adsense Ad, Google will pay you a certain amount of money (from a few cents to a few dollars). So the amount of money that you will make from adsense depends on the numbers of clicks your ads will receive.

    How big that amount will be depends on the following factors:

    Volume of traffic – Obviously the more people visit a website the greater are the chances someone will click on one of the Adsense ads.

    Type of traffic – This is equally important as the volume of traffic. When you have an adsense website you don’t just need any kind of traffic but you need targeted traffic i.e. people looking to buy something or solve a problem and they come to your website for help. These people are more likely to click on a related Adsense Ad than people who are visiting your website to read the latest news or hangout in your forums.

    Type of Website – This is related to the above as the type of website makes a big difference in the amount of money you can make from Adsense. For example a website that has funny videos will make less from Adsense compared to website that has in-depth articles.

    The reason is that people will visit the website and view the different videos and then leave since they are not looking to solve a problem or buy something.

    On the other hand, people visiting the in-depth articles website are more likely to click a related ad after they read an article that helps them understand a concept, make a decision or solve a problem.

    Ad placements – The type and location of ads is also important. Ads that are in the main content of the page get more pageviews and have a higher CTR (click through rate) than ads that are in the sidebar.

    IMPORTANT: While the ad position is very important you should not take risks for a higher CTR. What I mean is that when placing your adsense ads in your website make sure that you read and follow the guidelines for ad placement given by Adsense and also have in mind that Google is punishing websites that have ‘too many ads above the fold’.

    In other words, you can have ads above the fold and earn more but at the same time you should avoid exaggerations. One adsense unit in a similar way as shown below is enough.

    From experience, one of the best positions to place an adsense ad in content rich websites is at the end of an article or blog post so you get a good CTR and revenue without violating any guidelines.

    Competition – The ads shown by the Adsense system are coming from Google Adwords. Advertisers that are using PPC campaigns to promote their products or services, pay Google an amount of money every time someone clicks on their ads. Out of that money Google keeps a percentage (around 40%) and the rest is paid to the publisher.

    Now, the amount of money that PPC advertisers are paying for each click depends on a number of factors, one of them being competition. The higher the demand of advertising for a particular keyword, the higher is the CPC and the higher are the earnings for the publisher.

    So, if your website topics are based on popular and high competition keywords, it is more likely to make more from Adsense rather than having a website with general content that people like to read but not searching for it in Google.

    This is also the reason why niche websites tend to perform better in Adsense (if they have a lot of traffic and content) than websites of general interest.

    Final thoughts and advice

    To make real money from adsense make sure that:

    You don’t violate any of their guidelines ever.

    You create a website with lots of original and unique content.

    Concentrate on getting organic traffic to the website since it converts better than any other type of traffic (when it comes to adsense).

    Your content should be mainly text and must provide a solution to problem or advice (how-to articles).

    Position your ads above the fold and in places where people can see them (best places are in the main content).

    Use big size ads without overdoing it.

    If you follow the above suggestions, sooner or later you will be able to answer the question “how much google adsense pays” and also you will be able to understand whether adsense is the medium to improve your quality of life.

  • Increase your Google AdSense earnings

    Follow these tips to increase your Google AdSense earnings without taking any risks or violating any guidelines.

    AdSense is one of the most popular ways to make money online and perhaps among the easiest ways if you do things correctly.

    By doing things correctly I mean following standards and practices that are in accordance with AdSense guidelines but at the same time can contribute in maximizing your revenue and earnings.

    So, let’s see below the most important AdSense tips that will help you achieve that.

    #1 Don’t violate any AdSense Guidelines

    I have mentioned this 3 times so far in the article and we are only in the first AdSense tip but it’s very important that whatever you do to increase your earnings is not against these guidelines. You can read the full guidelines here but in general avoid:

    Clicking on your own ads for any reason (even testing them)

    • Buying traffic or clicks
    • Making the ads not look like ads
    • Showing only the ads to the user and no content
    • Asking your friends to click on the ads
    • Adding the ads on website that have inappropriate content (adult, alcohol, gambling etc)

    #2 Use Responsive AdSense Units

    We made several tests and all tests show (more details to be published in coming posts) that responsive websites with responsive AdSense units perform better than non-responsive websites.

    If you have a responsive website then you can replace your ads with Responsive AdSense Units. This means that depending on the available ad space, AdSense will show the most appropriate ad (both in size and type).

    Especially for mobile websites, you will soon realise that the 300×250 on mobile performs much better compared to the standard 320×50.

    #3 Place your ads where users can see them

    The position of the ads is very important and can make a big difference in clicks and earnings.

    It’s always better to have the ads above the fold (that’s the area users see without scrolling) but if this is not possible then try to have the ads in the main content of the page instead of the sidebar.

    Caution: Google punishes websites that have too many ads above the fold so if you choose to enter the ads in the main content do it at the end of the article.

    #4 Publish Content more often

    Depending on the type of website, you may choose to publish content more often.

    The idea is that frequent publishing will generate more visits to your website and more visits will naturally generated more AdSense clicks and revenue.

    #5 Make your website load faster

    It is proven that faster websites lead to more ad clicks so if you optimize your website’s speed this will eventually increase your earnings too.

    Avoid using too many graphics and remove any images that don’t add value to the user experience but slow down the site.

    #6 Remove other ad networks

    If you want to make more from AdSense then you can remove any other ad networks and run AdSense only.

    This will not only make your website load faster but also it will give more visibility to the AdSense ads that will lead to more clicks and revenue.

    Certainly many ads does not mean more revenue so it’s always better to stick to the 3 ads per page (even if you are not using AdSense).

    #7 Find your Adsense Referrers and improve them

    When you connect your Google Analytics account with Google Adsense, you can go in Analytics and see which referrers generate your AdSense revenue. You can see that under Behaviour -> AdSense -> AdSense Referrers.

    Maybe visits from Facebook or other social media networks generate AdSense revenue when they visit your website so it’s a good idea to work on those and improve your presence so as to get more traffic and revenue.

    #8 Use standard ad sizes (both text and image)

    When setting up your ads use the sizes recommended by AdSense as being the most popular. These usually are 728×90, 336×280, 300×250 and 300×600. Other sizes may have less demand from advertisers and this will lead to lower earnings.

    Also, make sure that your ads are set to show both text and images as this will increase the numbers of advertisers competing for your ad spaces and will lead to better earnings per click.

    #9 Use AdSense experiments to test different ad variations

    One of the features of AdSense that is not well known to users is AdSense Experiments (found under My Ads in your AdSense account). With experiments you can test different variations for the same ad spot and see which one performs better.

    For example you may test different link colours, border or no border etc. This feature is very easy to use and you can tell in a few days which of your ads are better performing.

    #10 Don’t make your website look like it Made for AdSense (MFA)

    AdSense is supposed to enhance the user experience (and it really does in most cases) by showing relevant ads that may interest the user.

    That does not mean that your website should focus on the ads but still your focus should be on the user experience and high quality content.

    AdSense is a way to monetize your content and not the reason of your website’s existence.

    What else you can do to improve your AdSense earnings?

  • How does Google Adsense Works?

    A beginners guide to Adsense. Everything you need to know to get started with Google Adsense.

    What is Google Adsense and how does it work? Can you make a living out of Adsense or is it another myth? Read our guide for beginners to Google Adsense and learn how you can start using Adsense on your website or blog.

    I’ve been an AdSense publisher for more than 15 years and in this post, I’ll explain how to get started with AdSense and give you an overview of what it takes to make money using the AdSense platform.

    The following topics will be covered:

    What is Google Adsense?

    Google AdSense is an advertising platform that helps website owners earn money from their websites by displaying contextually relevant ads. Adsense publishers receive 68% of the click cost and Google 32%.

    What you should know about AdSense?

    It is owned by Google and it generates a large part of Google’s income.

    Adsense ads are shown on the websites that participate in the Google Adsense program (these are called the Adsense Publishers).

    Adsense is a platform for publishers i.e. those people that have a website and want to show Google Ads. The system for advertisers i.e those who want to advertise their products or services in Google is Google Ads.

    Adsense ads are shown on all devices including desktop, mobile, and tablet.

    Adsense works with EPC (earnings per click) and CPC (cost per click). Publishers will get paid for clicks on ads appearing on their websites.

    Currently (December 2019), Adsense publishers receive 68% of the click cost and Google 32%. This means that if an advertiser pays $1 for each click on his ads, the AdSense publisher will get $0.68 and Google $0.32

    Anybody (above 18) with a website that meets the Google Adsense guidelines can participate in the program.

    Adsense has strict rules that should not be violated for any reason. It is your responsibility as an AdSense publisher to know and follow the rules.

    Adsense has a number of products suited for desktop websites, videos, games, mobile apps and more.

    Adsense ads can have a number of formats and sizes including text and images.

    Adsense publishers get paid monthly by Google.

    How does Google Adsense work?

    Now that you have a better idea of what is AdSense, let’s see how to get started with AdSense. The process has two steps: Create an AdSense account, start displaying ads on your website and get paid for clicks on your ads.

    How to Create an AdSense Account

    Step 1 – Create an Account with Google AdSense

    The first step is to go to the Google AdSense website and create an account. Your AdSense account is associated with a Google Account like the one you use to login to Gmail, youtube, etc.

    Step 2 – Add Adsense ads to your website

    Before being accepted to the program, Google needs to check that your website adheres to the AdSense guidelines. To pass this step, you need to add AdSense code to your site so that the Google crawler can access your website’s content.

    This is a very important step because as we will see below there are cases that your application may not be accepted.

    During this step and until you are fully approved, AdSense ads are not shown to your website but they are hidden by default. If your application is accepted, ads will start to show and you will get paid for the clicks.

    Have in mind that this is a once-off process since after you are accepted as an AdSense publisher, you can run AdSense on any website you want (provided of course that it is not violating any AdSense rules).

    Step 3 – Set up your payment information

    The next and final process in the application process is to add your payment information so that you receive payment and the end of the month and once you passed the minimum threshold of $100.

    Please note that before receiving any money from Adsense, Google will verify your postal address by sending you an envelope with a confirmation code so make sure that the details you provide for your postal address are correct.

    Start Displaying Ads on your Site

    Once you are accepted into the program, the next step is to add the AdSense code to your website. This is the same step as above but now that your account is verified, you can choose where you want the ads to appear.

    You have two options: Let Google decide when and where to show ads or choose the exact places where the ads will be shown.

    Let Google Place Ads for You (Auto Ads)

    If you go with this option, all you have to do is add the AdSense code to your website (once) and Google will automatically show ads in the best possible places. This is currently the recommended method to add ads to your website.Google AdSense Auto Ads

    Click Get Code and copy the given script in the <HEAD> tags on the pages you want to show Google Ads.

    Create Custom Ad Units

    If you don’t want to go with Auto Ads, the other option is to create custom ad units and add the code in the exact places you want the ads to appear on your site.

    Click by ad unit, and select what kind of ad units to create.

    Google AdSense Custom Ads

    When creating an ad unit you will select the size (for example responsive ads, 336×280), type (text and display ads, matched content, in-article ads, in-feed ads), style (text and border colors) and then you will be given a code (javascript) to add in your website where you want the particular ad to appear.

    In the space provided Google may decide to show 1 or more ads.

    How many AdSense ads can you show per page?

    In the past, you were allowed to show up to 3 AdSense units per page but this rule is no longer valid. You can show as many ads you have per page, provided that they do not interfere with the user experience.

    Where should I place my ads?

    The general rule is to place the ads where they can be seen by your visitors but without violating any AdSense or google webmaster quality guidelines.

    You can use these simple rules:

    • Place 1 ad unit above the fold in the main content of the website (not in the sidebar)
    • Place 1 ad unit in the sidebar. The 160×600 is very good for placing in the sidebar
    • Place 1 ad unit at the end of your page or article (preferably in the main content area)

    Adsense Guidelines on Ad Placement

    How does Google decide what kind of ads to show on my website?

    That’s not an easy question to answer since there are many factors taken into account before an ad is shown. You can assume that Google will try to show ads that are relevant to your content and interesting for your users.

    In case you want to block an ad (or group of ads) from showing, you can do so by visiting “Allow and Block Ads” in your AdSense account.

    How much money can you make with Adsense?

    This is a very common question and I have already provided a detailed answer in my previous posts, How much does Adsense pay and Can you still make money with Adsense.

    In summary how much money you will make from AdSense depends on:

    • The amount of traffic your website receives
    • The type of traffic
    • The number of advertisers in your niche
    • The type of content you have on your website
    • The position of your AdSense ads

    How to increase your AdSense revenue?

    Once you have AdSense running, there are a number of things you can do to maximize your earnings.

    You can read more details in my post 10 tips for maximizing your AdSense earnings, but have in mind that asking your friends to click on your ads is NOT one of them.

    How to increase your chances of being accepted by AdSense?

    If you take a look at the Adsense forum, there are many people complaining that their applications for joining the Adsense program were rejected.

    The most common reasons are:

    • The website was violating Adsense guidelines
    • The website has little content
    • The website had no original content
    • The website had only duplicate content
    • Domain was new

    To increase your chances of being accepted to AdSense follow these simple rules:

    • Make sure that your website has a lot of content (a number of pages indexed by Google)
    • Make sure that your content is unique and original (not copied from other websites)
    • Make sure that your pages do have the text content (not only images and videos)
    • Make sure that you placed the test AdSense code in all your pages and that you have ad units above the fold
    • Don’t apply for an AdSense account if your website is less than 3 months old (that’s not an official rule of Adsense, it’s my recommendation). For some countries (India, Pakistan, Middle east) you may have to wait for your domain to get at least 6 months old before being accepted to Adsense.

    Can you make a living out of Adsense?

    If you take a look at the success stories provided by Adsense, you will see people (Website owners) that live exclusively from Adsense. So the answer to the question is Yes, you can make a living out of Adsense BUT my 15+ years of experience of working online tells me not to count on this.

    The reason is not that it is not a reliable platform but because you need a lot of traffic to make money from AdSense and this cannot in any way be guaranteed.

    You may receive a lot of traffic from Google now but after a change to their ranking algorithm, your traffic drops and you lose a large portion of your income.

    The above can happen not because you are trying to violate any rules and trick Google but because the competition online is so big that you cannot be 100% sure that your current rankings will remain forever in the same positions.

    Conclusion and Final thoughts

    Adsense is a great way to make money online. It’s easy to use, it’s reliable and it works better than any other platform. Adsense works by giving you the opportunity to create ad units of different types and sizes and add those to your website. Google fills that space with ads that are related to your content and audience using a complex algorithm.

    When someone clicks on ads appearing on your website,  you get a large portion of the revenue. While it’s easy to set up and use, there are a number of things you can do to increase your revenue by tweaking your ad positions and settings.

    If you don’t have an AdSense account, the first step is to apply and get accepted to the program and then hope that someday you will also be featured in the Google Adsense success stories!

    Let me know in the comments if you have any other questions on how AdSense works.

  • How To Start A Blog And Make Money In 2026

    Starting a blog can be both a rewarding and lucrative venture that opens exciting opportunities. Through blogging, you can establish yourself as a credible expert in your field, earn a part-time or full-time income, and connect with like-minded people who share your interests and passions.

    In this article, we’ll explain how to start a blog and make money no matter your experience level.

    What Is a Blog?

    In the early days of the internet, blogging was more akin to journaling. Some of the earliest blogs were used as a way to chronicle someone’s personal viewpoints and experiences.

    Blogging has since evolved to become much more than a form of digital record-keeping. Nowadays, both businesses and individuals alike create blogs to share information and to bring in sales or commissions.

    7 Reasons You Might Want To Start a Blog

    There are several reasons to start a blog. You could be looking to start a blog to try a fun hobby, generate some side income, build a community or for any of the following reasons:

    1. To Document What Happens to You

    The word “blog” is actually a shortened form of “weblog,” a relic from its origins as a way to document what was happening. You may want to create a blog to have a space or a way to save your thoughts and photos in one centralized place.

    2. To Have a Creative Outlet

    Blogging encompasses writing, editing, and to some extent, design. This makes it a very creative pursuit. If you’re looking for a relatively low-cost way to express yourself, blogging is a great option.

    3. To Share Your Thoughts and Experiences

    No one else is you—which means you have thoughts and experiences that are uniquely your own. A blog is a platform through which you can share your thoughts with others, have discussions and build genuine connections while doing so.

    4. To Connect With People

    Blogging is an excellent way to connect with others, whether they be other bloggers, content creators or your intended audience. Blogging opens doors to meet people that you otherwise may not have come into contact with. The blogging community is highly active on sites such as Facebook, Instagram and Reddit.

    5. To Get Better at Writing and Digital Marketing

    Blogging is a craft. If you’re looking to brush up on your writing skills, writing daily or weekly for a blog could be beneficial.

    Similarly, running a blog takes a lot of work behind the scenes. Bloggers are often their own webmasters and social media marketers in addition to content writers. If you want to build skills in those areas, starting your own blog will allow you to gain valuable experience.

    6. To Build Your Brand and Credibility

    Creating a blog can help you build your brand and establish you as a credible expert in your niche or industry. Your blog content can demonstrate how knowledgeable or experienced you are on certain subjects.

    7. To Bring In Sales or an Income

    Blogging can be used to bring in sales—whether that’s for your existing business or an entirely new one. According to Indeed, bloggers bring in an average annual income of $37,073.

    Misconceptions About Blogs

    You don’t need to be famous to start a profitable blog. Anyone can blog, no matter their experience. Here are the most common misconceptions people hold about starting a blog:

    Blogging Is Expensive

    You can start a blog for free, as long as you have an internet connection. Even if you decide to pay for a custom website, domain name or photography, these costs are relatively nominal compared to the amount of money you can potentially generate from your content.

    Blogging Is a Dying Medium

    Blogging is not dead or dying. It is more saturated now than it was a decade ago, but that doesn’t mean you can’t create a successful one. Building a profitable blog nowadays may take more effort and initial investment than it would have if you started earlier but that shouldn’t necessarily dissuade you from starting one.

    Every Blog Post Needs To Be Perfect

    You should publish blog articles that you’re proud of, but don’t let the fear of your content not being “good” enough or “perfect” enough hold you back. Blogs are editable, so if you find you’re not satisfied with something after it’s gone live, you can always go back and change it.

    You Need To Have an Existing Following To Start a Blog

    You don’t need to be a celebrity or existing social media personality to start a blog. In fact, many now-famous bloggers, including Joy Cho, Carly Riordan and Blair Eadie, were not famous until after they started blogging.

    Blogging Is Easy

    Blogging may seem easy in theory: write words, press post, done. But in reality, unless you have a staff or have outsourced the marketing or webmaster aspects of running a blog, you’ll be spending time on more than just writing.

    Depending on your niche or goals, you also might need to spend considerable time researching your topic or creating complementary assets such as photos or videos. Blogging is not necessarily easy, but that doesn’t mean it’s not enjoyable or rewarding.

    Blogging Is a Fast Way To Earn Money

    While it’s true that blogging can be used to earn an income, it’s not something that will help you “get rich quick.” You need to build an audience that wants to purchase items from you before you can start earning any money.

    12 Steps To Start a Blog

    If you’re ready to start a blog but don’t know where to start, these steps will set you up for success, regardless of your ultimate goals.

    1. Define Your Topic or Niche

    Finding a niche can be tough or feel limiting, but will help you build stronger credibility in the long term. You can certainly talk about more than one subject, but make sure your main focus is consistent and specific enough to draw readers in and encourage them to keep reading your work.

    2. Do Competitor Research

    After deciding what you want to write about, do some initial research to understand who the other key players are in your space. Is your niche already fairly crowded? Or are very few people writing about your intended topic?

    No matter the case, doing your research beforehand will help you understand how you can create content that’s better than or different from what’s already out there.

    3. Define Your Audience

    In addition to nailing down your niche, you should also consider your audience. Who are you going to be blogging for?

    Having the answer to this question will help you write articles that are valuable and relevant to your readers. Try to determine the following information about your ideal reader before diving right into writing:

    1. How old are they?
    2. Where do they live?
    3. What do they do for work?
    4. What other forms of media do they already consume?
    5. Do they read any other blogs?
    6. What do they do in their free time?
    7. What issues or problems do they face on a regular basis?
    8. What do they wish they were more of an expert in?

    4. Plan Your First Blog Post

    Once you’ve nailed down your niche and desired audience, you can start planning your first blog article. Again, this may require some research to ensure you’re creating something that your audience will want to read.

    As a starting point, type your desired topic idea into a search engine to see what kinds of articles appear in the results. If you find that the existing results don’t accurately or aptly explain the topic, that’s a great indicator that you’ll be able to write something better.

    5. Name Your Blog

    Every blog needs a name. You’ll want to ensure that your blog’s name makes sense given your niche or brand, is memorable/catchy, and is easy and quick enough to type.

    If you have a name in mind, scour the web and social media to make sure that no one else is already using that name. If your desired name is already taken, you can either create a new one or contact the website owner to see if they are still actively using the name that you want. If you really want to protect your assets, you can even trademark your business name.

    6. Create Branding Elements for Your Blog

    In addition to a name, you’ll need to select a font and color palette for your blog that you’ll incorporate once you’ve built your website. You can do this yourself or outsource it to a graphic designer.

    If you want a custom logo for your blog, you can design one with a free platform such as Canva, or work with a designer.

    7. Claim a Domain Name

    After settling on a name for your blog, you’re ready to select a domain name. You can check to see if a domain is available by typing in your desired domain name in your browser and see if a live website appears. Most domain registrars will also have a tool to help you find available domains.

    When you’ve chosen a domain that’s available, you’ll need to pay for the rights to use it through a domain registrar. Owning and setting up a domain is a separate process from selecting a hosting site and web builder, which you’ll do next.

    8. Choose a Hosting Site

    Choosing a web host is an essential step in creating your blog. Without a host, you won’t be able to build a website; a host is what lets you effectively “rent” a presence on the internet.

    Some platforms will host your blog for free, but in exchange, they’ll tack on their brand name to your web domain, e.g., thefancyblog.squarespace.com or thefancyblog.wordpress.com. In these examples, to remove the “.squarespace” or “.wordpress” from the URL, you would need to pay for web hosting in addition to buying the domain name thefancyblog.com.

    Web hosting can cost anywhere from 50 cents to $10 per month depending on how much speed and storage you want to purchase. There are dozens of different hosting options out there, but we recommend selecting one of the best web host services that fits your budget and needs.

    9. Build Your Website

    You can build your website from scratch or by using a template or theme—it all depends on your budget and desires. A no-code web builder, such as Blogger or WordPress, will allow you to design and build a beautiful website even if you have no prior web development experience. Some templates or themes are free, but others may run you anywhere from $10 to $200.

    Certain web builders allow for more customization and flexibility than others. Be sure to read the specs of each website builder you’re interested in to understand what’s possible when designing your blog.

    10. Upload and Publish Your First Article

    After you’ve built your website and are satisfied with its look and feel, it’s time to upload your first article. You can type and edit your content right from the back end of your website, however, it’s wiser to create all your content in a separate, cloud-based editor such as Google Docs. That way, you’ll have a secure backup of your blog content in case your site experiences any technical issues.

    Before you hit publish, it’s a good idea to preview your blog post to see if it displays exactly how you want it to. You can always go back and edit it later, though, if you want to change or update anything.

    11. Promote Your Blog

    Once you’ve published content to your blog, you can share your links. Social media is a popular and effective way to distribute your blog content. You can share links on your existing social channels, or create new accounts to complement your blog.

    12. Track Your Analytics

    After you’ve published and publicized your blog, it’s important to track metrics such as views, visitors and clicks. Your hosting platform may have a default analytics dashboard built in, but we strongly recommend connecting your blog to Google Analytics. Google Analytics is a free tool that will allow you to track your traffic as well as important demographic and conversion details.

    You’ll need to use your analytics to earn brand sponsorships and/or advertising revenue.

    How To Make Money With a Blog

    Bloggers can make money using a multitude of different strategies. Some require more effort than others. Most blog income streams rely on precarious conditions, such as search engine algorithms and brand budgets. Therefore, it’s highly recommended that you diversify your revenue by choosing multiple methods.

    Brand Partnerships

    Bloggers often team up with brands to create sponsored content. This usually entails having to review a specific product or incorporate a product mention into your regular content.

    Brand partnerships can be one-off deals or turn into long-term relationships based on your content’s performance and mutual interest.

    Advertising Networks

    Advertising networks will pay you to either run ads on your blog or when someone clicks on an ad, or both. Certain networks, such as Mediavine, require you to have a pretty hefty amount of monthly views (50,000) in order to run ads, whereas others, such as Google AdSense, have no minimum view count requirements.

    Affiliate Links or Codes

    Bloggers can join what are known as affiliate networks. Affiliate networks allow you to generate unique links to products that you talk about on your blog to help you earn a commission when someone makes a purchase. Amazon Associates and LTK are two common examples.

    Affiliate codes work similarly to links in that you earn a small commission when someone makes a purchase. Brands may give you a unique code for your readers to enter at checkout when they shop online, and you can promote this code throughout your content to drive sales.

    Digital Products

    If you want to sell products without the logistical hassle of coordinating packing and shipping, digital products might be a better fit. Digital products are a relatively low-effort, inexpensive way to create products that your audience wants to buy. Most digital products can be accessed or downloaded by your customers immediately after purchase.

    Some examples of digital products you can sell include but are not limited to:

    • Printables. These can be anything from calendars and lesson plans to budgeting sheets.
    • Online courses. You can use a platform such as Teachable to create more detailed lessons or tutorials than what your blog provides.
    • E-books. An e-book is usually a self-written, self-published title that comes in PDF form.

    Physical Products

    Your blog can be used to sell physical products, too—whether you already sell things on another channel or want to create entirely new ones.

    You can insert links to any existing products you sell into your blog posts, or you can create merchandise that aligns with your content and audience. For example, if you have a fashion blog, you can sell items such as T-shirts, hats or tote bags with your blog’s logo.

    Premium Content or Memberships

    Blogs are free to read, but you can put exclusive content behind a paywall to create an additional revenue stream. Dedicated readers or fans will then need to pay for access to read it.

    Patreon and Buy Me a Coffee are two examples of platforms that help creators host subscriber-exclusive content. You can also use these platforms to create memberships, where your readers pay a recurring monthly fee to access premium content.

    Consulting or Coaching

    Your blog is a great source of free information, but your readers might be interested in learning more from you. If you start getting requests for specific advice or guidance, that’s a good sign that you’d be able to earn money through one-on-one consulting or coaching sessions.

    Bottom Line

    Starting a blog can be enlightening, fun and a profitable way to connect with others. Maintaining a blog requires wearing a lot of hats, but if you’re up for learning and growing through an ever-changing medium, you’ll likely see fulfillment and success.

  • A Complete SEO Checklist for Website Owners: Optimize your website to rank better!

    Google serves trillions of searches every year and if your website ranks well, you’re almost guaranteed sincere traffic. But, Google’s guidelines are extensive and tricky. It can be difficult if you’re learning about SEO for the first time.

    Search Engine Optimization has become essential for all websites. Today, most websites get traffic from search engines. And SEO is your best bet at attracting some of that organic traffic.

    It has become an important part of any website’s digital marketing efforts. So it would make sense if you allocate a healthy budget for SEO efforts. It’ll help you attract new visitors and potential customers to your website.

    We figured we’d help out website owners and startups with a one-stop solution to understanding SEO tasks. It lead us to compile this complete SEO checklist, in which we’ve included all the tasks and aspects of your SEO efforts.

    THE MAIN CATEGORIES COVERED IN THIS GUIDE INCLUDE:

    HOW TO USE THIS CHECKLIST?

    We’ve divided this checklist into sections that cover the main focus areas of SEO. These include the basics, keyword research, technical SEO, on-page SEO, and off-page SEO factors.

    Your site might already cover a lot of the points that we mention. And if it does, that’s great.
    However, we also know that there is always a scope of improvement. We are confident that you will find at least some best-practices that you have overlooked.

    Also, some points and tasks might not be relevant to you, and that is fine. You can skip over such points.

    Work through this checklist, reference it against your site, resolve issues, and maximize opportunities where you can. SEO success is not guaranteed by simply following a checklist. To outrank your competitors, you need to make sure you are at least covering most of these points.

    BASIC SEO CHECKLIST

    1. SET UP FREE REPORTING PLATFORMS

    Start off by ensuring that you have Google Search Console, Bing Webmaster Tools, Google Analytics, and Google Tag Manager tied to your site.

    Google Search Console is an important tool that provides you with invaluable insights into your website’s performance as well as a wealth of data. You can use this information to grow your site’s organic visibility and traffic.

    Google Analytics is a free marketing analytics tool. It allows you to view data and insights about how many people are visiting your website, who they are, and how they are engaging with it. It provides a detailed report on all aspects of your website usage.

    2. INSTALL SEO PLUGIN (IF YOU’RE USING WORDPRESS)

    WordPress powers over 37% of the web. So, chances are that your website is built on WordPress as well.

    If that is the case, you should install and configure an SEO plugin that provides the functionality and features that you need to properly optimize your site.

    You can check out the Yoast SEO plugin and the RankMath SEO plugin for your WordPress website. Yoast SEO is one of the most popular SEO plugins on WordPress.

    3. XML SITEMAP

    A sitemap is like a table of content for your website. It is a modern way of submitting your pages to the search engines.

    Most website platforms have plugins/add-ons that will create a dynamic sitemap that stays in sync with the pages on your site. In WordPress, you can use the Yoast SEO or the RankMath SEO plugin to generate XML sitemaps of your website.

    4. ROBOTS.TXT FILE

    Your website’s robots.txt file tells search engine crawlers the pages and files that web crawlers can or can’t request from your site. It is used to prevent certain sections of your site from being crawled.

    This file instructs the search engines about what pages or parts of the site to not index. By default, the search engines will look at all the content they can find.

    Even if you don’t want to restrict the search engines from indexing any pages on your site, you must ensure that this file is accurate, it validates in Google Search Console and Bing Webmaster Tools, and doesn’t block important content from being indexed.

    5. ENSURE THAT YOUR SITE CAN BE INDEXED BY SEARCH ENGINES

    A lot of times, you might not see your website in Google search because it is not being indexed by search engines at all.

    In fact, you’d be surprised at how often a sudden de-indexing of a site is the result of developers accidentally leaving ‘noindex’ tags in code when moving it from a staging environment to a live one.

    You can use the SEMrush site audit tool or the UberSuggest Site Audit tool to ensure that your website can actually be crawled and indexed.

    Double-checking this can ensure that your SEO efforts are not wasted by search engine crawlers not being able to crawl and index your website.

    KEYWORD RESEARCH CHECKLIST

    Keyword research is the process of discovering search terms that search engine users type into Google to find information related to your business or industry.

    Without good keyword research, you are not going to rank for the right terms. And if you’re not ranking for the right words, your visitors won’t convert at the rate you want.

    Here is a checklist of the important keyword research tasks you need to perform to ensure success from your SEO efforts.

    1. IDENTIFY AND ASSESS YOUR COMPETITORS

    The quickest way to get started with keyword research is to find the terms that are working for your competitors. Competitor Analysis gives you significant insight into what you need to do and where should your efforts concentrate.

    Run your domain and your competitors’ domains through SimilarWeb, SEMRush Domain Overview Tool, or UberSuggest. These tools will help you know about the SEO efforts of your competitors and give you a clearer idea of where you stand and where you want to be.

    2. FIND YOUR ‘PRIMARY’ KEYWORDS

    Your ‘primary’ or ‘main’ keywords are the ones that’ll drive you leads, sales, and conversions. Mostly, these are high volume, high competition keywords that summarize what you have to offer. They directly relate to your business’ main offering and will be most used by potential customers to be able to reach you.

    You can use tools like Google Keyword Planner, UberSuggest, or the SEMRush Keyword Overview tool. These will help you understand which keywords are best for your business and you should rank for.

    3. FIND LONG-TAIL KEYWORDS

    Long-tail keywords deliver a higher conversion rate despite typically having lower search volume than primary keywords.

    You need to make sure that your SEO strategy targets long-tail keyword variants as well as primary keywords. You must optimize your site’s pages to ensure that they are ranking for a variety of related terms. This will also enable you to create supporting content that sits alongside your key or primary content.

    Use tools like Answer The Public and Keyword Shitter to figure out all the long-tail keywords that revolve around your primary keywords.

    4. KEEP YOUR KEYWORD LIST UPDATED

    You know your business the best. That’s why keyword research always starts with a brainstorming session to create a seed list of potential keywords.

    This list should include any terms that you know are relevant to your business. Anything that may refer to your specific company, industry, or even headquarters is a smart start to keyword research.

    Also, include all the low-competition long-tail keywords that are relevant to your business. It is easy to rank for these keywords and the traffic that they get has a higher conversion potential.

    Keep this list of keywords updated, along with all the pages you’ve created targeting each keyword and all such other efforts that you’ve made to rank for each keyword.

    Such a list will give you a good overview of your keyword strategy. You can also use tools like SEMRush or Ahrefs or UberSuggest to organize your keywords research efforts.

    TECHNICAL SEO CHECKLIST

    A technical SEO checklist can seem intimidating, especially if the technical side of SEO is new territory for you. Technical SEO, however, is essential. That’s why you must review and follow this basic SEO checklist for technical SEO.

    1. HTTPS SSL

    Having a secure site is extremely important. If your website doesn’t have an SSL (Secure Sockets Layer) certificate, you may lose users before they even get to your site when they see a security warning in their browsers.

    Not having HTTPS secure connection is a surefire way to lose some visitors and conversions. No one wants to provide their confidential information on a website that is not secure. So don’t expect many conversions if you have not applied an SSL certificate to your website to make it secure.

    2. DOMAINS

    If you own more than just your primary domain name, make sure you know what all of your additional domains are doing. If they not in use, that’s fine. Also, different domain versions of your site should point to a single one so that google indexes only one version of your website.

    If they redirect to your website, check to ensure that they 301 redirect to it. You should quickly check this to confirm and never overlook this. It can cause issues with duplicate content and confusion over which domain name is the real one.

    3. FIND AND FIX CRAWL ERRORS

    You can quickly identify any crawl errors that exist through Google Search Console.

    Open your Google Search Console, head to the coverage report, and you will see both errors and excluded pages. You will also see those with warnings and those which are valid.
    Take the time to resolve any errors that you find, and explore the cause of excluded URLs in more detail (in many cases, there is a reason why this is happening that you need to resolve; from 404 errors to incorrectly canonicalized pages).

    4. WEBSITE ARCHITECTURE

    The more hierarchy and structure you can build into the navigation and sections of your site, the better. This will benefit users & search engines and present organized topics & content. Getting your directory structure and URLs to match the literal page and file structure of content on the site is a good goal to have.

    Stepping back and mapping out your site structure or sitemap is a great starting point. It forces you to think about the content, how you prioritize certain aspects of your site, and how you want to funnel your users through it.

    5. WEBSITE SPEED AND PERFORMANCE

    Google has recently confirmed an upcoming page experience update for 2021. It is set to place an even greater focus upon user experience as a ranking factor than is currently the case.

    So your website must function smoothly and perform optimally at all times. Look for ways to minimize the use of JavaScript and heavy loading pieces of code in your pages and find ways to cache or load elements externally.

    You can use tools like Google PageSpeed Insights, GTMetrix, or Pingdom to analyze your website’s speed and performance.

    If you need more help with speeding up your website, you can get in touch with us. At W3SpeedUp, we are website performance and speed optimization specialists.

    6. ENSURE THAT YOUR SITE IS MOBILE-FRIENDLY

    Since over half the searches are made through mobile devices, it’s a given that your site has to be mobile-friendly. However, just because you built your site in a mobile framework like responsive design does not mean it corresponds in real-time. Test it out and make sure that it actually validates.

    Be sure to run it through Google’s Mobile-friendly test. Also, do as much user experience and quality assurance testing as possible to make sure it truly works for your users on all devices.

    7. 404 PAGES

    You must not forget to create a custom 404 page and add helpful information on it. You don’t want to lose your website visitors by having a default browser error come up.

    So, you should build a 404 page that includes navigation, helpful links, site search functionality, and contact details.

    8. FIX BROKEN INTERNAL AND OUTBOUND LINKS

    Broken links are another indicator of bad user experience. No one wants to click a link and discover that it doesn’t lead them to the page they were expecting.

    A list of broken internal and outbound links can be found in your Site Audit report in SEMRush or UberSuggest. You should fix the identified issues either by updating the target URL or removing the link.

    ON-PAGE SEO CHECKLIST

    Without a great on-page experience and great content, you will struggle to rank your site and increase your organic traffic. With so much competition, you must ensure that you are taking every possible step to outrank other competitor blogs for important search terms.

    Let’s jump into the on-page SEO Checklist for your website.

    1. CONTENT

    In today’s world, content is king. Good content can not only create your brand recognition but also instill confidence in your potential customers. High-quality content that helps your visitors is valued by them. Even search engines like good content that is genuinely informative, is presented nicely and is unplagiarized.

    Content is also necessary to show relevancy. Well-researched content that resonates with users and is clear to the search engines is a win-win situation for you.

    2. KEYWORDS AND TOPICS

    If you haven’t done keyword research, you’ll need to take some time to learn what topics and phrases your audience will use to find your website.

    Remember that the days of stuffing terms and keywords into pages are long gone. You have to use proper SEO tools, analyze competitors, and research keywords before you can even think about search engine rankings. Your keyword research will determine the performance of your content and website.

    3. URL

    A URL is the first element of a page. But, it is sometimes overlooked. Search engines can index ugly, unorganized URLs just fine.

    However, the URL is an opportunity to present a clean directory structure that includes keywords and context as to what the page is about. Customize your website’s URL paths to present a more organized website structure and navigation.

    4. TITLE TAGS

    The title tag alone will not do much for you. However, you need to have a relevant and unique tag for each page.

    Be mindful of best practices for the length of title tags.

    You must ensure that all the pages and posts on your website have a title tag.

    If you’re using WordPress, plugins like Yoast SEO and Rankmath will help you optimize your title tags as per SEO guidelines.

    5. META DESCRIPTION

    Just like the title tag, you must have a custom and relevant meta description for each page. You must make sure it is helpful to the user, contains keywords relevant to the content, and helps build context with the title tag.

    You must ensure that all the pages and posts on your website have a meta description.
    If you’re using WordPress, plugins like Yoast SEO and Rankmath will help you optimize your meta descriptions as per SEO guidelines.

    6. HEADINGS

    Headings or ‘H’ tags have to be organized as per SEO guidelines. Your headings must have relevant keywords. You must use only one H1 tag for any page or post. Also, make sure to use H2 to H6 sub-heading tags throughout your content and include keywords in them as well.

    7. BODY COPY

    You must never overstuff your keywords in the body. But, there should be a healthy mention of your primary as well as related keywords throughout the content.

    Include your primary keyword as well as related LSI keywords. LSI (Latent Semantic Indexing) Keywords are conceptually related terms that search engines use to deeply understand the content of a web page. You can use LSI Graph to determine to keywords closely related to your primary keyword.

    If you’re using WordPress, plugins like Yoast SEO and Rankmath will help you optimize your body copy as per SEO guidelines. You can use them to make the body of your pages and posts optimized to rank better in search engines.

    8. IMAGE ALT ATTRIBUTES

    Missing Alt text in images is one of the biggest red flags in results from on-page auditing reporting tools. Alt text helps search engines understand what an image is about.

    This is another opportunity to add keywords to a page. Moreover, you need to consider those in your audience who may be using a screen-reader and ensure that your site is fully accessible.

    OFF-PAGE SEO CHECKLIST

    Off-page SEO factors should not go ignored in your SEO efforts. Contrary to the popular belief, off-page SEO involves more than just link building.

    Let us take a look at the off-page SEO Checklist for your website.

    1. ANALYZE COMPETITOR’S BACKLINKS

    Just as it is important to spend time analyzing your competitor’s content, you should also invest time and resources to dig deep into their backlink profile.

    You can run any URL through the SEMrush backlink analytics tool or UberSuggest Backlink Analysis Tool. With these tools, you can analyze your competitor’s backlink profile and start to understand the overall quality and authority of the links that point to their site.

    2. WORK ON YOUR BACKLINKS

    Backlinks to your website from authoritative and credible websites play a huge role in SEO. Also important are unlinked brand mentions or citations, and how much your website is talked about on the web.

    The most valuable strategy involves creating great content that people naturally want to link to. To supplement your awesome content, it helps to look for great sources of quality links through natural relationships, accreditation, and possible traffic sources in your industry.

    You want to focus your efforts on quality sources that are relevant to your subject matter. Never pay for a link in a way that violates the guidelines of search engines.

    Backlinks are important, but only good quality ones will make a difference in your SEO. So, don’t waste your time on low quality, low authority backlinks. We’d suggest you to focus on quality instead of quantity. Try getting backlinks for websites with high Domain Authority (DA) and Page Authority (PA). You can check any web page’s DA and PA with MozBar extension for Google Chrome.

    3. EMAIL OUTREACH

    Email outreach involves sending your website’s content to journalists, bloggers, and other influential people in your industry who are interested in the content’s subject.

    This strategy is most effective when you pair outstanding content with a short, effective message. This lets someone quickly skim your email, navigate to your content, and decide whether they want to link to it from their site.

    4. SOCIAL MEDIA OUTREACH

    Social media outreach is similar to email outreach, except that you do it over Twitter, Facebook, or another social network.

    Generally, social media outreach isn’t as effective, convincing, or personal as an email. That is why it’s best to use it only when you can’t find someone’s direct email address.

    Still, it gets your content in front of an influencer, and they might even share it with their followers. Even if your ideal target doesn’t link to your site, you can still get residual links from people who checked out your link, enjoyed it, and linked to it themselves.

    5. LOCAL SEARCH

    Local directory and search site citations are important if you have a physical business.

    Claiming and properly owning your listing helps protect your brand at a basic level. You need to make sure your name, address, and phone number (NAP data) are accurate. NAP data must be consistent across all local and social directory listing sites that are relevant.

    There’s an entire local directory ecosystem where you can list your physical business. You can build a good foundation using these local directories.

    You must also claim your Google MyBusiness listing and update it with accurate NAP data, location info, and hours of operation.

    FINAL WORDS

    This SEO checklist can help your business get started with SEO. But, that doesn’t mean it’s easy to implement a search engine optimization checklist on a site. It requires time, dedication, hard work, and some background SEO knowledge. But you have to start somewhere.

    If you can master your on-page optimization & technical SEO, and influence the right external factors, you’ll set your website up for success.

    Did we miss out on an important SEO checklist item? Let us know in the comments below and we will update the article!

    Need help with website SEO? Get in touch with us and we’ll help you out!

  • WordPress SEO Tips

    My simple website search engine optimization tips for year 2023.

    • What’s changed?
    • What hasn’t changed?

    Find out all inside my little guide!

    What hasn’t changed

    Most SEO principles remain the same. If you don’t know your basics, go read up on it [somewhere else]. I ain’t got time to explain all that here.

    The main 3 principles remain the same:

    1. Quality content
    2. Quality backlinks
    3. Be better than your competitors

    Oddly enough, content quality is often determined by content quantity. And the bigger, spammy-er, generic sites tend to dominate. Sure…Google algorithms keep updating and they somewhat penalize recycled junk content, but still…the junk content formula still reigns supreme. Honestly, I should’ve added “content quantity” to the list above.

    Quality backlinks…ahhhh, what IS that? Getting links from a domain with lots of authority? Or getting lots of links? Or lots of links from websites with similar keywords? Probably a mix of all of those. What I don’t recommend are those PBN tactics some people try to use. Don’t waste your time gaming the system, Google’s updates will eventually penalize you for it eventually.

    What does “be better than your competitors” mean? It means to outdo them. Quite often, I see people following SEO recommendations to the tee and then wondering why they still haven’t ranked on the first page. Haha…it’s because you didn’t outdo your competition. If your competitor’s “camera review” guide is 8,000 words long and yours is only 2,000….who do you think is gonna win that one? At the end of the day, your minimum effort for success has to go beyond your competitor’s. I know…I wish it was easier, too.

    What HAS changed?

    1. No more “word optimization”

    Google has done a great job getting away from doing all the focus on longtail keywords and trying to catch all variant spellings of keyphrases. It’s good at catching synonyms as well. Although it still counts, you don’t have to worry so much about “word optimization” anymore.

    2. Punishing generic content

    I run a webhosting service for many clients all around the world. And a good chunk of my biggest clients are running content networks. I hear it all the time when Google algorithms update because they get hit harder than anyone else.

    How do you avoid [getting punished for] writing generic content?

    To be honest, I don’t even know because it’s never happened to me. I write all my content off the top of my head. I don’t copy anybody else’s structure or title or body, nothing. Literally nothing is copied. I don’t hire writers to write for me. And I don’t follow any particular template. And I’ve NEVER been punished by any Google algorithm updates. (In fact, I’m usually happy to hear about them because I feel my content typically ranks higher afterwards.)

    3. Write personable content

    Write with more personality. (Instead of shoving keyword after keywords.) Try not to sound generic or bland. I’ve always been a proponent of “write like you speak”. The more you-ness you can shove into your post, the better. It makes your content not only that much more engaging and personable, it actually increases your chance of reader engagement. Which brings me to my next tip…

    4. Increase social media engagement

    SEO back in the days used to be a combination of A) writing tons of content and linking it back and forth, B) getting backlinks from other sites, then C) checking your rank every week or so.

    But I don’t recommend that anymore. Too slow, too boring, and probably not how Google ranks things. I don’t officially know this but I have a strong gut feeling search engines put more weight on social media engagement (and I’m not the only one who thinks so).

    The tactic strategy I would recommend today is probably more like A) write really personable content, B) post it on social media to get likes and re-shares, then C) watch your organic SEO pick up because of it.

    And this is why personable content is really key! Don’t sound like a machine. Also don’t use stock pictures. Put an ugly photo of yourself even; trust me, it’ll do better than some weird fake generic stock photo. Oh yeah…put some social share buttons at the bottom of your articles to encourage sharing.

    5. Build a community

    I don’t know what kind of website you run, so the tactics below might not work for you but try to be creative.

    • Facebook Group – Facebook pages are a thing of the past. You should still have it but engagement rates are really low. Instead, make a group for your industry/niche. Random people will join. Chat, talk, share your stuff. It’s bound to get comments, likes, and re-shares which will help your SEO down the line.
    • Youtube, Twitter, or Instagram – pick just one and use it! Grow its follower/fanbase and stay as active as you can.
    • LinkedIn – not my style, personally but I’ve heard great things about it.
    • Forum – ehhhh, a ton of work! But having user-generated content is incredible if it works out.

    6. Get featured in Google snippets

    If you don’t already know, Google featured snippets are those little boxes that show at the top of search results featuring what they think are the most helpful results to your search. They can be in the form of a paragraph, bulleted list, or a table. Users notice them easily and results featured in those snippets tend to get much more clicks (and traffic).

    In terms of WordPress, I think the best thing you can do to get featured is to organize on your website well. Try to open your posts with a brief but comprehensively description intro. Put it in the form of a paragraph, list, or table…and let the magic happen!

    I’ve heard of plugins that supposedly help you rank higher and also hear of developers trying to add little tags and code into their content, or using custom content blogs to help it get featured. You can try that as well.

  • Google AMP Sucks for WordPress

    Google AMP sucks. Creates more problems and doesn’t always solve the one it’s supposed to. My biggest issues with it are breaking your site design/functionality, still not making your site all that fast, and worst of all…it ruins your user experience. Just go install a generic theme if you love AMP so much.

    I don’t care about obscure users with slow connections as they probably aren’t my target demographics either.

    Here are the AMP promises:

    • faster site – AMP streamlines the design, stripping out unnecessary elements so your site loads faster.
    • better seo – faster load, faster content digestion…all equals better rankings
    • more traffic –  better rankings equals better traffic
    • better user experience – I’m not sure how this works, unless your site is so terribly designed and coded that using AMP is somehow considered an upgrade?!

    REALITY?

    • easily broken site – one little weird design or coding mistake and your site falls apart
    • limited compatibility – only works on mostly static blog sites. All other sites aren’t compatible because their fancy effects or features stop working on AMP.
    • limited SEO/traffic benefit IMO – here’s the funny thing, blog sites typically do well in search engines already. So I’m not sure how putting AMP on your blog helps you beat other blogs. It ultimately comes down to content.
    • limited speed improvement – yes, it speeds up your site if your site was really bloated in the first place. And if it was that bloated, then you need to speed up the site first so it’s fast for all visitors…not just AMP visitors!

    Here’s the thing. AMP was supposedly invented to help websites show content faster and in a more streamlined way…thereby improving rankings, on-site performance, and overall user experience.

    But IMO, I think it’s just another way for them to own and parse your content, and enhance the GOOGLE experience. They don’t care about you and the benefit isn’t much. AMP cannot save a crappily coded/designed site. And for sites that already designed and coded well, not only do you not need AMP but you’ll feel like it’s detracting from your overall branding and user experience.

    DEC 18, 2020 UPDATE:

  • 10 Best WordPress SECURITY plugins review

    Want to know the best WordPress security plugins to protect your site?

    Read on because I’ve done a review on them and tested their most important features. I’ve had some client sites get hacked recently and simply didn’t have the time to thoroughly compare files so I fired up the usual security plugins and was surprised by what I found. Some were designed quite intuitively and extremely helpful whereas others were IMO a collection of garbage of common htaccess tweaks.

    Let’s cover their differences…

    What features are most important in a WordPress security plugin?

    I generally don’t bother with WordPress security plugins (having previously complained that security plugins “sucked”) but will admit their convenience for quickly detecting issues and guessing where the rest of the dirt might be. They do have useful functions for others if not even for myself.

    The MOST IMPORTANT security function to me is SCANNING (blocking malware, code injection, backdoors, file changes). The typical malware hacks where your website files and code is changed. Those are the most common website defacements that immediately affect your website appearance. Malware scanning is absolutely the most important security function in a plugin because it’s so much more efficient than manually scanning with your own eyes and comparing files for changes. With that said, scanners are very helpful but not 100% perfect. You may still have to manually check access logs and scrutinize entire directories (and subdirectories) to make sure you get everything out.

    The SECOND MOST IMPORTANT security function to me is FIREWALL (blocking entry attacks, flooding, brute force). Brute-force into login pages, XML-RPC spam, DDOS (levels 3, 4, 7), or constant flooding into other services and ports and what not. The problem with these attacks is that while they often don’t get into your site, they quickly overwhelm your server with requests and take it down or cause outtage to actual users. So in a way, firewall scans are more a performance more than anything. They prevent hackers not only from getting in but also from taking down your server. The reason why it isn’t the most important function is that it should be done from the server already

    The THIRD MOST IMPORTANT security function are the CHECKLISTS (file permissions, pass strength, login page). These are what I call the ‘common-sense checklists’. I hate to see these in plugins for the most part. Most of them are nothing more than little lines of code put into htaccess that you could do on your own without a plugin. Sure, it’s great for newbies but annoying when you’re a tech-savvy user and just want a plugin for scanning protection and maybe firewall protection. Nonetheless, they are still helpful from time to time when you have a hacked site and don’t know where to begin.

    Different categories of WordPress security plugins:

    • FULL FEATURED plugins – these have everything (scanning, firewall, and checklists). Basically, everything is built-in. Of course, some features may be locked into their paid version. Like maybe they can scan and tell you which files are affected but they won’t clean it unless you pay. Or maybe they’ll only allow manual scans in the free version, and scheduled scans are only be allowed in the paid version.
    • SCANNING & FIREWALL plugins – these do only scanning & firewall. IMO, this is all you really need if you know what you’re doing. They’re just there for hack prevention and also to provide a convenient log of where your attacks are coming from so you can beef up your server security. They can also be used for the occasional clean-up. Some plugins may even be only scanning or only firewall. There are also plugins that do only one aspect of the firewall like maybe disabling only XML-RPC or only disabling bot traffic. Etc.
    • CHECKLIST plugins – these provide a list of basic security tweaks you should do for your site. Some are more helpful than others. Some try to over-inflate the importance of certain aspects. And I really hate when checklist plugins masquerade as “security scanners” when they actually aren’t scanning for malware.

    Additional notes:

    • Many plugins claim to have a “scanner” but they don’t actually scan your files for malware. They simply scan for basic security stuff…like a “checklist scanner”.
    • Many scanners will falsely detect other security plugins as potential security issues. Hahaha.
    • Many security plugins are not worth the price.
    • You can STILL get hacked even if you do have a security plugin installed.

    Best WordPress security plugins

    1. Wordfence Security – Firewall & Malware Scan (FREE & PAID)

    If you’ve been hacked or trying to prevent getting hacked, WordFence is easily my #1 pick. It has a good range of functions to help secure your site against the 2 most common and most devastating hacks (brute force & code injections). All the other million security features are just a bonus.

    The malware scanner is full-functioning, intuitive as hell, and so helpful in comparing code differences and letting you repair them easily from their interface. It is by far the most helpful scanner out there. I’m willing to bet it’s even better than their competitors’ paid versions. The firewall features are comprehensive enough and can block a wide range of attacks.

    You know why I think this plugin is so good? It’s because it’s used by many people so they probably have the largest collection of hack signatures and what not. This is probably your best bet against zero-day attacks. I also like the cool email function letting you know about admin login attempts.

    The UI could be designed a little cleaner and not look so much like a busy travel booking site, or with such constant upsells for their (paid) PRO version. I also hear some people complaining that it uses more server resources. I’m pretty sure you can configure this in the settings to be less resource-hungry.

    2. Cerber Security, Antispam & Malware Scan (FREE & PAID)

    In places where WordFence failed to detect hacks or was hacked itself. My very next go-to plugin was Cerber Security. I heard raving reviews about these guys when they first released their Appsumo deal and now I see why. A very clean and unstyled interface that is friendly for admins, although may appear less friendly for users. I love that you can see many options without having to scroll. I love the helpful guides explaining why each optimization is important and additional tips for newbie users to read.

    Their malware scan is #2 in my book (although I never tried all the paid scanning services out there). The firewall and checklist features are descriptive enough without taking over my screen. Really great UI, really. I don’t think I could have designed a better UI for a security plugin, myself.

    3. Sucuri Security (PAID)

    The best 3rd-party interface plugin. Usually, I hate it when plugins take over the WordPress site design with their own colors and styling…making it feel like another website within your website. But Sucuri does it well. It totally makes you feel like a premium security service is protecting your site.

    I love that they focus on 2 things…SCANNING and FIREWALL. They don’t waste your time with the silly ‘common-sense checklists’ (have a good password, file permissions, etc). This plugin is good if you’re a responsible tech-savvy user who only needs scanning and a firewall.

    My only issue is that I think their automated scanning is probably still not as good as WordFence. Their firewall, however, should be better since it goes through their proxy. The issue is that their firewall isn’t free. You have to pay.

    I think their plugin is great if you get their paid service and use their human-assisted cleanup services ($200/year is pretty cheap compared to paying a developer to clean up your hacked mess several times). Otherwise, I think their standalone plugin isn’t much help. I do like that it’s simple and doesn’t nag you too hard to pay up. Enter an API key and you’re good to go!

    4. Single-function plugins

    If you know exactly what you’re doing, I’m a big fan of those security plugins that only do one thing. Like as only changing the WP-admin login URL, blocking certain bots, or blocking certain protocols. These plugins are great because they allow you to have exactly the security functions you really need/want and not overlap with security mechanisms already implemented by other plugins or by your web server.

    WordPress security plugins (I didn’t like)

    1. SecuPress

    really great design. reminds me of WP Rocket with the super sexy-simplified interface that lays out many options in a friendly way. Unfortunately, the malware scanner is locked off behind a paid service which means the free version offers very little beyond simple protection rules in htaccess. For all I know this plugin might not be all that good but I give it some benefit of the doubt.

    2. Defender

    Why do I bother? (It’s WPMU.) Hahahah. ok. let’s be fair. WPMU is not known for good themes/plugins/service but I gave this plugin a try. It’s designed well and looks user-friendly. but has the similar issue as many other free security plugins, the most important features are castrated from the free version. so no malware scanner unless you pay. sorry, no thanks.

    3. All-in-One Security

    Malware scan requires offsite signup. Ugh, no thanks. All the other security features like blocking specific traffic were great. Ultimately, I just felt this plugin felt kinda outdated. I didn’t like the styling. The ribbons in the UI look so early 2000’s “web 2.0”.

    4. iThemes Security

    I don’t know this plugin ever gets raving reviews. It’s too bad because I did like their UI. I liked the one simple page where you could see all the options to enable or not. The sad part is that if you know what you’re doing, you’ll quickly realize many of these “security features” are simple htaccess rules, nothing more. Then again, maybe it’s unfair of me to say that since newbie users do find tremendous value in it and it’s great that they aren’t over-cluttering their plugin.

    5. MalCare Security (FREE & PAID)

    Many people love this one but I wasn’t such a fan. Don’t like the UI taking over my screen and looking completely non-WordPress. The first-time setup was quite slow. It advertises quick scanning but was slower than other top plugins. I do like that it advertises not overloading your server.

    I find it amusing when a malware-scanning plugin itself looks and functions like malware. Even their website feels like malware as well. Something between an unfinished website and an advertisement. Kind of like those parked domains that you visit by accident when misspelling a website URL. Also looks like those damn CNET download pages where you couldn’t tell which download button was real or an ad.

    Oh look, the scanner finished and didn’t find any of the ones that WordFence found. I totally get the allure of a simple set-and-forget security plugin that promises low server resource usage but this is not a good one. Having no options is almost the same as having no features, IMO. There’s simplicity and then there’s just blindly trusting a plugin to work exactly how you want it to work.

    Then there was another site that was hacked (I already found it via scanning system processes from the server and what not but decided to test Malcare on it). Malcare DID find the hack BUT put a red button that said “AUTO CLEAN”. I click on it and it wants me to “upgrade” to a paid plan in order to clean the malware. Just for the heck of it, I click UPGRADE and then hit an error page that said “error, report this” and also other option that I forgot. I click to go back and sure it enough, it won’t even tell you where the hack is so you can clean it off yourself.

    So basically…this thing is like one of those free software you find online that looks like it’s fully functional but then asks for money before running its critical function. I’m just fed up, I feel tricked and don’t even see the point of this plugin. They might as well just be upfront and tell you that it only scans but doesn’t remove any malware unless you pay. Ok…I put Wordfence on and sure enough it finds it.

    6. WebARX – Web Application Security

    Heard some good reviews about this one but didn’t bother to try since they only have a paid version. Luckily enough, a generous reader gave me his account access and I got to try it for myself. The UI and overall design is really nice. Feels premium, feels like you’re really protecting your site with state-of-the-art security.

    The actual experience and overall protection of the plugin was something else. The UI and settings were really nice. Options and settings were laid out comprehensively and explained well with helpful descriptions. But those settings only covered the firewall and typical checklist security features. The malware scanner (OR LACK OF) was a totally different experience. There is no malware scanner?!

    I don’t even get how they make any money at all as a PREMIUM-only plugin. There is no free version and yet the paid version itself feels like trial software. So what the heck are we paying for? You’re paying for a firewall, nice user interface, and fancy report charts that show what attacks are being blocked by their firewall. Sorry but this plugin gets a total thumbs down from me. Totally overrated and incomplete as a security plugin. If all you wanted was a fancy firewall plugin, this is it…but then again, the best firewall is probably best done from your server (protecting the entire server instead of only one site).

    7. Security Ninja

    I’m a little torn. On one hand, the functions and features were laid out in a simple organized manner. On the other hand, the UI made you feel like this plugin wasn’t so native with WordPress. The interface seemed to link out to their website incessantly. 80% of the things you clicked on lead out to their website where you guessed it…and upsell to their PAID VERSION!

    The plugin was simple enough but seemed like you had to pay for anything to really work. Sorry, no thanks! This isn’t even trialware or adware. It’s just a catalog plugin of their security features. Hahaha. With that said, the scan is nice if you want to see a quick checklist of which common sense things to fix on your site.

    8. Bulletproof Security

    Cool name but I’m not a fan. Really clumsy outdated UI right off the bat. Seriously, the UI is a MAJOR turnoff. They make even basic functions look super complicated. The “features” layout is so confusing and unorganized. And why the heck am I seeing CSS styling options throughout security settings? Oh and the scan didn’t find anything whereas other plugins did.

    9. VaultPress

    Worthless and annoying. 2 big flags for me. One is that it requires JETPACK…uggh, stop forcing that on us! The other disqualifier is that it’s a PAID plugin. So you’re gonna make me PAY to use Jetpack?! Sorry, but no. I didn’t continue any further. I also saw bad reviews of it not being able to detect hacks. Why am I not surprised?! I simply don’t like/trust those Automattic guys.

    So basically…it’s built by Automattic/Jetpack and requires a paid subscription to do anything. As with many things by those guys, there’s complaints about it being slow, not working well, and not worth the price they’re demanding. I didn’t bother to pay or try it out at all. Nope, not when they got that reputation.

  • WordPress security plugins SUCK!

    Do you really need a WordPress security plugin?

    My personal opinion? Yes and no. Most of them suck. Most of their features suck.

    • They slow down your site.
    • They can’t secure/detect everything.
    • They cost money.
    • They give a false sense of security (BIGGEST OFFENSE).
    • (I’ll also cover which features DON’T suck.)

    Don’t worry, I’ll explain.

    Introduction to WordPress security

    To talk about WordPress security, you have to understand what you’re actually securing your site from! Attacks come in various forms and with different motives behind them. And the attacks target different aspects of your site. Without understanding this, you’ll never know how to secure your website. At best, you’ll be a paranoid web-owner installing every random security option without knowing if it has any impact against what you’re trying to secure!

    I could make a full-blown WordPress security guide later, but not today!

    Common WordPress attacks (and how they work)

    Brute-force

    • Bot trying rapidly trying different passwords on your login page (usually WP-admin).
    • They are a problem even if they can’t get in since their constant effort still overwhelms your server with requests and slow down your website.
    • They can also hammer your XML-RPC protocol on WordPress.

    Code injection

    • Using vulnerability in your website software (usually theme/plugins) or server software (operating system, modules) somewhere to inject code into your site.
    • This code can cause unwanted site behavior, typical malware like ads or redirect links to other sites, display prank-style messages.
    • The code is also used to open backdoors and access information in your website and database, stealing sensitive content and passwords. Once they have your passwords, they’ll also try it on other sites…like your email, PayPal, and eBay accounts. (Backdoors are basically files that allow the hacker back into your site even if you correct the original vulnerability.)
    • The code can also change existing data, such as redirect your links to theirs or changing your PayPal address to their account instead.
    • The way these code injections usually get in is from vulnerable code in themes or plugins. This is why it’s important to choose your themes and plugins carefully and to always keep them updated.

    DDOS (distributed denial-of-service)

    • Using multiple servers to bring your server down by flooding it with massive requests. They don’t steal any info, they just want to make your site go down.
    • Commonly used against government, religious sites, or business competitors. Also used for targeting individuals/organizations for other personal reasons.

    So there you go! So simple, right? Most website attacks generally boil down to those 3 basic categories. And basically, all the attacks are either to 1) gain entry into your site/server, 2) steal sensitive information, 3) alter the site for their own benefit.

    The problem with WordPress security plugins

    1. They slow down your site.

    This should be public enemy #1. Why?! Because many security attacks are very much a performance issue. Look at the TSA lines at the airports. Super long wait times and they almost never ever catch anyone, right?! That’s what you’re doing to your website. Making it slow as heck for the 99.99% of legitimate users that are never going to hack your site. This is terrible UI by design.

    The other problem with a security method that slows down your site is that you’re potentially helping some hackers to attack you better. If their main goal is to overwhelm you with requests and you use a plugin that makes your website slower, and requiring more processing time, well guess…now it’s even easier for them to overwhelm your server with DDOS attack!

    2. Security plugins can’t secure/detect everything.

    Hear me out for a second. Maybe you think because a plugin can detect 98% of the hacks out there, that means it’s 98% effective…well I say “NO!” Here’s why…most people get hacked because of vulnerable themes and plugins. Security plugins CANNOT secure an insecure plugin. Pretend I kept building new room additions to my house but they had insecure windows and doors…well, I could have a security guard walking around the house but it doesn’t mean those windows and doors are now suddenly locked. So yeah…security plugins can’t prevent most attacks!

    The hackers will STILL get into your site. Ok fine, but you have a security guard who will get all the junk files out, right? WRONG! Because they can’t detect all the bad guy. So they’ll clean up maybe 98% of them, but the ones still left will KEEP LETTING THEIR FRIENDS BACK IN!

    Ok, fine. So how do we completely clean out a site once it’s been hacked? If you want my honest opinion of having personally cleaned hundreds of sites over the years…you have to do it manually. That’s the only way. If you use any automated tool or security service out there…they catch only a chunk of it but still leave some behind. And then it’s up to you to pray that the small chunk left behind isn’t enough to allow the hacker back in. Sure, some services out there guarantee a 100% clean-up and will go in and manually repair your site. It’s a great deal if they actually honor it but how much money have you lost by now?

    Just FYI…here’s a common timeline of how sites get hacked.

    1. Theme or plugin has a vulnerability.
    2. Hackers (or their bots) scanning websites eventually find yours and exploits it, creating a hole.
    3. The site is now vulnerable but the hacker doesn’t get to it until a month later. The hacker’s probably busy with hundreds of vulnerable sites around the world; it’ll be a while before he gets to yours.
    4. 2 months hacker finally gets in and starts all kinds of crazy things. Messing with the site and information.
    5. You wake up the next morning and realize something is wrong. You start to fix the damage, usually either by trying a free plugin-scan or asking your “web guy” who will also probably try a free plugin-scan. The problem is your web guy also probably don’t know how he got in. And the access logs that show his traces are already deleted since the system doesn’t save logs past a certain number of hours/days.
    6. From here you take blind guesses. You’ll update plugins, restore from backups. Then you’ll run a security plugin and try scanning to remove all the hack files. The scans complete.
    7. From here you basically pray nothing happens.
    8. A week goes by and then BOOM, you’re hacked again. All the bad files are back and it’s like nothing was ever cleaned. You’re scared as heck. You’ve done everything right and now realize you have no idea how he’s getting in.
    9. Yes, perhaps the vulnerable theme/plugin was patched but he probably left some backdoors in your site to allow himself back in. Your plugins can’t detect them because they’re written to be somewhat unique and not like the common hack scripts out there in the wild.
    10. You get desperate, contact a security expert or ask your security plugin to honor their guarantee. The person does a half-assed job mostly, running a typical scan and looking at only the most common folders and files. The mere $100-200 that you paid them doesn’t cover the hours it takes for them to actually scan every little corner of your site.
    11. You get hacked AGAIN. A 3rd time and again, all the hacks are back! And this time, your security person has the sense to look at the logs and know exactly where the hack is coming from. By now, you’ve been hacked 3 times and lost a time of sleep. Also have pissed off visitors and customers, probably lost a good chunk of revenue as well.

    3. Security plugins cost money.

    Why does this suck? Well…it’s because it means most of them will be designed and marketing in a way that increases revenue rather than increasing security. Lots of fear-based marketing that prey on ignorant users. And lots of bloated features to justify their cost. The worst part of all is that naive users will stay naive and never learn what it takes to secure their site. They’ll continue to focus on all the wrong things further increasing their trust in all the wrong security measures that don’t actually improve security.

    4. Useless feature bloat

    This is especially annoying since plugins will try to out-do each other for marketing purposes by loading every possible feature. Even features that are only marginally related to security and really don’t even need to be part of a plugin. Sure, it’s convenient for users but at the same time also confusing and can distract them from the most important security functions.

    Common security features (and why they fail)

    Let’s go over some common security methods and how they fail against the most common hacks!

    • Firewall blocking malicious traffic – they can only block known malicious traffic. Will they be able to block NEW malicious traffic? Probably not if your server is among the first ones to get hit. But sure, the plugin will probably catch it 3-6 months later when the hack is already outdated and “caught”. By then, the hacker’s already got a new script out.
    • IP blacklist – do you really think any hacker worth his salt would waste his efforts without using a proxy from a “trusted” IP?
    • Malware signature defense – all malware scans are designed to detect PAST malware signatures, not new ones. If a new one is similar enough to an old one, it may be detected. If it’s not, then it won’t!
    • Malware scanner – isn’t this funny? Why the heck does it need to scan if it’s already detecting them? Or the scan is to prevent you from inadvertently putting hack files on your site/server? Again, the malware scanner doesn’t detect everything and not only that but it slows down your server when it runs. How annoying.
    • Brute force protection – limiting login attempts. This one’s good!
    • Enforcing strong passwords – this is silly. You don’t need a plugin for this! Just use strong passwords.
    • Hiding WP-admin login page – this works somewhat in that hackers can’t find your login page to attack it. But it also fails (slowing down your site/server) if the automated bot keeps trying to reach your login page and your 404 page isn’t cached.
    • Checking WP core files – this is a nice feature; making sure your WordPress core files aren’t compromised. It’s nice but at the same time, believe me…it’s obvious when you’re hacked and the moment you realize one is affected, you’ll already know to immediately replace all WP core files. Everybody who’s been hacked knows immediately to check wp-config.php, index.php, functions.php. I can’t think of any hack that doesn’t prioritize these files first!
    • Hack reports – it’s nice because you see how many hacks are thwarted and makes you more aware of how often your site is being hit by bots and hackers. But also over-estimates the plugin’s effectiveness since many of these hackers would have been thwarted by WordPress naturally!
    • Bullshit features – captcha against bots/spammers, logging user actions, forcing SSL, blocking file editing, blocking XML-RPC protocol, removing WordPress site information from the code, changing database prefix. All this junk isn’t specifically-related to WordPress security and doesn’t actually thwart any attacks. They also don’t need a security plugin to implement. They’re a bunch of bloated features to justify the cost of having a security plugin.

    Fine, so what’s the best way to secure WordPress?

    1. BACK UP YOUR SITE. So that things can be repaired!
    2. Update your WordPress core, themes, and plugins.
    3. Use only quality themes/plugins. Avoid outdated ones or ones by smaller little-known development teams. Don’t buy themes/plugins illegally or download from unknown sources. Also avoid keeping any unused themes/plugins since they create unnecessary directories for hacks to hide inside and making your job harder when you have to find the hacks.
    4. Use strong passwords. And don’t use the same passwords for your site that you do for email and your PayPal account.
    5. Protect against brute force.
    6. Have some kind of brute force protection on your login page. Block XML-RPC protocol if you don’t use it.
    7. If you’re paranoid, you can install a security plugin that has a malware scanner BUT leave it deactivated. Don’t have it running constantly. And every now and then or when you notice issues with your site, you can run the scanner to see what it finds.
    8. Have a contact for a good server-admin or programmer for when you do get hacked. It will happen eventually and you’ll need someone you can call immediately. Are you really gonna trust your business site to random plugin? It’s much better to trust a live human-being who knows your site and can be made to guarantee their work.
    9. All other common sense applies. Use updated webhost, web-server, PHP, etc.
    10. You can install Cloudflare or Sucuri for extra security at the DNS level. Problem is they only help against DDOS attacks which most of you will never get! DDOS attacks are kind of expensive and usually targeted for very specific purposes.

    So does this mean you NEVER use security plugins?

    Yeaup, I don’t use ANY security plugins on my site. Again, the reason why these security plugins suck is because:

    • They can’t secure vulnerable themes/plugins. Most of you getting hacked are due to vulnerable code in your themes and plugins. Your best protection against this is not a security plugin but simply to keep your WordPress core, themes, and plugins updated!
    • They can’t detect the newest hacks and attacks. Their system is designed against detecting old ones that are already known and probably not circulating anymore. Don’t be fooled by “this scanner detects 5,000,000 known signatures”…it’s bullshit. Almost all of them are not used anymore. Hackers are always coming up with new hacks to exploit new vulnerabilities! So don’t waste your time with scanners slowing down the server and still not detecting the latest attacks. ARGH, I’m so impatient explaining all this!
    • They slow down your site. How annoying, right? They can’t detect the latest stuff AND they slow down your site? What’s the point anyway?!
    • NOTE: if you get hacked, you’re welcome to run a security plugin just to help repair/remove the most obvious hacked files but you still need to hire a professional to make sure the site is completely secured!

    More interesting reads:

    I’ll get some more helpful examples soon. Honestly, I think security plugins do almost nothing but slow down your site and give you a checklist of basic “security tips”. I see tons of people still getting hacked with security plugins installed and the ones that don’t get hacked are probably because their site wasn’t vulnerable in the first place.

  • Block XML-RPC protocol in WordPress

    If you’re not using XML-RPC, you should disable it from your site to prevent bots/hackers from hacking your site or slowing down your site with repeat XML-RPC attacks. Usually, the biggest problem with XML-RPC attacks is not that they get in but that they bog down your server with so many blocked requests.

    • XML-RPC is used to commonly used to connect to your site and blog from an a mobile app or remote publishing service. If you never publish to your site from anywhere but directly in WordPress admin itself, you are fine to disable it!
    • You can easily block all xmlrpc.php requests using .htaccess to prevent them from even getting passed into WordPress. Don’t bother using a security plugin for this, they’re either slower to process the block or they essentially do the same by adding this same bit of code to your htaccess.

    Apache/LiteSpeed servers can paste the following code in your .htaccess file (preferably at the very top):

    # Block WordPress xmlrpc.php requests
    <Files xmlrpc.php>
    order deny,allow
    deny from all
    allow from 123.123.123.123
    </Files>

    Quick note…if you need to leave it on for certain IP, you can whitelist your IP and also Jetpack IP’s (if you use it).

    Nginx servers can paste the following code into the functions.php (submitted by Regev):

    // Disables XML-RPC
    add_filter( ‘xmlrpc_enabled’, ‘__return_false’ );
    
    function disable_x_pingback( $headers ) {
    unset( $headers[‘X-Pingback’] );
    
    return $headers;
    }
    add_filter( ‘wp_headers’, ‘disable_x_pingback’ );
    
    add_filter( ‘xmlrpc_methods’, function( $methods ) {
    
    unset( $methods[‘pingback.ping’] );
    
    return $methods;
    
    } );

    Reference link to learn more about XML-RPC:

  • Cloudflare settings guide (best performance)

    Configure your Cloudflare account for the best website performance (full explanations provided).

    If you’ve ever wondered what settings to choose or why someone would chance from the default options, this guide will explain it all for you. (QUICK NOTE: all you need is the FREE plan.)

    UICK Cloudflare settings guide

    Leave everything on default and check/change the following settings:

    • DNS – if enabling proxy, do it only for your domain name and WWW record. Can also be for subdomain as well if it leads to a website. Don’t enable proxy for your control panel or anything that points to an external server.
    • SSL/TLS > SSL – set to “Full”.
    • SSL/TLS > Always Use HTTPS – ON.
    • Automatic HTTPS Rewrites – ON, unless you have some things that still need HTTP.
    • Speed > Auto Minify – check all 3 (JS, CSS, HTML).
    • Speed > Brotli – ON.
    • Speed > Rocket Loader – leave it OFF.

    DETAILED Cloudflare settings guide

    Overview:

    • Under Attack Mode – usually off. Only enable if you’re getting hacked with tons of fake/bad traffic.
    • Development Mode – enable if you’re constantly making design/styling changes to your site. It allows you to see the most recent version, otherwise you might see a cached (outdated) version of your site.
    • Domain Registration – use if you registered domains with them.
    • Active Subscriptions – choose which plan you want. The FREE is all I ever use.
    • API (Zone ID & Account ID) – copy this somewhere as you may have to paste it into your plugins later.
    • Pause Cloudflare on Site – I typically don’t use this. If I want to disable Cloudflare, I check off the proxy (to grey cloud) from the DNS page.
    • Remove Site from Cloudflare – self explanatory.

    Analytics:

    How to read this and deciding whether it’s better to have it on vs off.

    • Traffic – see your traffic, bandwidth usage, how many users and their location.
    • Security – see how many times you’ve been hacked, where they come from, which crawlers/bots.
    • Performance – it only shows if you have Argo service enabled.
    • DNS – shows how many DNS queries get made.
    • Workers – shows if you’re using any workers.

    DNS:

    • Shows DNS records – up to you to know what you should have and not have.
    • Enable/disable proxy – click the cloud icon to enable proxy (ORANGE) or disable proxy (GREY). The proxy features are the security and performance features. Basically decides whether all the settings you put on the different pages will take effect or not. REMINDER: disable proxy when generating SSL from your web server or webhosting control panel, then can turn it back on afterwards.
    • TTL – when having proxy off, I recommend a higher TTL so that your DNS info is cached. Or lower TTL when migrating so that your DNS record changes take effect sooner. This is helpful to migrate without downtimes.
    • Custom Nameservers – I never bother with this.
    • DNSSEC – I never use this.
    • CNAME flattening – I never mess with it.

    SSL/TLS:

    • SSL – I use “Full” because it uses SSL but isn’t strict about it. I don’t use the “Full (strict)” setting because I hear it increases your SSL handshake times, slowing down every request.
    • Edge Certificates – you are fine with the free shared options. Totally fine, you get a secure padlock and all that. But if for whatever reason, you don’t want a shared certificate…you can purchase business plan ($20/month) to upload a custom certificate or just pay $5/month and get a dedicated certificate from Cloudflare. If you don’t know what any of this means, you are fine with the free one!
    • Custom Hostnames – I don’t use.
    • Origin Certificates – this sounds like such a giant hassle when your web server probably already has free Let’s Encrypt certificates. I don’t waste any time with this.
    • Always Use HTTPS – put to ON.
    • HTTP Strict Transport Security (HSTS) – I don’t use this. Yes, it theoretically adds better security and speed by enforcing HTTPS on your site but it’s a giant risk if SSL renewal fails for whatever reason (it won’t allow users to visit your without a proper SSL in place). For that reason, I think it’s much much safer off. The busier and more 3rd-party assets you have on your site, the more this might be a risk to use. Then again, it’s not a risk if you know what you’re doing.
    • Authenticated Origin Pulls – forces visitors to go through Cloudflare proxy instead of bypassing it. But requires extra configuration at your web server. I don’t use it.
    • Minimum TLS version – leave this on the lowest setting for maximum compatibility with most browsers. Only raise it if you need your website to be compliant with certain security requirements for specific industries (health, legal, government, etc).
    • Opportunistic Encryption – leave it ON. (It allows TLS for other protocols like HTTP/2.)
    • Onion Routing – leave it ON. Protects privacy of Tor network users.
    • TLS 1.3 – leave it ON for best security/performance.
    • Automatic HTTPS rewrites – leave it ON, unless you have some items that only work on HTTP.
    • Disable Universal SSL – only used if you’re planning to have dedicated or custom SSL certificates.

    Firewall:

    • Overview > Firewall Event – look at the visitors that got blocked (or challenged) by Cloudflare’s security proxy. You can also filter the list to look for certain traffic.
    • Managed Rules – enable web application firewall (requires paid service), see explanations of Cloudflares DOS protection.
    • Firewall Rules – can create custom rules to block, challenge, or allow specific traffic. I never use much as default Cloudflare rules along with my webserver security has worked just fine.
    • Tools > IP Access Rules – allow/block/challenge traffic via IP. This is the place to whitelist your IP if you get challenged a lot from your own site for whatever reason.
    • Tools > Rate Limiting – I don’t use it and I think it costs money. It blocks IP’s based on (defined) usage pattern.
    • Tools > User Agent Blocking – block certain browsers or applications from accessing your site.
    • Tools > Zone Lockdown – limits certain URLs on your site to only the IP’s that you allow. Most commonly used for “admin” or other protected areas of your site.

    Access:

    • Manage access to applications – I don’t use this at all.

    Speed:

    • Image Resizing – paid service. Not necessary when you have image plugins already.
    • Enhanced HTTP/2 Prioritization – enable if you have the paid plan.
    • TCP Turbo – enable if you have the paid plans.
    • Auto Minify – check all (JS/CSS/HTML). I love to do this from Cloudflare (using their servers) rather than from my site plugins (which uses resources from my own web server).
    • Polish – paid service, but I’m not sure if you’ll like their exact image optimization settings.
    • AMP Real URL – for AMP users only. Uses your URL instead of Googles. I think it makes sense to enable, no?
    • Railgun – really cool service that really does speed up your site. But it often breaks site style/functionality. Test carefully or if you want to be safe, just don’t use it.
    • Brotli – leave it ON to benefit from superior Brotli compression.
    • Mirage (BETA) – I don’t have the paid plan but it’s worth a try if you have the paid plan.
    • Rocket Loader – I feel this often breaks sites and isn’t worth risking.
    • Mobile Redirect – use this if you need it. It’s a nice service since these redirects would be faster from a Cloudflare proxy than from a website plugin.
    • Prefetching URLs From HTTP Headers – you should enable it if you have the paid service.

    Caching:

    • Purge Cache – can purge your Cloudflare cache from here, if you didn’t already do it from the Overview page or even from a website plugin. Useful for when you make changes to your site (or assets) but Cloudflare is still caching the old version.
    • Caching Level – I recommend standard since it’s the safest one that can cache assets with or without query strings.
    • Browser Cache Expiration – the default 4-hour setting works fine. But if your site doesn’t change its assets often, picking a longer time (2-8 days) would be better for repeat visitors. I probably wouldn’t go too far above that since any changes might take that much longer to refresh in your user’s browsers.
    • Always Online – leaving it ON sounds good.
    • Development Mode – temporarily disables the proxy so you can see changes in real time. Don’t forget to purge cache after you re-enable since this feature doesn’t do it.
    • Enable Query String Sort – very clever feature that’s extremely beneficial for ecommerce sites caching HTML (via page rule). Allows Cloudflare to cache multiple URLs with same-but-misordered query strings as the same page (since they ARE the same). Great for when you want to cache product-filtering pages so that it doesn’t require exhaustive database lookups on your origin server. Can also be used for other types of pages that alter content depending on the query string.

    Workers:

    • This is so freaken cool but I don’t use this at all right now and it shouldn’t concern you at the moment. It’s pretty much advanced stuff you can toy with later when you got lots and lots of time.

    Page Rules:

    • There are a million guides out there of what (and what not) to put here. If you want to be safe, don’t mess with it. Or play at your own risk.

    Network:

    • HTTP/2 – turn it ON if you have the option to.
    • HTTP/3 with QUIC (BETA) – I signed up for the waitlist and still waiting. Yes, HTTP/3 is all that and a bag of chips. You should get it as soon as you can.
    • IPv6 Compatibility – turn it ON if you can.
    • WebSockets – leave it ON.
    • Psuedo IPv4 – leave it OFF, unless you need it on.
    • IP Geolocation – leave it ON. It allows your server to track country location of visitors coming through Cloudflare’s proxy. Can be useful for content-filtering or security-filtering purposes.
    • Maximum Upload Size – left on 100MB for free plans.
    • Response Buffering – not available for free plans. Speeds up delivery of many small files.
    • True-Client-IP Header – not available for free plan. When enabled, Cloudflare includes yet another header (more convenient for servers) containing the original client IP. Helpful for reporting, content-filtering, or security purposes.

    Traffic:

    • Argo – Cloudflare premium routing service. Speeds up your DNS times. Many people don’t feel it’s worth it for the price you pay. Probably makes more sense for really large companies.
    • Argo Tunnel – used to quickly expose any applications or your network directly to the internet without configuring DNS records or firewall/router.
    • Load Balancing – can use Cloudflare’s paid load balancing service. It seems pretty cheap to me considering the complexity of their infrastructure, but I never tried it.

    Stream:

    • I don’t know about you but I think their pricing is expensive, although could be more convenient than setting up S3 and Cloudfront and all that. If you’re doing a membership site, just stick to Vimeo PRO.

    Custom Pages:

    • Being able to customize all the error pages that are shown to visitors sounds cool, but I don’t need it.

    Apps:

    • Oh, I pretty much salivated at the idea of playing with this page. It’s so cool to see many widely-used applications that can be now be integrated with your site through Cloudflare rather than through a WordPress plugin. Why is this such a big deal? It means those plugins will be processed and loaded through Cloudflare’s servers rather than yours. More speed and less load on your server…HOORAY!

    Scrap Shield:

    • Email Address Obfuscation – hahaha, man they thought of everything! Yes, leave it ON (so bots don’t collect your email off your website).
    • Server-side Excludes – one of those ‘good-to-know’ features that I’ll probably never use. Really cool that Cloudflare can exclude desired content from “bad visitors”. I leave it ON but haven’t bothered to exclude anything.
    • Hotlink Protection – it’s OFF by default and for good reason. Usually, people don’t mind having their web images linked to and shared by other sites. Part of the reason may be because they don’t want their images “stolen” but more likely, they just don’t want their web-server to take extra load. But that really isn’t such a concern when your static assets are now server by Cloudflare’s servers. I know I prefer having my content exposed and freely shared all over!
  • Why You SHOULDN’T Combine CSS & JS (performance reasons)

    Quick chat I had with a friend…

    Why shouldn’t I combine CSS styles and JS scripts?

    To combine/merge or not. It’s an endless debate over which is better.

    Merging CSS/JS looks great on performance test sites like Pingdom and GTmetrix but is it really the best performance for your site?

    STOP Merging CSS/JS!

    Reason #1 – it slows down your site load!

    For me, merging CSS is a superficial improvement that makes your test scores look better since you have fewer requests. These page speed tests were only intended to be used as guidelines. Many of them (if not all) were designed before the new HTTP/2 protocol.

    [Brief] history of evolution from HTTP to HTTP/2 protocol

    1. Old HTTP protocol could only load a few requests at a time, queuing the other requests (imagine 1 cashier with many customers in line). So in those days, it was better to have fewer HTTP requests. Tactics like “CSS sprites” and combining CSS/JS was standard practice. With only one cashier, having one giant order was faster than several small orders, each with their own transactional overhead in DNS request times.
    2. HTTP/2 protocol came out allowing parallel requests (imagine multiple cashiers instead of one). With multiple cashiers, requests were served quicker as separate smaller requests rather than combined. HTTP/2 gave such massive performance increases, you would expect almost immediate adoption. Unfortunately, it required HTTPS (TLS/SSL certificates) which weren’t yet standardized (also cost money/skills to implement).
    3. As expected, low-budget webhosting clients weren’t willing to pay for SSL or deal with technical hassles of setup/renewal for them. They also weren’t necessarily if you didn’t have a store. (At the time, no 1-click solution existed for installing TLS/SSL certificates; you had to copy-paste long bits of encrypted text and wonder if you did it right.)
    4. But then the industry changed…Google started requiring all websites to have HTTPS or risk being penalized on their search engine rankings. The only one thing left in the way was affordable TLS/SSL certificates. Luckily for everyone, Let’s Encrypt came out with free TLS/SSL certificates—HOORAY! Webhosts started offering 1-click solutions overnight and HTTPS (alongside with HTTP/2) became the standard.
    5. While the webhosting and web-browser industry made HTTP/2 and HTTPS standard; outdated page speed tests (and many speed-up guides) are still recommended practices like decreasing the number of requests. We are still living in that conflicted aftermath today. For the record: I’m all for decreasing code and even requests; I just don’t see the point of wasting precious server resources to combine code into one lump file that takes longer to process.

    People think that because their server sent out fewer requests, it means their server did less work…but that is false thinking. Your server sends out the same amount of code no matter what. If anything, your server may work harder because you merged. Merging CSS also has a few annoying issues…instead of letting your page render immediately, it now has to wait for your entire CSS to load.

    Imagine eating at a restaurant with 20 friends. Do you want the food to come out as soon as it’s ready? Or only when everyone’s order is cooked?

    For me…most CSS should be loaded as fast as possible and most JS should be as delayed as possible (UNLESS, there is critical JS like being used for slider above the fold).

    As for merging JS (scripts)….I think it’s great if your merging mechanism can also defer and throw them to the footer (that’s the only reason why I would merge them). But in general…and especially with well-coded sites, you don’t want it.

    Rson #2 – it breaks your site

    You’ll end up spending a lot of time troubleshooting sites with broken CSS/JS merges. I see “cache plugin broke my site” on WordPress Facebook groups about 2 dozen times every week.

    And even if things do look alright, the site might not be perfect and or might not always get performance benefits. Your contact form might break, or some scroll function, or some ajax function. There’s a myriad of possible conflicts that can happen when you merge JS.

    Reason #3 – it adds unnecessary page load

    This is one of the funniest aspects of CSS/JS merge. Many people think doing it will decrease their page requests and page load but it often does the exact opposite. Merging CSS/JS combines all your stylesheets into one file and all your javascript into one file. This is a huge problem if you have a busy site with many different kinds of pages.

    For example:

    • Plain pages will load your pagebuilder.
    • Pages that aren’t related to your store or products will load WooCommerce.
    • Pages that don’t have any forms loaded will load your forms anyway.

    And so forth. Imagine if you had 30-40 plugins, well guess what…now your site loads all the CSS/JS on every single page. How wasteful!

    Ok fine…there are some “intelligent” CSS/JS merges that allow separate CSS/JS for every page but now this is overkill. Your server spends more time merging CSS/JS than actually serving pages to users. Feel free to experiment on your own but my general rule is not to merge JS.

    Reason #4 – it delays cache prebuild

    Last but not least, you don’t want to merge CSS/JS with your cache plugin because it delays the cache prebuild. Imagine a huge site like 1,000 pages. You don’t want cache plugin to rebuild html/CSS/JS for all 1k pages when you update one post. It’s better….let autoptimize or async javascript do the merging. And then your cache plugin only has to build html cache.

    There’s a million tactics and it’s kind of an art in itself. Depends on what kind of site, what kind of traffic, and how often you update content.

    PS: those test sites are a little bit dated. Giving suggestions that would have worked better for older webhosting technology.

    But (rebuttals)…

    “Doesn’t combining CSS/JS reduce the code?”

    Yes, it’s true! Merging your CSS/JS often reduces code, stripping out empty spaces and unnecessary code. So it would seem like your site would load faster since there’s less code overall to load. Only problem is, that’s not how pages render.

    You see, pages render as soon as an entire asset loads.

    • Let’s compare uncombined CSS (split1.css + split2.css + split3.css = 60kb total) vs combined CSS (combined.css = 50kb).

    It’s reasonable to think the combined css would load faster because it’s smaller, but that doesn’t always happen. There’s a good chance your site can start rendering the page with only split1.css (with split2.css & split3.css being used to render lower parts of the page). If that’s the case, you’re better off leaving the files uncombined so the page renders earlier for users. The idea here is to start rendering soon rather than finish rendering sooner. (It’s basically the concept behind “Critical CSS“.)

    “But the combined CSS doesn’t have to load if it’s cached!”

    That’s a great point, too. If you combine the CSS/JS and then cached it to the user’s browser locally, they wouldn’t have to download it! The only problem is…most visits to your site are going to be 1st-time visits. Even if it was just one person…they could be visiting from their desktop, their laptop, their mobile phone. Maybe a different browser, or maybe their cache cleared. Whatever reason it is, the majority of your traffic will be first-time visits.

    Here’s another thing…you can cache uncombined CSS/JS files, too! Put long expiry times on them and it’s pretty much the same thing.

    “What about Critical CSS?”

    If your site is bloated to the point where you actually have critical CSS vs non-critical CSS, you have a different problem. Clean up your code. If your total CSS is only 40-50kb, that’s fine. Leave it un-merged.

    “Are you sure about NOT merging JS?”

    The topic of merging JS is a whole can of worms in itself. Let’s start with the pros and cons. Right off the bat…merging JS is always a darn risk because something breaks in your site. Second, we’re now in the age of HTTP2 where loading multiple assets in parallel beats loading one combined asset. Those 2 reasons alone are good enough to avoid it. It’s a safer option with great performance and far less issues to fix.

    So what’s the best way to manage JS and when should you merge JS?

    I think most JS are not critical to initial page rendering. JS usually has to do more with the page’s function than its design. Note the operative word ‘usually’. Some JS does have to do with the design…such as image sliders, tab content, expandable/collapsible divs, pop-ups, etc.

    Ideally, all JS (except for design-related JS placed above-the-fold) is deferred to the end of the page load queue and doesn’t load until the rest of your design loads first. Even better is if you can prevent certain JS from not loading at all unless the user scrolls to it or interacts with it (lazyload/onload-event)…this would be great for things like super bloated Googlemaps iframe laying at the bottom of the site.

    Some of the merging mechanisms out there will do all that…combine your JS and defer it. And then you could manually exclude certain critical JS files from being merged and deferred. And also put some on lazyload if you wanted.

    “But my site has faster speed scores with CSS/JS combined!”

    This is a great reason many people use to justify combining CSS/JS. And in some cases, it’s true—combining CSS/JS might get you a faster FINISHING load time. But here’s the thing…what we want is faster STARTING load time.

    Remember that whole trend about optimizing TTFB? It’s all about starting sooner, not finishing sooner. Having a fast response time can be just as important as a fast load time.

    We want your pages to render quicker (not necessarily just to download quicker). The sooner your page renders, the faster the perceived load will be for users. This is why JS loading is such a finicky matter. Some items should load first, others should all be deferred so they don’t get in the way of critical JS items!

    So decide…are you speed-optimizing your site for page scores or for users? (And FYI, it’s possible to do it for both…that’ll be a whole other guide later.)
    Aren’t there any exceptions?

    As with all things, yes. There are indeed exceptions but they are few and far between and still I wouldn’t recommend you to do it if you wanted a hassle-free caching experience.

    Combining CSS/JS from the same theme or plugin makes sense!

    If you’ve ever had a theme or pagebuilder plugin offer to combine its own CSS or JS. Yes, please enable that. It makes sense. As all CSS and JS coming from one extension is already compatible/harmonious with itself. Not only that but it can combine them natively without requiring extra server processing or mechanism to manage. It’s like choosing whether to carpool with roommates, or with friends that live all over town.

    Combined CSS/JS files sometimes cache better

    The key word is “sometimes”. Sometimes the combined file is more likely to hold it’s long expiry time, or hit Cloudflare’s DNS cache better. It depends on different scenarios. It’s always worth a shot if you’re not happy with your situation. The general idea is that the CSS file is cached on the user’s computer and no longer needs to be downloaded on subsequent requests. Only issue left is that even with this, your first load will still be slower as the merged CSS isn’t cached yet. Check your GA stats and if most visitors hit less than 1.5 pages, I probably wouldn’t merge.

    Combining CSS/JS is worth it for small files

    I especially don’t like when you combine a bunch of large 20kb CSS/JS files to make a giant 1MB file. But if you have a bunch of 0-3kb CSS/JS files, I think it’s ok to combine those. This is logical as small files cost more in DNS lookup time than they do in actual processing time.

    Combined CSS/JS files sometimes has less conflicts

    This has more to do with conflict resolution than performance. Sometimes, you may have a bunch of CSS or JS files conflicting with each other and breaking the site design or functions. Sometimes combining fixes that. It’s random but I’ve seen it happen.

    Combined CSS/JS can speed up small sites when placed in-line

    On really small/lightweight sites, the DNS resolution time is longer than the actual load time for the tiny CSS/JS files. In cases like this, it might be a good idea to just combine the CSS/JS code and place it inline with the html.

    In this case, you’re speeding up the site not by combining CSS/JS but by reducing the number of HTTP requests. Again, this is only recommend for really lightweight pages! If you’re total CSS and JS is like 10kb or less, you may be a good candidate for this tactic.

  • Recovering from a HACKED web server (Linux)

    Recovering from a HACKED web server (Linux)

    Comprehensive guide on how to recover from server attacks (whether inbound or outbound). NOTE: this guide is written for WordPress users but can be applied to any CMS.

    I wrote this security guide to be as helpful as possible. It should help you detect and repair at least 99% of the hacks out there. I repair around 20 servers every year due to hackers, intrusions, and other interruptions caused by attacks. This cheatsheet was originally compiled for my personal use but has since been re-written to be digestible for even newb server admins. (In the midst of complicated server jargon guides out there, I figured to help the community by writing something more actionable for real-world use.)

    The only requirement of this guide is that you know how to get to the command line. Also, I don’t cover all nuances of server security here or list every command for every linux distro. I’m more often using CentOS (RHEL) rather than Ubuntu (Debian). It’s up to you to look up alternative commands if that’s what you need.

    First thing to do when your server gets hacked…

    OH NO! YOU JUST GOT HACKED!! WHAT DO YOU DO?!! WHAT DO YOU DO?!

    Usually, you find out your server got hacked because your datacenter or provider has network-restricted you. Or maybe you find out because of failed services, or defaced websites showing malware. It’s a scary situation as you don’t know what’s wrong and the immediate reaction is to panic. What’s most annoying is that it always seems to happen at the worst time (e.g. big project, vacation, wedding, medical illness).

    1. Hire an expert

    Seriously, don’t mess around. If you don’t know what you’re doing or have critical sites/client stuff, just hire an expert and be done with it. Now is not the time to play DIY. I advise you not to continue venturing on your own unless you really like being an IT paramedic and being responsible for other people’s lives.

    2. Figure out what’s being hacked

    • Is it an inbound attack?
    • Or is it an outbound attack?
    • Is it just malware and defaced website or altered data?
    • How much access did the hackers get into your server? (Just a backdoor/script running from from user directory? Or is it a root-level intrusion?)
    • Did your webhost or datacenter limit your network connections?
    • If the damage is really bad, do you have a plan to temporarily restore critical client sites?

    3. Be prepared to build a new server

    In many cases, if your server is hacked that badly, it’s faster to rebuild a new server from scratch than to waste time trying to find all the hacks and repair all the damaged services and config files in the server. It’s also not wise as you’re not 100% sure whether it’s still compromised somewhere.

    4. Restore from backup or no?

    Many people get lazy and try to resolve hacks simply by restoring an older backup. Sure, this can work if the data hasn’t changed much. Just restore the backup and then quickly harden your server/sites to block the impending attack. But it’s not an option if you don’t have backups or the backup data has changed since. Quite often, we don’t notice an attack until much later from when the server was breached. So if you notice it too late, the clean backups may have already been overwritten.

    Recovering from INBOUND ATTACKS

    This is when outside machines/servers are attacking YOUR server. Some of these attacks actually try to gain entry into your server but others only intend to disrupt services by overwhelming your server. Regardless of their intentions (to get in or not), all of these attacks eat up server resources rendering it unable to load your website for real website visitors.

    Different kinds of inbound attacks:

    • Brute force – multiple attempts in rapid succession at guessing your admin passwords and gaining entry through your login pages or other connection protocols (like XML-RPC for WordPress).
    • Flood attacks – denial of service (DOS), the even stronger distributed denial of service (DDOS), or SYN FLOOD attacks. These attacks specifically target the server on different ports and protocols, requesting many open connections (beyond the server’s limit). It’s the equivalent of mass-calling someone’s phone-line to make it unavailable for legitimate callers.

    These attacks can be randomly targeted or specifically-targeted. The random ones are annoying and erratic. The specifically-targeted are most impactful (they don’t stop until your site goes down). It helps to not have controversial material, exposed IP’s on the internet, or making enemies on the internet. Sometimes, you just can’t help it. It might just be because you have an ecommerce site and those make attractive targets.

    Detecting inbound attacks:

    • Server running slow – this is an obvious sign you might getting hacked. Especially if you haven’t changed anything else on the site and traffic is still the same.
    • Check for high server (CPU) load grep processor /proc/cpuinfo | wc -l. Unnecessary if your webhosting control panel already has a GUI for this. Anything at or above the number of CPU cores you have is considered really high (i.e. load of “5” when you only have 4 cores). High CPU usually means an attack at network level (bombarding services).
    • Check for high memory usage cat /proc/meminfo or top. High swap messages in your control panel at random intervals are also an obvious indicator. Sometimes the attacks will erratic and you’ll just have to scan logs. High memory usually means an attack at software level (bombarding php scripts).
    • Check connections per IP netstat -ntu|awk '{print $5}'|cut -d: -f1 -s|sort|uniq -c|sort -nk1 -r. Up to 50 connections from one IP can be normal, anything over 100 is suspicious. If you see many single connections but coming from the same subnet, check 2nd half of this guide.
    • Alternate commands to check connections per IP tail -n 10000 yourweblog.log|cut -f 1 -d ' '|sort|uniq -c|sort -nr|more and netstat -n|grep :80|cut -c 45-|cut -f 1 -d ':'|sort|uniq -c|sort -nr|more. Use these if the previous ones didn’t help.
    • Check for syn connections netstat -n | grep :80 | grep SYN
    • Check logs for failed login attempts cat /var/log/secure (RHEL, Centos, Fedora) or cat /var/log/auth.log (Ubuntu, Debian).
    • Check for WordPress wp-login brute-force attack (current day) grep -s $(date +"%d/%b/%Y:") /usr/local/apache/domlogs/* | grep wp-login.php | awk {'print $1,$6,$7'} | sort | uniq -c | sort -n
    • Check for WordPress XMLRPC attack (current day) grep -s $(date +"%d/%b/%Y:") /usr/local/apache/domlogs/* | grep xmlrpc | awk {'print $1,$6,$7'} | sort | uniq -c | sort -n
    • Then ban the most offending IP’s and/or disable the ports and services that are being attacked.

    Stopping inbound attacks:

    • Ban IP’s – you can block the most offending IP’s through your firewall or security plugin. It might also be helpful to install security software like fail2ban that automatically scans your logs and bans the most obvious IP’s. Sure, there are some debates about its efficacy since it may slow down your server and also unable to detect all kinds of attacks.
    • Disable ports/services (OPTIONAL) – this is another good tactic to remove attacks by taking away their attack point. Just make sure it isn’t a port or service that you’re actually using.
    • Enable security (firewall) plugins – the point of using security plugins is to block attacks more efficiently than your current firewall solution. Again, the real risk isn’t that these attacks actually get in but that they use up server resources.
    • Enable security (firewall) services – another way of blocking attacks is to rely on a security service. Usually they operate at the DNS level, and you send all your traffic through their proxy servers so that they can police incoming requests. This is especially important when you have really complicated attacks that low-level plugins cannot handle. For example, layer 7 DDOS attacks are able to send tons of requests to your computer from many different machines. Because it’s a botnet and not just one computer, you cannot ban a single IP. You’d need a much more sophisticated security service (that probably relies on multiple computers) with the capacity to quickly process these requests and let legitimate traffic through without affecting their page load [too much].

    I wish I could be more clear about how to ban IP’s and disable ports/services but it really depends on what firewall you have have. The most common ones I’ve come across are:

    • iptables (command-line)
    • ConfigServer
    • ModSecurity
    • Firewalld
    • Lua-Resty-WAF

    See which one you have and if you DON’T have one, well it’s time to install one then! Then look up its documentation to see: which ports/services are open, where the block/ban lists are, how to make changes. Don’t forget to restart it after you make changes. (Note to myself to update this distinguish between network vs application firewalls.)

    Reference links:

    Recovering from OUTBOUND ATTACKS

    This is when there’s a hack or malware script on your server, using your server to hack other servers. Typically, they take over your server, using it and its resources as part of their botnet to target other servers. Pretty malicious and evil, I know! In doing this, they can clever deploy tons of servers to brute force or DDOS for them instead of having to pay for all those servers themselves. It’s very diabolical! And worst of all, aside from using up your server resources, it gets YOUR SERVER and YOUR IP reputation trouble. It’s the equivalent of a criminal using a stolen car to rob banks.

    Unlike other hacks, you cannot fix these on your own time. Quite often, I’ll have clients that have a hacked site but aren’t in a rush to fix it since it’s not as important as the others. Well, guess what? These hacks typically cause other server owners and datacenters to complain to your datacenter that you’re hacking them. At this point, your hardware vendor has no choice but to do the responsible thing by limiting YOUR network connections. That means restricting some of your ports and services to limit the damage, which will affect all sites on the server. So sure…it might not be an important site that was hacked but it will affect all other sites. A definite quandary if you’ve got other client sites on there. So what do you do? Fix the outbound attack ASAP and so your datacenter can lift the network restrictions.

    Different kinds of outbound attacks:

    • Same as the inbound attacks but now it’s your server that’s doing the hacking. Brute force, flood attacks, email spam, etc.

    But this time, we don’t diagnose it the same way. We don’t look to see how many connections we have with each IP because the idea isn’t to ban other IP’s. The strategy now is to see which illegal processes are running, find out their location, kill them (from running), and delete them. And then most ideal is to find the hole where they got in and fix or remove that vulnerability as well.

    Detecting outbound attacks:

    • Check outbound connections netstat -nputw and see which ones look suspicious. If you see too many lines, try netstat -nputw | less (PS: you can exit less command with q). If you see any “stealth” processes on the right side, take note of their process ID number (aka “PID”).
    • Can also check for stealth processes directly ps -ef | grep stealth.
    • Find location of stealth process lsof -p 12345 | grep cwd and lsof -p 12345 but replace 12345 with actual process ID. Now you know which directory to clean. You should also check /tmp directory as stealth processes often run files from there find /tmp | grep -i stealth.

    Stopping outbound attacks:

    • Clean the directory manually (using your eyes to detect bad files), or plugins (like Wordfence) to scan the site.
    • Check recently modified files within last 24 hours find /directorypath -mtime -1 -ls using path to home directory of hacked user account or wherever the hack was. (Of course, change the path or timeframe as needed). More info on adjusting this command here. Then go in there and delete or fix files! (NOTE: if the list of files is too long, you can use the pipe command to output them to a file.)
    • Change passwords – if you saw backdoor scripts and Adminer during your cleaning process, it’s probably a good idea to change all control panel, admin, and database passwords. If you also used any of these passwords for your email, PayPal, eBay, Facebook accounts…I recommend changing them as well. (Hackers often cross-check your passwords against other online services.)
    • Kill the process, using kill if you know the process ID (kill 12345) or pkill if you know the process name (pkill processname). This will kill the PID, as well as anybody running the process under that ID.
    • Find and close the vulnerability – time to figure out how they got in. Almost always, it’s a vulnerable theme or plugin (probably one that has a form in it). Usually you have to check the modified files. But what if you didn’t detect the hack until many days later? Unfortunately, it’s really hard to know as you probably won’t have the time to read all the logs or maybe the logs showing how they got in have already been deleted. All you can do from here is update all your 3rd-party extensions and keep a close eye on the site. If it gets hacked again, immediately check the recently-modified logs.

    Reference links:

    Recovering from INJECTION, MALWARE, DEFACEMENT ATTACKS

    Malware or defacement attacks are usually the most obvious and most low-level ones. You can see it when your website all of the sudden starts redirecting to another site (probably with ads and questionable material), or maybe your site itself is showing ads, weird pop-ups and triggering security warnings. The worst is when they actually change the data in your database, changing your content and even payment gateway API (re-routing incoming payments to their financial accounts instead of yours!).

    Different kinds of malware/defacement attacks:

    • Website redirects to another one
    • Website has ads or weird messages/content that you didn’t put
    • Website content altered and now has links in it that you didn’t put
    • Website redirects incoming customer payments to the hacker’s financial account instead of yours
    • Website stops working or is broken
    • Login page hacked into a “phishing page” and sends info from user login attempts to the hacker

    In case you’re wondering of how they got there in the first place…WELL, it usually has to do with some vulnerable plugin or theme that you had running on your site. And to be more specific, it’s almost always some plugin that has a form somewhere or allows users to input information. Quite often, these forms don’t properly “sanitize” the data (sanitization means to disallow illegitimate data)…which then allows the hacker to plug vulnerable code into the database (aka “SQL injection”). These SQL injections are used to run commands that can return information like user names and passwords, payment gateway API’s, or output hack code to a php file (backdoor scripts). And of course, these backdoor scripts are usually placed inpublicly-allowed directories like image and upload directories which allow php execution. Why do plugins sometimes fail to sanitize data? It’s either one or a mix of both lazy and incompetent coding.

    The thing that many people don’t understand about security: hackers got in because YOU installed or activated some vulnerable plugin that then let them in. It’s not because your security system failed.

    Detecting malware/defacement attacks:

    Usually pretty obvious as you can see your website functions have gone awry but now is the time to check the usual places. The first 3 steps must because checked and corrected first.

    • Check htaccess – open it up and see if there are new lines in there that you didn’t add.
    • Check wp-config (or other CMS config) – open it up to see if the site URL was changed in there.
    • Check database – if using WordPress, go to the wp_options table and look at the “site address” and “WordPress address” rows. If it’s got the wrong URL in there, change it back. If they changed all the urls in your database (uncommon), you’ll have to manually change all those strings back.
    • Check theme files – go into your active theme directory and look around for weird files. Also check the functions.php file to see if any malicious functions were put in there.
    • Check plugin files – same thing as above but in your plugin directories. This option is often not realistic if you have too many directories to look through.
    • Check uploads directory (or other public directories) – many hacks and scripts will hide (and execute) from these directories because these are open to the public. Would be smart to block php execution from the uploads directory.
    • Check plugin settings in WordPress – log into your WordPress admin (or other CMS admin) and check all settings to see if they’ve been changed. What you’re looking for is any place where they might have changed sensitive info, like putting their PayPal email instead of yours, putting their logo or site URL instead of yours, having your backups go to their remote storage instead of yours, etc…the possibilities are endless. Be thorough and check everything over carefully!
    • Checking for base 64 encrypted code – hackers use this to hide their code. So you can’t read and see the exact strings to search for. No worry at all…we learn how to search base64 code below…

    Use find and grep to search for these strings. (But beware that there are legitimate uses for base64.):

    • base64_decode
    • gzinflate(base64_decode
    • eval(gzinflate(base64_decode
    • eval(base64_decode

    Stopping malware/defacement attacks:

    • Run a malware scanner – run something like WordFence as it has the best malware database and also notifies you of which files are changed and which files don’t belong there. Honestly, this should have been the very first step as soon as you can get into your site admin. But I mention all the other since you have to be at least pass over it with your eyes and know how to do some of this stuff manually.
    • Check recently modified files – using commands I already shared above.
    • File comparisons – this is so time-consuming and probably not absolutely necessary unless this is a truly critical site and you need to make sure no other hack or vulnerability is on the server. Simply compare side-by-side between current site backup and one from a date you know is clean. If you’re clever, you’ll know how to do this quicker with code editors.

    Reference links:

    Recovering from ACCESS BREACH

    This is when hackers have gained access into your websites (or web server) and its content. Even scarier is when they have their own admin accounts or gained access to yours, even worse—have root-level access! Server accounts, FTP, database, email, website admin, and so forth. It’s scary stuff!

    Different kinds of access breaches:

    • Website admin – they have admin rights and can change info as they please.
    • FTP access – they’re able to upload files and scripts to your server, or also download stuff off of it.
    • Database access – they’re able to download or change data, even inject code into files.
    • Email access – able to read, or send emails from your server.
    • Server access – with access to the server, they can do any or all of the above and even take complete control of your server. Once a hacker has root access and enough time, they could theoretically create so much damage and chaos that it’d be much faster for you to rebuild a new server from scratch than to try repairing their damage. The risk is that even if you found 99.99% of their hacks but still left one backdoor open, they could let themselves back in again.

    Detecting access breaches:

    • Check who is logged in (and where from) w, the hacker might be logged in and working as you speak. Take note of the usernames used and their IP location. Most likely if they’ve gotten this far, they’ve gained root access. Do NOT try to kick them out just yet! You don’t know how much access they have and trying to kick them out now might cause immediate retaliation (further hindering your recovery process).
    • Check login history last. Useful to see who has previously logged in. Again, take note of usernames and IP location. You should be very suspicious if the login history is empty (that means somebody is hiding their tracks!)
    • Check command history history, shows you all the recent commands used (also stored at ~/.bash_history). Look for wget or curl commands used to install malicious software/packages. Again, if you see nothing that means somebody is hiding their tracks.
    • Check for high use processes top, look at the top cpu-use processes. Hackers with root level access typically use as much server resources as possible to hack other servers, send email spam, or mine for cryptocurrency. If you don’t recognize a process, try lsof -p 12345 or strace -p 12345 (replacing “12345” with the actual process ID number). Lsof will show all the files run by a process (super useful).
    • Check all processes ps, ps aux, ps auxf. Each one shows more info than the last. I personally prefer “ps aux”. Here, you can see all running processes and can take note of any that you don’t recognize. TIP: the more often you run this command the better you’ll get at spotting strange processes.
    • Check network usage iftop shows processes sending/receiving data, along with their source and destination. Any processes abusing your network with DOS or spam will show at the top.
    • Check listening connections lsof -i or netstat -plunt, look for any “LISTEN” or “ESTABLISHED” processes that you don’t recognize. It’s good to check for listening processes as they don’t consume much CPU to get noticed in “top” but are used by hackers to send commands to the server. Again: use the “lsof -p” command to look up processes if you don’t know what they do.

    Stopping access breaches:

    • Shut off server, and hire someone – if this is way above your level. Shut off the server and don’t turn it back on until you have an experienced admin there to quickly remove and reseal so the hacker can’t re-access.
    • Disable SSH from all IP’s except your own – do this after you turn server back on. Make sure you’re the only one logged in.
    • Block all ports and services – start limiting your firewall and re-allow things one by one only when you’re sure they’ve been verified.
    • Kill and remove processes – like you did with previous steps.
    • Change passwords – to everything.
    • Search for new admin accounts – hackers often create new admin accounts for themselves once they get in. Or they might do clever things like increasing another user’s rights to full admin, or disguising an admin account as an official “support” account for your webhost/software. Look carefully and remove or adjust all accounts. They often create multiple admin accounts if they go through the trouble at all.
    • Copy everything to new server – I’m sorry but just about everyone will tell you it’s irresponsible to continue working off a previously compromised server. There’s no telling how much damage was done and not smart to risk it. You’re safer off copying everything to a fresh install. With that said, this option is quite drastic and may not be absolutely necessary if your site was only vulnerable at the user-level and some backdoor scripts. The sentiment is more for when people had their server breached at the root/admin level.

    Reference links:

    Quick thoughts on server security

    I know most of you will be asking this question here but I really don’t want to write a post-in-a-post, so I’ll leave you with a few quick thoughts.

    • Firewall is best handled at the server level or even DNS level (by 3rd party security service). Using application-level plugins would be resource heavy, slow down legitimate visitors, and not as comprehensive.
    • Malware scanning is theoretically best (most resource-efficient) done at the server level BUT…the problem is that applications are so complicated within their own plugins and extensions that they need their own application-specific malware scanners to be thorough enough for zero-day attacks.
    • The best server-level malware scanner is probably ImunifyAV (free) or Imunify360 (paid). With that said, I don’t use it. So that goes to show how much you really need it. I’m sure it’s great for catching little server oddities and email spam and what not. You can use them if you’d like an easy GUI to do your malware scanning and perhaps auto-scheduling options.
    • The best application-level malware scanner (for WordPress) is Wordfence. It’s got the best signature database, most thorough and protective. Wordfence catches more hacks, malware, and intrusions than any other WordPress security/malware plugin IMO. It would be so awesome if Wordfence could design a server-level plugin to use on WordPress-oriented servers.
    • Maldet is a total waste of time. I can’t tell you the number of times this thing has failed to find the exact hack causing all the problems. At best, it finds some old hacks in your email files and that’s it. It’s terrible for zero-day attacks or real-world use IMO.
    • When it comes to firewall plugins, you need SMART [ADAPTIVE] firewall plugins. With a “dumb” [manual] firewall, it doesn’t adapt to attacks and no settings are applied unless you manually apply them yourself. Smart firewalls can read logs and ban IP’s on the fly based on their behavior.
    • Most security plugins (both server and application) out there are junk. Just plugins with fancy marketing and logos that barely do even as much as the free ones.
    • The best way to handle website/server security AND prevent attacks and security mechanisms from slowing down your sites…is to use best practices and other typical checklists security tasks. I’ll do a post on that later. Honestly, you should be learning from real sys-admins showing you their favorite security configs. I don’t even consider myself a senior admin…so if you’re trying to learn from me, you’re already doing it wrong!
    • Here’s another cool way to deal with security vulnerabilities…by scanning for vulnerabilities during the development process. (Cool service: RIPSTECH) The only issue is that it’s probably very expensive and the only developers who would care to use this are the ones being responsible enough with their coding that they probably won’t need it.
  • Disable WP-Cron and use real CRON JOB

    Use a real cron job instead of the default WordPress WP-Cron (for better performance and reliability).

    • What is WP-Cron, what is it used for, and how to use a Linux server cron job instead.

    I promise this is all very easy to do and totally worth your time. It might also fix other random issues you’ve had on your site.

    ALWAYS use a real cron job instead of WP-cron.

    STEP #1 – disable WP-cron from your wp-config.php file

    • Open up wp-config.php
    • Add define( 'DISABLE_WP_CRON', true); anywhere above the line that says, “That’s all, stop editing! Happy blogging.”

    STEP #2 – create a cron job from your webhosting control panel

    • Log into your webhosting control panel (cPanel, etc) and find the Cron Jobs function.
    • Add this line and set it to 5 min intervals wget -q -O - https://domain.com/wp-cron.php?doing_wp_cron >/dev/null 2>&1 (change the domain to yours)

    NOTES:

    • Some hosts may have limits and force you to use longer intervals (30 mins and up). It’s fine, use the lowest one you can. Even if it’s your own server, I think 5 or 10 mins is frequent enough.
    • If you really need a higher frequency than what your webhost allows, you can either A) get your own server where you have no limits, or B) get a 3rd-party cron service like EasyCron or even Cloudflare workers.
    • Some guides out there use the server directory path (/home/user/public_html/wp-cron.php?doing_wp_cron) instead of the URL. I prefer the domain version as it’s easier to understand and safer (since actual server directory might be different). I think only benefit for server path version is it’s slightly less server work not having DNS lookups and SSL handshake but it’s not noticeable at all.
    • You can use WP Crontrol plugin to manage your cron jobs if you feel they’re backed up or stuck. It’s sometimes an issue for bloated sites. If your cron jobs haven’t run for a while, your site may seem slow or crashed while it catches up. Just wait 5-10 minutes and it should work again.
    • Multi-sites only have to set the cron job for the main site domain. You don’t have to set for each site in there.

    You’re done here. Nothing else to do! If if you want to learn more about how cron jobs work, keep reading…

    What is a cron job?

    A “cron job” is a service built into all Linux servers that runs processes at a scheduled time. (Sometimes called server cron, linux cron, system cron, cron job, “real cron job”.)

    These processes are listed in the crontab file on the server. (Usually located in /var/spool/cron for CentOS/RHEL and /var/spool/cron/crontabs/ for Ubuntu/Debian.)

    For those curious, the crontab file usually looks like:

    0 6 * * * /usr/local/cpanel/scripts/exim_tidydb > /dev/null 2>&1
    30 5 * * * /usr/local/cpanel/scripts/optimize_eximstats > /dev/null 2>&1
    14 21 * * * /usr/local/cpanel/whostmgr/docroot/cgi/cpaddons_report.pl --notify
    32 0 * * * (/usr/local/cpanel/scripts/fix-cpanel-perl; /usr/local/cpanel/scripts/upcp --cron > /dev/null)
    0 2 * * * /usr/local/cpanel/bin/backup
    35 * * * * /usr/bin/test -x /usr/local/cpanel/bin/tail-check && /usr/local/cpanel/bin/tail-check
    5,20,35,50 * * * * /usr/local/cpanel/scripts/eximstats_spam_check 2>&1
    /usr/local/cpanel/scripts/update_mailman_cache &&  /usr/local/cpanel/scripts/update_db_cache
    25 */2 * * * /usr/local/cpanel/bin/mysqluserstore >/dev/null 2>&1
    15 */2 * * * /usr/local/cpanel/bin/dbindex >/dev/null 2>&1
    15 */6 * * * /usr/local/cpanel/scripts/autorepair recoverymgmt >/dev/null 2>&1
    */5 * * * * /usr/local/cpanel/scripts/dcpumon-wrapper >/dev/null 2>&1
    12,27,42,57 * * * * /usr/local/cpanel/whostmgr/bin/dnsqueue > /dev/null 2>&1
    22 22 * * 7 /usr/local/cpanel/scripts/send_api_notifications > /dev/null 2>&1

    I know all that looks scary right now but don’t worry! They’re just typical server scheduled server commands that tell it to do maintenance checks and tasks. For example:

    • Running daily backups.
    • Sending out notifications.
    • Deleting mailbox trash that’s older than 30 days.
    • Restarting failed services.

    Basically all automated tasks are run by the server cron. It simply checks all the time and runs tasks when they’re scheduled. Most of the tasks you see in there are automatically entered by your server. But you can also add your own (sometimes required for certain plugin functions).

    How to read a cron command:

    15 */2 * * * /usr/local/cpanel/bin/dbindex >/dev/null 2>&1

    • 15 */2 * * * is the interval part. I would guess this means 15 mins on the hour of every other hour. (e.g. 2:15, 4:15, 6:15)
    • /usr/local/cpanel/bin/dbindex is the command. Basically if you had to type this command manually in CLI everyday, you can now simply make it a cron job and you wouldn’t have to do it anymore. It will run exactly as you type.
    • >/dev/null 2>&1 tells the system to discard any errors or outputs, instead of sending them to an error log or emailing you. Useful since this is only an automated task and nobody is actually at the computer to read it anyway.

    And what is WP-Cron?

    WP-Cron is PHP function built into WordPress that simulates the server cron service.

    It doesn’t actually check the server crontab file every second and run its scheduled tasks. It has its own internal “cron handler” file (not actually a file but stored in database) and only checks it when someone loads up the website. Basically, it’s a fake or pseudo cron service. Or as some developers like to say…”not a real cron job”.

    Some scheduled “automated” functions you might find in a typical WordPress site:

    • Comments automatically emailed to commenters.
    • Backup plugin running every night.
    • Scheduled posts publishing live when it’s time.
    • Widgets updating to show the latest data.

    How do you think your site “automatically” handles these functions? It does it using the WP-Cron function (which is built into WordPress and runs from the wp-cron.php file). And is triggered every time the website is requested.

    This means…every time someone (or a crawler) visits your website…your site runs the wp-cron.php file.

    ….this can be bad for 2 main reasons:

    1. If your site has MANY VISITS (over 2K/day):
      • It slows down the server needlessly checking the WP cron list multiple times every minute.
      • So a high-traffic site with 500 visitors per second would run 500 WP-cron runs every second, not even including typical bot traffic as well!
    2. If your site has NO VISITS (under 100/day):
      • Your scheduled tasks might not run for long periods. For example if no one (no person or even a bot) visits your site, and you don’t log into the wp-admin area…your backup might not run, etc.
      • The scheduled tasks pile up until the moment you visit and then it runs super slow on that visit since it’s busy offloading all the backed up wp-cron tasks.

    In real-world practice, the first issue is more common for me. It’s that high-traffic sites are being slowed down by excessive WP-cron runs. The latter issue of low-traffic sites doesn’t matter much because low-traffic usually means low importance anyway. You should absolutely disable it WP-cron and use your Linux server cron jobs instead if you have more than 100k monthly visitors.

  • What Is a Firewall?

    Every website needs protection. Just like your personal computer, online servers can be targeted for attack. You need a way to keep out hackers or other sources of illegitimate traffic. That’s where firewalls come in.

    What is a firewall, in short? It’s a barrier between a computer and the “outside world”.

    Malicious actors can wreak havoc on your server if you leave your website unprotected and that’s why you should do everything you can to secure your WordPress site. Setting up a firewall should be one of your first orders of business.

    But there are many different types of firewalls and you might not know where to begin.

    “A firewall is the barrier between your computer & the outside world. 🔥 So how do you choose the right one to keep your website safe from hackers? 🦹‍♂️ Read on for recommendations ⤵️

    What Is a Firewall? What Does a Firewall Do?

    Whenever you visit a website, you’re basically connecting to another computer: the web server. But because a server is just a specialized kind of computer, it’s susceptible to the same kind of attacks your own PC is.

    It’s not safe to connect so directly to another device without any kind of protection in between. Once that connection is established, it’s much easier to infect the other party with malware or launch a DDoS attack.

    That’s what a firewall is for. It’s the intermediary between you and any other devices trying to connect to you or, in a web server’s case, between it and the hundreds or thousands of connections it makes with others every day.

    So how exactly does a firewall work?

    Firewalls simply monitor incoming and outgoing traffic on a device, scanning for any signs of malicious activity. Should it detect something suspicious, it will instantly block it from reaching its destination.

    How to Get a Firewall?

    To protect yourself and your website, you need a high-quality firewall that will keep intruders out.

    As far as personal firewalls go, it’s not usually necessary to go out of your way to get one. Windows’ built-in firewall works very well with no configuration at all. And between the application firewall that often comes with your antivirus software, and the packet filter on your router, your computer is usually more than protected.

    Just make sure your firewall is activated, you have a good antivirus installed, and your router is configured properly. The same thing can be said for macOS users.

    But what if you have a website that needs protection?

    It’s a lot different then. There’s not as many built-in tools to protect you, and often it’s up to you to secure your website. For instance, if you’re running WordPress, there’s no firewall or anything to protect your server and security plugins are one of the most common options.

    WordPress developers do their best to keep the code optimized, but when vulnerabilities do arise, you have nothing to prevent intrusions.

    Every site can benefit from a WAF. Online services like Sucuri, Wordfence, Cloudflare can get one set up on your server in minutes.