Honest WordPress plugin reviews. See the best (and worst) plugins for shopping, memberships, forums, forms…and also back-end management like caching, backup, image compression, spam-blocking, tracking, user management, etc.
Google AMP sucks. Creates more problems and doesn’t always solve the one it’s supposed to. My biggest issues with it are breaking your site design/functionality, still not making your site all that fast, and worst of all…it ruins your user experience. Just go install a generic theme if you love AMP so much.
I don’t care about obscure users with slow connections as they probably aren’t my target demographics either.
Here are the AMP promises:
faster site – AMP streamlines the design, stripping out unnecessary elements so your site loads faster.
more traffic – better rankings equals better traffic
better user experience – I’m not sure how this works, unless your site is so terribly designed and coded that using AMP is somehow considered an upgrade?!
REALITY?
easily broken site – one little weird design or coding mistake and your site falls apart
limited compatibility – only works on mostly static blog sites. All other sites aren’t compatible because their fancy effects or features stop working on AMP.
limited SEO/traffic benefit IMO – here’s the funny thing, blog sites typically do well in search engines already. So I’m not sure how putting AMP on your blog helps you beat other blogs. It ultimately comes down to content.
limited speed improvement – yes, it speeds up your site if your site was really bloated in the first place. And if it was that bloated, then you need to speed up the site first so it’s fast for all visitors…not just AMP visitors!
Here’s the thing. AMP was supposedly invented to help websites show content faster and in a more streamlined way…thereby improving rankings, on-site performance, and overall user experience.
But IMO, I think it’s just another way for them to own and parse your content, and enhance the GOOGLE experience. They don’t care about you and the benefit isn’t much. AMP cannot save a crappily coded/designed site. And for sites that already designed and coded well, not only do you not need AMP but you’ll feel like it’s detracting from your overall branding and user experience.
My personal opinion? Yes and no. Most of them suck. Most of their features suck.
They slow down your site.
They can’t secure/detect everything.
They cost money.
They give a false sense of security (BIGGEST OFFENSE).
(I’ll also cover which features DON’T suck.)
Don’t worry, I’ll explain.
Introduction to WordPress security
To talk about WordPress security, you have to understand what you’re actually securing your site from! Attacks come in various forms and with different motives behind them. And the attacks target different aspects of your site. Without understanding this, you’ll never know how to secure your website. At best, you’ll be a paranoid web-owner installing every random security option without knowing if it has any impact against what you’re trying to secure!
I could make a full-blown WordPress security guide later, but not today!
Common WordPress attacks (and how they work)
Brute-force
Bot trying rapidly trying different passwords on your login page (usually WP-admin).
They are a problem even if they can’t get in since their constant effort still overwhelms your server with requests and slow down your website.
They can also hammer your XML-RPC protocol on WordPress.
Code injection
Using vulnerability in your website software (usually theme/plugins) or server software (operating system, modules) somewhere to inject code into your site.
This code can cause unwanted site behavior, typical malware like ads or redirect links to other sites, display prank-style messages.
The code is also used to open backdoors and access information in your website and database, stealing sensitive content and passwords. Once they have your passwords, they’ll also try it on other sites…like your email, PayPal, and eBay accounts. (Backdoors are basically files that allow the hacker back into your site even if you correct the original vulnerability.)
The code can also change existing data, such as redirect your links to theirs or changing your PayPal address to their account instead.
The way these code injections usually get in is from vulnerable code in themes or plugins. This is why it’s important to choose your themes and plugins carefully and to always keep them updated.
DDOS (distributed denial-of-service)
Using multiple servers to bring your server down by flooding it with massive requests. They don’t steal any info, they just want to make your site go down.
Commonly used against government, religious sites, or business competitors. Also used for targeting individuals/organizations for other personal reasons.
So there you go! So simple, right? Most website attacks generally boil down to those 3 basic categories. And basically, all the attacks are either to 1) gain entry into your site/server, 2) steal sensitive information, 3) alter the site for their own benefit.
The problem with WordPress security plugins
1. They slow down your site.
This should be public enemy #1. Why?! Because many security attacks are very much a performance issue. Look at the TSA lines at the airports. Super long wait times and they almost never ever catch anyone, right?! That’s what you’re doing to your website. Making it slow as heck for the 99.99% of legitimate users that are never going to hack your site. This is terrible UI by design.
The other problem with a security method that slows down your site is that you’re potentially helping some hackers to attack you better. If their main goal is to overwhelm you with requests and you use a plugin that makes your website slower, and requiring more processing time, well guess…now it’s even easier for them to overwhelm your server with DDOS attack!
Hear me out for a second. Maybe you think because a plugin can detect 98% of the hacks out there, that means it’s 98% effective…well I say “NO!” Here’s why…most people get hacked because of vulnerable themes and plugins. Security plugins CANNOT secure an insecure plugin. Pretend I kept building new room additions to my house but they had insecure windows and doors…well, I could have a security guard walking around the house but it doesn’t mean those windows and doors are now suddenly locked. So yeah…security plugins can’t prevent most attacks!
The hackers will STILL get into your site. Ok fine, but you have a security guard who will get all the junk files out, right? WRONG! Because they can’t detect all the bad guy. So they’ll clean up maybe 98% of them, but the ones still left will KEEP LETTING THEIR FRIENDS BACK IN!
Ok, fine. So how do we completely clean out a site once it’s been hacked? If you want my honest opinion of having personally cleaned hundreds of sites over the years…you have to do it manually. That’s the only way. If you use any automated tool or security service out there…they catch only a chunk of it but still leave some behind. And then it’s up to you to pray that the small chunk left behind isn’t enough to allow the hacker back in. Sure, some services out there guarantee a 100% clean-up and will go in and manually repair your site. It’s a great deal if they actually honor it but how much money have you lost by now?
Just FYI…here’s a common timeline of how sites get hacked.
Theme or plugin has a vulnerability.
Hackers (or their bots) scanning websites eventually find yours and exploits it, creating a hole.
The site is now vulnerable but the hacker doesn’t get to it until a month later. The hacker’s probably busy with hundreds of vulnerable sites around the world; it’ll be a while before he gets to yours.
2 months hacker finally gets in and starts all kinds of crazy things. Messing with the site and information.
You wake up the next morning and realize something is wrong. You start to fix the damage, usually either by trying a free plugin-scan or asking your “web guy” who will also probably try a free plugin-scan. The problem is your web guy also probably don’t know how he got in. And the access logs that show his traces are already deleted since the system doesn’t save logs past a certain number of hours/days.
From here you take blind guesses. You’ll update plugins, restore from backups. Then you’ll run a security plugin and try scanning to remove all the hack files. The scans complete.
From here you basically pray nothing happens.
A week goes by and then BOOM, you’re hacked again. All the bad files are back and it’s like nothing was ever cleaned. You’re scared as heck. You’ve done everything right and now realize you have no idea how he’s getting in.
Yes, perhaps the vulnerable theme/plugin was patched but he probably left some backdoors in your site to allow himself back in. Your plugins can’t detect them because they’re written to be somewhat unique and not like the common hack scripts out there in the wild.
You get desperate, contact a security expert or ask your security plugin to honor their guarantee. The person does a half-assed job mostly, running a typical scan and looking at only the most common folders and files. The mere $100-200 that you paid them doesn’t cover the hours it takes for them to actually scan every little corner of your site.
You get hacked AGAIN. A 3rd time and again, all the hacks are back! And this time, your security person has the sense to look at the logs and know exactly where the hack is coming from. By now, you’ve been hacked 3 times and lost a time of sleep. Also have pissed off visitors and customers, probably lost a good chunk of revenue as well.
3. Security plugins cost money.
Why does this suck? Well…it’s because it means most of them will be designed and marketing in a way that increases revenue rather than increasing security. Lots of fear-based marketing that prey on ignorant users. And lots of bloated features to justify their cost. The worst part of all is that naive users will stay naive and never learn what it takes to secure their site. They’ll continue to focus on all the wrong things further increasing their trust in all the wrong security measures that don’t actually improve security.
4. Useless feature bloat
This is especially annoying since plugins will try to out-do each other for marketing purposes by loading every possible feature. Even features that are only marginally related to security and really don’t even need to be part of a plugin. Sure, it’s convenient for users but at the same time also confusing and can distract them from the most important security functions.
Common security features (and why they fail)
Let’s go over some common security methods and how they fail against the most common hacks!
Firewall blocking malicious traffic – they can only block known malicious traffic. Will they be able to block NEW malicious traffic? Probably not if your server is among the first ones to get hit. But sure, the plugin will probably catch it 3-6 months later when the hack is already outdated and “caught”. By then, the hacker’s already got a new script out.
IP blacklist – do you really think any hacker worth his salt would waste his efforts without using a proxy from a “trusted” IP?
Malware signature defense – all malware scans are designed to detect PAST malware signatures, not new ones. If a new one is similar enough to an old one, it may be detected. If it’s not, then it won’t!
Malware scanner – isn’t this funny? Why the heck does it need to scan if it’s already detecting them? Or the scan is to prevent you from inadvertently putting hack files on your site/server? Again, the malware scanner doesn’t detect everything and not only that but it slows down your server when it runs. How annoying.
Brute force protection – limiting login attempts. This one’s good!
Enforcing strong passwords – this is silly. You don’t need a plugin for this! Just use strong passwords.
Hiding WP-admin login page – this works somewhat in that hackers can’t find your login page to attack it. But it also fails (slowing down your site/server) if the automated bot keeps trying to reach your login page and your 404 page isn’t cached.
Checking WP core files – this is a nice feature; making sure your WordPress core files aren’t compromised. It’s nice but at the same time, believe me…it’s obvious when you’re hacked and the moment you realize one is affected, you’ll already know to immediately replace all WP core files. Everybody who’s been hacked knows immediately to check wp-config.php, index.php, functions.php. I can’t think of any hack that doesn’t prioritize these files first!
Hack reports – it’s nice because you see how many hacks are thwarted and makes you more aware of how often your site is being hit by bots and hackers. But also over-estimates the plugin’s effectiveness since many of these hackers would have been thwarted by WordPress naturally!
Bullshit features – captcha against bots/spammers, logging user actions, forcing SSL, blocking file editing, blocking XML-RPC protocol, removing WordPress site information from the code, changing database prefix. All this junk isn’t specifically-related to WordPress security and doesn’t actually thwart any attacks. They also don’t need a security plugin to implement. They’re a bunch of bloated features to justify the cost of having a security plugin.
Fine, so what’s the best way to secure WordPress?
BACK UP YOUR SITE. So that things can be repaired!
Update your WordPress core, themes, and plugins.
Use only quality themes/plugins. Avoid outdated ones or ones by smaller little-known development teams. Don’t buy themes/plugins illegally or download from unknown sources. Also avoid keeping any unused themes/plugins since they create unnecessary directories for hacks to hide inside and making your job harder when you have to find the hacks.
Use strong passwords. And don’t use the same passwords for your site that you do for email and your PayPal account.
Protect against brute force.
Have some kind of brute force protection on your login page. Block XML-RPC protocol if you don’t use it.
If you’re paranoid, you can install a security plugin that has a malware scanner BUT leave it deactivated. Don’t have it running constantly. And every now and then or when you notice issues with your site, you can run the scanner to see what it finds.
Have a contact for a good server-admin or programmer for when you do get hacked. It will happen eventually and you’ll need someone you can call immediately. Are you really gonna trust your business site to random plugin? It’s much better to trust a live human-being who knows your site and can be made to guarantee their work.
All other common sense applies. Use updated webhost, web-server, PHP, etc.
You can install Cloudflare or Sucuri for extra security at the DNS level. Problem is they only help against DDOS attacks which most of you will never get! DDOS attacks are kind of expensive and usually targeted for very specific purposes.
So does this mean you NEVER use security plugins?
Yeaup, I don’t use ANY security plugins on my site. Again, the reason why these security plugins suck is because:
They can’t secure vulnerable themes/plugins. Most of you getting hacked are due to vulnerable code in your themes and plugins. Your best protection against this is not a security plugin but simply to keep your WordPress core, themes, and plugins updated!
They can’t detect the newest hacks and attacks. Their system is designed against detecting old ones that are already known and probably not circulating anymore. Don’t be fooled by “this scanner detects 5,000,000 known signatures”…it’s bullshit. Almost all of them are not used anymore. Hackers are always coming up with new hacks to exploit new vulnerabilities! So don’t waste your time with scanners slowing down the server and still not detecting the latest attacks. ARGH, I’m so impatient explaining all this!
They slow down your site. How annoying, right? They can’t detect the latest stuff AND they slow down your site? What’s the point anyway?!
NOTE: if you get hacked, you’re welcome to run a security plugin just to help repair/remove the most obvious hacked files but you still need to hire a professional to make sure the site is completely secured!
I’ll get some more helpful examples soon. Honestly, I think security plugins do almost nothing but slow down your site and give you a checklist of basic “security tips”. I see tons of people still getting hacked with security plugins installed and the ones that don’t get hacked are probably because their site wasn’t vulnerable in the first place.
Why shouldn’t I combine CSS styles and JS scripts?
To combine/merge or not. It’s an endless debate over which is better.
Merging CSS/JS looks great on performance test sites like Pingdom and GTmetrix but is it really the best performance for your site?
STOP Merging CSS/JS!
Reason #1 – it slows down your site load!
For me, merging CSS is a superficial improvement that makes your test scores look better since you have fewer requests. These page speed tests were only intended to be used as guidelines. Many of them (if not all) were designed before the new HTTP/2 protocol.
[Brief] history of evolution from HTTP to HTTP/2 protocol
Old HTTP protocol could only load a few requests at a time, queuing the other requests (imagine 1 cashier with many customers in line). So in those days, it was better to have fewer HTTP requests. Tactics like “CSS sprites” and combining CSS/JS was standard practice. With only one cashier, having one giant order was faster than several small orders, each with their own transactional overhead in DNS request times.
HTTP/2 protocol came out allowing parallel requests (imagine multiple cashiers instead of one). With multiple cashiers, requests were served quicker as separate smaller requests rather than combined. HTTP/2 gave such massive performance increases, you would expect almost immediate adoption. Unfortunately, it required HTTPS (TLS/SSL certificates) which weren’t yet standardized (also cost money/skills to implement).
As expected, low-budget webhosting clients weren’t willing to pay for SSL or deal with technical hassles of setup/renewal for them. They also weren’t necessarily if you didn’t have a store. (At the time, no 1-click solution existed for installing TLS/SSL certificates; you had to copy-paste long bits of encrypted text and wonder if you did it right.)
But then the industry changed…Google started requiring all websites to have HTTPS or risk being penalized on their search engine rankings. The only one thing left in the way was affordable TLS/SSL certificates. Luckily for everyone, Let’s Encrypt came out with free TLS/SSL certificates—HOORAY! Webhosts started offering 1-click solutions overnight and HTTPS (alongside with HTTP/2) became the standard.
While the webhosting and web-browser industry made HTTP/2 and HTTPS standard; outdated page speed tests (and many speed-up guides) are still recommended practices like decreasing the number of requests. We are still living in that conflicted aftermath today. For the record: I’m all for decreasing code and even requests; I just don’t see the point of wasting precious server resources to combine code into one lump file that takes longer to process.
People think that because their server sent out fewer requests, it means their server did less work…but that is false thinking. Your server sends out the same amount of code no matter what. If anything, your server may work harder because you merged. Merging CSS also has a few annoying issues…instead of letting your page render immediately, it now has to wait for your entire CSS to load.
Imagine eating at a restaurant with 20 friends. Do you want the food to come out as soon as it’s ready? Or only when everyone’s order is cooked?
For me…most CSS should be loaded as fast as possible and most JS should be as delayed as possible (UNLESS, there is critical JS like being used for slider above the fold).
As for merging JS (scripts)….I think it’s great if your merging mechanism can also defer and throw them to the footer (that’s the only reason why I would merge them). But in general…and especially with well-coded sites, you don’t want it.
Rson #2 – it breaks your site
You’ll end up spending a lot of time troubleshooting sites with broken CSS/JS merges. I see “cache plugin broke my site” on WordPress Facebook groups about 2 dozen times every week.
And even if things do look alright, the site might not be perfect and or might not always get performance benefits. Your contact form might break, or some scroll function, or some ajax function. There’s a myriad of possible conflicts that can happen when you merge JS.
Reason #3 – it adds unnecessary page load
This is one of the funniest aspects of CSS/JS merge. Many people think doing it will decrease their page requests and page load but it often does the exact opposite. Merging CSS/JS combines all your stylesheets into one file and all your javascript into one file. This is a huge problem if you have a busy site with many different kinds of pages.
For example:
Plain pages will load your pagebuilder.
Pages that aren’t related to your store or products will load WooCommerce.
Pages that don’t have any forms loaded will load your forms anyway.
And so forth. Imagine if you had 30-40 plugins, well guess what…now your site loads all the CSS/JS on every single page. How wasteful!
Ok fine…there are some “intelligent” CSS/JS merges that allow separate CSS/JS for every page but now this is overkill. Your server spends more time merging CSS/JS than actually serving pages to users. Feel free to experiment on your own but my general rule is not to merge JS.
Reason #4 – it delays cache prebuild
Last but not least, you don’t want to merge CSS/JS with your cache plugin because it delays the cache prebuild. Imagine a huge site like 1,000 pages. You don’t want cache plugin to rebuild html/CSS/JS for all 1k pages when you update one post. It’s better….let autoptimize or async javascript do the merging. And then your cache plugin only has to build html cache.
There’s a million tactics and it’s kind of an art in itself. Depends on what kind of site, what kind of traffic, and how often you update content.
PS: those test sites are a little bit dated. Giving suggestions that would have worked better for older webhosting technology.
But (rebuttals)…
“Doesn’t combining CSS/JS reduce the code?”
Yes, it’s true! Merging your CSS/JS often reduces code, stripping out empty spaces and unnecessary code. So it would seem like your site would load faster since there’s less code overall to load. Only problem is, that’s not how pages render.
You see, pages render as soon as an entire asset loads.
It’s reasonable to think the combined css would load faster because it’s smaller, but that doesn’t always happen. There’s a good chance your site can start rendering the page with only split1.css (with split2.css & split3.css being used to render lower parts of the page). If that’s the case, you’re better off leaving the files uncombined so the page renders earlier for users. The idea here is to start rendering soon rather than finish rendering sooner. (It’s basically the concept behind “Critical CSS“.)
“But the combined CSS doesn’t have to load if it’s cached!”
That’s a great point, too. If you combine the CSS/JS and then cached it to the user’s browser locally, they wouldn’t have to download it! The only problem is…most visits to your site are going to be 1st-time visits. Even if it was just one person…they could be visiting from their desktop, their laptop, their mobile phone. Maybe a different browser, or maybe their cache cleared. Whatever reason it is, the majority of your traffic will be first-time visits.
Here’s another thing…you can cache uncombined CSS/JS files, too! Put long expiry times on them and it’s pretty much the same thing.
“What about Critical CSS?”
If your site is bloated to the point where you actually have critical CSS vs non-critical CSS, you have a different problem. Clean up your code. If your total CSS is only 40-50kb, that’s fine. Leave it un-merged.
“Are you sure about NOT merging JS?”
The topic of merging JS is a whole can of worms in itself. Let’s start with the pros and cons. Right off the bat…merging JS is always a darn risk because something breaks in your site. Second, we’re now in the age of HTTP2 where loading multiple assets in parallel beats loading one combined asset. Those 2 reasons alone are good enough to avoid it. It’s a safer option with great performance and far less issues to fix.
So what’s the best way to manage JS and when should you merge JS?
I think most JS are not critical to initial page rendering. JS usually has to do more with the page’s function than its design. Note the operative word ‘usually’. Some JS does have to do with the design…such as image sliders, tab content, expandable/collapsible divs, pop-ups, etc.
Ideally, all JS (except for design-related JS placed above-the-fold) is deferred to the end of the page load queue and doesn’t load until the rest of your design loads first. Even better is if you can prevent certain JS from not loading at all unless the user scrolls to it or interacts with it (lazyload/onload-event)…this would be great for things like super bloated Googlemaps iframe laying at the bottom of the site.
Some of the merging mechanisms out there will do all that…combine your JS and defer it. And then you could manually exclude certain critical JS files from being merged and deferred. And also put some on lazyload if you wanted.
“But my site has faster speed scores with CSS/JS combined!”
This is a great reason many people use to justify combining CSS/JS. And in some cases, it’s true—combining CSS/JS might get you a faster FINISHING load time. But here’s the thing…what we want is faster STARTING load time.
Remember that whole trend about optimizing TTFB? It’s all about starting sooner, not finishing sooner. Having a fast response time can be just as important as a fast load time.
We want your pages to render quicker (not necessarily just to download quicker). The sooner your page renders, the faster the perceived load will be for users. This is why JS loading is such a finicky matter. Some items should load first, others should all be deferred so they don’t get in the way of critical JS items!
So decide…are you speed-optimizing your site for page scores or for users? (And FYI, it’s possible to do it for both…that’ll be a whole other guide later.) Aren’t there any exceptions?
As with all things, yes. There are indeed exceptions but they are few and far between and still I wouldn’t recommend you to do it if you wanted a hassle-free caching experience.
Combining CSS/JS from the same theme or plugin makes sense!
If you’ve ever had a theme or pagebuilder plugin offer to combine its own CSS or JS. Yes, please enable that. It makes sense. As all CSS and JS coming from one extension is already compatible/harmonious with itself. Not only that but it can combine them natively without requiring extra server processing or mechanism to manage. It’s like choosing whether to carpool with roommates, or with friends that live all over town.
Combined CSS/JS files sometimes cache better
The key word is “sometimes”. Sometimes the combined file is more likely to hold it’s long expiry time, or hit Cloudflare’s DNS cache better. It depends on different scenarios. It’s always worth a shot if you’re not happy with your situation. The general idea is that the CSS file is cached on the user’s computer and no longer needs to be downloaded on subsequent requests. Only issue left is that even with this, your first load will still be slower as the merged CSS isn’t cached yet. Check your GA stats and if most visitors hit less than 1.5 pages, I probably wouldn’t merge.
Combining CSS/JS is worth it for small files
I especially don’t like when you combine a bunch of large 20kb CSS/JS files to make a giant 1MB file. But if you have a bunch of 0-3kb CSS/JS files, I think it’s ok to combine those. This is logical as small files cost more in DNS lookup time than they do in actual processing time.
Combined CSS/JS files sometimes has less conflicts
This has more to do with conflict resolution than performance. Sometimes, you may have a bunch of CSS or JS files conflicting with each other and breaking the site design or functions. Sometimes combining fixes that. It’s random but I’ve seen it happen.
Combined CSS/JS can speed up small sites when placed in-line
On really small/lightweight sites, the DNS resolution time is longer than the actual load time for the tiny CSS/JS files. In cases like this, it might be a good idea to just combine the CSS/JS code and place it inline with the html.
In this case, you’re speeding up the site not by combining CSS/JS but by reducing the number of HTTP requests. Again, this is only recommend for really lightweight pages! If you’re total CSS and JS is like 10kb or less, you may be a good candidate for this tactic.
10 proper ways to mitigate your slow WP-admin backend.
If you’re frustrated with a slow backend taking forever to click from one page to the next, trust me I hear you. Frontend pages are so much easier to cache but the backend is not.
Does that mean you’re forever cursed with miserable backend load times, and admin functions that take forever?
NO!…ok, maybe…but I’ll help you make the best of your options.
The CAUSE of slow backends
Backends are slow because they’re completely dynamic.
And by “dynamic”, I mean that they have to query the database for every page request. The database is called up and every bit of information is requested from scratch as if its never seen it before. There’s zero caching applied.
It also doesn’t help that the backend sometimes shows more info. What users, what content, what comments, how many sales, etc. It often calculates info that isn’t even being shown. There’s also the heartbeat API running constantly in the background to auto-save your edits.
Databases can also get slower as they grow in size. Just like how finding things in your house becomes harder when you have more things. Databases take longer when you start looking for very complicated data that’s buried or organized in complex and/or inefficient ways.
Knowing this…let’s see how we can optimize these dynamic backend requests to speed up your WP-admin experience.
1. Audit your plugins
Anytime someone comes to me for help with a slow backend, they are immediately “guilty until proven innocent” to me.
Check all your plugins and see which ones are contributing to this god awful slow-ass backend load.
“But how?!”
Like this…
Deactivate some non-essential ones to see if it runs faster. Then deactivate some more. Keep going until you get to the point of having no plugins activated. I’m sure you’ll have an idea which ones it is by now.
You should also check your theme. With all your usual plugins activated, try switch themes to the default theme for a second. Did it help?
Hahaha, I’m kidding…ignore those first 2 steps (don’t wreck your live site) and do it like a pro. Install Query Monitor and then surf some pages from frontend while studying the diagnostic panel at the bottom of your browser. There’s only two things you need to check—Slow Queries, and Queries by Component. Those two alone will tell you which themes, plugins, or queries are causing the biggest delays. You should also take note of the memory use (on your top admin bar) and how many queries each plugin makes.
Once you find out what’s causing it…you ought to replace them!
Slow slider plugin? – get a new slider plugin!
Slow theme? – get another theme!
Some of you are going to have attachment pains letting go of your precious plugins…but I promise you this…whatever bullshit crap-code plugin you have lagging your backend, there’s a good chance a higher quality developer-grade one exists and without any the slow query nightmares.
2. Check for errors
Error.log – find it in your public_html directory and look inside. Do you see lots of errors?
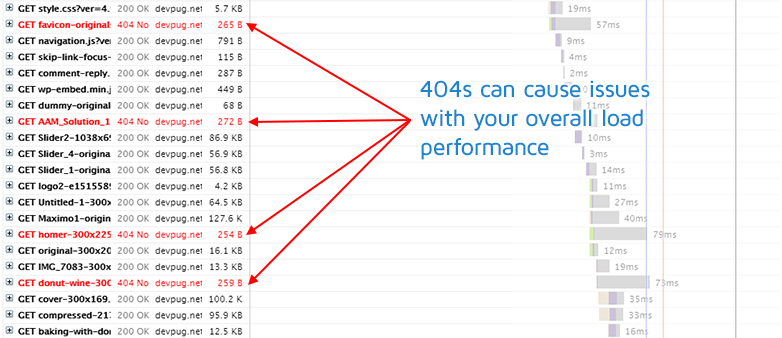
Console errors – open up developer tools and see if there’s any obvious 404 requests.
It’s usually not so much the errors that are causing the problem, but the plugins related to those errors that are.
Of course, you can try increasing your site memory limits. Add the following lines below to your wp-config.php file above the line that says “That’s all, stop editing! Happy blogging.”:
The first one increases memory use for the frontend, the second one increases for the backend. For most well-built sites, you don’t need either. You can even raise the 2nd one to 512mb or even higher but here’s the thing…that limit is still restricted by the server’s global PHP memory limit. If you have your own VPS server, you can set as high as you want. If you’re on a crappy shared host, it’s probably very limited and trying to set it higher won’t do anything.
If it needs to be said, you should get rid of plugins that are eating up so much memory. And please don’t forget to check your autoloads. Quite often, there are many old themes or plugins you don’t have any more that are still eating up your memory! They sit around in the database loading their indexes even when there’s no plugin using them!
4. Upgrade your web-hosting (or web-server)
Did you replace all your bloated plugins?!
NO?!
WHY NO? Because you wanted to save money?
Well today, you get to spend that money you saved on better hosting. Sorry buddy, you have to pay for a quality experience!
Ok, let’s be fair…maybe some of you did replace your plugins. Or you saw that your plugins weren’t the problem!
The answer is the same…the easiest hassle-free way from this point is to get a better webhost or stronger web-server. Keep in mind, I didn’t say go get a MORE EXPENSIVE webhost. No!
Whatever tier of webhosting you’re in (shared hosting, VPS, etc), I guarantee there’s probably another one that’s better and not that far away in price.
But be careful..this simple bailout button doesn’t work like you think. The new server you get can’t just be more expensive or bigger, it actually has to give your site more resources! Just because you’re going with a bigger or stronger server doesn’t mean your site automatically gets access to more CPU and MEMORY. I’ve seen many people upgrade and pay double and still not get better performance.
Hard to say because any specs or stats I give you could be easily lied about through false marketing (just like how you got into your current predicament). The easiest way is to feel if it’s fast or not.
But if you insist, it’s good to know if they have the latest PHP and MySQL. Fast hard drives with good disk I/O rates. And aggressive settings. Also good to have decent PHP memory limits.
5. Decrease heartbeat API interval
This is low-hanging fruit and can get some mild results without much effort. There are some specialized plugins that do this, like Heartbeat Control…but it’s much better if you could use it from your caching plugin (like Swift, Rocket, LiteSpeed).
My recommendations below:
You can (probably) safely disable heartbeat on all pages frontend and backend except for the post editor.
Don’t disable it from the post editor because the Heartbeat is used there to do auto-saves.
If you have many writers logging in and working at the same time, fine you can lengthen the Heartbeat interval for the post editor, but still do not disable it!
I’m sure you’ve heard of buzzwords like “Memcache” and “Redis” before. Redis (being the better and standard one nowadays) is a server module that allows you to cache your database queries. It’s very fast, since it saves that info in memory rather than on the disk (like typical page caching).
There are many caveats and variables to think about…I’ll leave general recommendations below and you can research the rest if curious:
Object caching needs lots of memory. Therefore, it’s usually only allowed with VPS plans and almost never on shared hosting. Even if your shared hosting does allow object caching, it’s probably neutered.
A good object cache expiry time is anywhere from 5-60 minutes. Too short and the cache expires before you get to benefit from it. Too long and your dynamic content is outdated until the object cache expires (but maybe that’s ok with you).
Object caching acts like page caching but with shorter cache “benefit” times. The first few hits are slow, subsequent hits are fast until the cache expires (and needs to be rebuilt).
Object caching helps if you work around in the backend a lot. If you’re only in and out a couple minutes each day, you’re probably faster without object caching.
It case you’re wondering, it’s called object caching because it caches the database queries (aka “database objects”)…which allows you to retain most of your dynamic functionality but benefitting from faster speeds (since some queries are already built and don’t have to be looked up on each click).
7. Caching admin-areas and logged-in users.
Alright, this is flat out desperation mode here. It’s mostly a bad idea but can work in some situations. Here’s when it does and doesn’t help:
HELPS if…
You have many logged-in users.
Your logged in users see mostly static content.
DOESN’T HELP if…
You don’t have many logged-in users.
All of your backend is completely reliant on live dynamic data.
If you really think about it, caching only helps you load repeated content faster. If you don’t have any static backend content or enough users to benefit from it, then caching the admin area isn’t gonna be much use IMO. If anything, it’ll make your site even slower! (Slower because your server resources are now wasted for building and purging cache that isn’t even used.)
HOW to cache the backend?
Enable the following features in your cache plugin:
Cache admin area – should be easy enough.
Cache for logged-in users – you may have to decide which areas are public vs private. Public means all users see the same content. Private means all users see different content (like their “Account” pages).
ESI cache – can play with this hole-punching technology but I warn you that it’s not for DIY people. You need a developer to do this right. If you use LiteSpeed server and caching, the easiest way to use ESI is if your content is deployed via shortcodes or in a widget.
8. Check your security plugin
Do you have Wordfence or Sucuri? Well, you don’t have to get rid of them but do know that they slow down the backend a lot. Since they check every page load for hack executions and what not.
Sure, you might have seen guides telling you to slow down the scanning…but really, it won’t matter much. It’s because of those security plugins logging every page load, and checking for potentially bad code executions.
9. Prevent unnecessary plugin load on backend
Welcome to the “joy” of asset load management. Here, we disable all unnecessary CSS/JS calls from the backend.
I take back what I said about the previous step. There IS a step even more desperate than the previous. I used to try and optimize to this degree but I realized it’s stupid. Your life is more valuable than wasting time doing this. There is no point whatsoever…this is like cleaning the bottom of your shoes the night before you go mud-running the next day.
You should have NEVER had to do this.
You should had a quality theme.
With quality plugins.
On a good web server.
And with your autoloads cleaned up of any cruft left from old themes/plugins.
If you’re here trying to time-travel your life away switching CSS/JS assets on and off…it’s because you were being stubborn about a previous step. I urge you to go back and do everything else. You’ll end up doing so much more work here than you would just replacing your themes/plugins. AND you might inadvertently break your site or affect future operations and forget that you disabled something.
Still want to go forward with this? *Sigh* Ok, you win. Recommendations below:
WP Gonzalez and Plugin Load Filter are also ok as well.
The rest are either 1) too complicated and poor UI to use, or 2) they add their own load which negates the load they’ve removed!
Don’t try to remove every single asset from every plugin. Focus on the major bloated plugins!
The only pro way to remove unnecessary asset loads from plugins:
Fork the plugin and hack it.
10. Resist the dumb ideas
I’ve heard clients scheming up many silly tactics from time to time. They’ll read random words on the internet and think it applies. Happy to dispel them for you below:
Getting better cache plugin – sorry, no. Cache plugins are generally designed for frontend use.
Installing performance plugins – I’ve seen all the dumb booster plugins for WooCommerce, pagebuilders, and what not. At best, they just hog up more memory via autoloads making their intended plugin run faster while the rest of your site slows down.
Increasing memory limits – this only allows your slow site to run instead of erroring out. It doesn’t make your site reduce it’s [wasteful] memory use.
Cloudflare caching your admin – DUMB! NO! *slaps your hand away*
Static site – no, static sites are only for frontend.
Load balancing, or cluster setup – if your site is too bloated to load on one server, adding another proxy isn’t gonna help or redistribute the load in any way. It’s like trying to bake a cake using 2 kitchens instead of one. Load balancing is for high traffic load, not slow code load.
Remote database – lol, no! Your slow database runs even slower now since it’s not in the same server.
Asset organization (step #7 above) – because even if you chop out the assets, you’re still not chopping out the queries. And keep in mind that asset management mostly only helps frontend users as backend users don’t even use those assets to load.
Tuning MySQL configurations – I highly doubt this is your issue.
Some speed optimization really isn’t for non-developers to do. Even if you don’t break your site, you might only improve your slow speed by 10% (if not make it worse). I recommend you hire a developer if you’ve gotten this far.
Welcome to the new era where cloud-caching goes mainstream (vs server-caching).
What is NitroPack? What does it do? And why do people rave about it so much? How does it help speed up sites and improve page scores?
Where should I start first? The good or the bad? Ok…let’s start with the GOOD!
NitroPack features:
1. It really does speed up sites.
The sites feel fast. Most of the time, instant load upon a single click. Then again, it IS a caching plugin/service and this is what caching is supposed to do.
JUNE 1, 2021 UPDATE – I’ve been hearing more complaints about NitroPack not being as fast. I wonder if their service pre-caching is slowing down under the growth of new users, or otherwise not being as sustainable. Just a thought.
2. It gives you better page scores.
Oooooooh! Now it sounds like I’m just teasing but it’s real! Turning on NitroPack is quite possibly the easiest most effortless way to improve your page scores. You don’t need to learn a damn thing about speed optimization. Just enable NitroPack and your “D” grade can become a “B” or even an “A”. Hate all you want, the NitroPack really delivers the nitro!
3. (REALLY) Easy to use.
Listen up, “simple” cache plugins….NitroPack really is the simplest cache plugin out there. Like stupid simple. The plugin settings is one screen with 3 toggle switches and one slider. You don’t have to read online guides on what settings to pick or learn speed optimization. Of course, of course…all the settings are on their website. But still…it feels simpler and that’s all that matters for many people.
4. Tons of features.
Really comes with everything. Caching. Pre-caching. Minification, merging, critical CSS. CDN. Lazy load. Image compression. JS defer. It really does have nearly every single website speed optimization feature and function you could ever ask for. And all conveniently loaded into one service. How handy, right?!
5. Automated optimization service.
NitroPack fills in that special gap of not only giving clients the tools but actually making the best decisions for them. It makes you realize where all caching plugins fall short…that they don’t help if users don’t know how to use them.
NitroPack drawbacks:
1. Ugly FOUC issues.
Every single client of mine using NitroPack has a FOUC issue. Heck even the official NitroPack site has it. LOL. You can see a split second where the styling slides into place. Call me a dinosaur but IMO it looks so unprofessional. But hey… if it doesn’t bother you…then it doesn’t matter!
2. Sometimes not that fast.
It bothers me to no end that even the official NitroPack site is kinda *sticky* load. It’s not that fast. Even after I’ve already visited the pages and pre-warmed its cache, they’re still sticky! The good news is that my client sites do load fast with NitroPack.
Yes…both are on NitroPack. So whatever the case may be…you know it’s not always a guaranteed miracle. I hate that even the fast one still has sporadic FOUC issues. Just remember that the best way to test speed is right in your own browser and see what’s actually loading. Don’t be surprised when a NitroPack site doesn’t load so pretty when analyzed from an actual browser.
3. The price is wayyyyy too expensive.
The price you pay for NitroPack can be even more than your webhosting, especially for the higher plans. And kudos to them, taking advantage in a consumer market that doesn’t know any better. Repackaging overly technical services into a dumbed-down simplified product for end users. It’s great marketing and product execution. But if only people knew…just put that money into your webhosting server and you’ll might get a much better overall loading experience for so much less (depending on your webhost).
NitroPack costs $132/month per site if you have 1 million pageviews/month.
That same $132/month easily get you a VPS server that’ll handle 2-3 million pageviews(if not more) and cover as many websites in there as you want.
But of course…in this random match-up scenario, we have to assume that you have a good webhost or server.
4. I think NitroPack “cheats” the page scores.
For example, when I tested a client site. It wouldn’t show the proper number of requests. My browser network tab was showing 152 requests (5.3mb) but GTmetrix only showed 19 requests (246kb). Congrats. They found a way to cheat the page score…but you can’t cheat the user experience. If all you care about is the number…then stick with it. But if you want to know how many MPG your car actually gets, then be cautious.
UPDATE JAN 16, 2021:
This has since been commented on by Deyan (NitroPack CEO) that it only seems that way because NP moves certain processes off the CPU main thread and some page tests don’t report that.
So while NP doesn’t cheat the scores it certainly optimizes things in a way that cause your site to appear better and loading fewer things on those scores.
In reality, your website is still loading everything. I’ll comment more on this if I come back to check on this further.
UPDATE NOV 26, 2021 – I made a new NitroPack review, briefly describing what changes I’ve noticed.
5. Automated cache configurations can cause issues.
If you have a complex site with complex caching or optimization needs, I think NitroPack may get in your way. Its strength of being super easy to use can also be a con for advanced users. WooCommerce sites or sites with lots of custom/dynamic AJAX stuff may have issues.
I don’t actually know this for a fact, ok? It’s just speculation. If you have a complex site and slow as heck, please try NitroPack for us all and report back here in the comments!
My verdict on NitroPack
I like what NitroPack is doing…but I don’t like NitroPack.
It delivers a fantastic user experience and pushes the limits of what caching can do.
I love that it’s bringing edge-caching to the masses (only they just don’t realize it).
I also enjoy the in-house (automated) JS combine tactics. A centralized cloud service like that could certainly benefit from a known list of JS conflicts similar to how Wordfence benefits from a known list of security exploits.
NitroPack is also a great bandaid fix for sites on slow servers and with limited caching options.
Another side benefit is that it’s an easily-reversible optimization attempt. If it doesn’t work, you only paid for a single monthly fee. It’s not like you bought a super expensive plugin, hired an expensive speed-op developer, or migrated everything to a new server.
My gripe with NitroPack is that it’s stupidly expensive (especially for someone like me who knows what they’re doing) and still doesn’t deliver a professional page load experience. FOUC is just a major no-no in my book. I think of the word “amateur” every time I see it.
The edge-caching revolution continues!
The good news is that edge-caching technology has already advanced so much. It used to be only for simple CDN things like static assets (CSS, JS, images, etc) but has now grown into caching even the full page cache at the edge.
There are so many boundary-crossing cache plugins and cache services that do more or less of the same thing. In time, they’ll all compete with each other to improve performance while decreasing prices.
Cloudflare APO – utilizing their massive CDN presence and long experience in cloud-caching and cloud-processing.
QUIC.cloud (by LiteSpeed) – leveraging their amazing free LiteSpeed cache plugin with their own CDN network. And it’s much cheaper than NitroPack.
Rocket.net – webhosting service that does page-caching at the edge.
All existing cache plugins – you give it some time and I bet many plugins and hosting services will start offering some degree of this (page-caching at the edge).
Who should use NitroPack?
Anyone on a crap server, bloated site, with zero knowledge of speed optimization, care (too much) about page scores, and don’t mind paying the premium.
NitroPack – the quick-fix bandaid solution to all your speed and page score troubles!
For everyone else…trust me, you can get a better experience with normal cache plugins and save a ton of money in the process. Or better yet, put that money towards fixing/rebuilding your site and remove the crap that was slowing you down in the first place. Fix your problems at the root cause!
Honestly…there are only 4 good ones (ShortPixel, WP Compress, LiteSpeed Cache Plugin, and Imagify). The rest are junk to me. Either poor compression quality, lack of features, hard to use, or don’t offer anything unique that these 3 don’t already do.
Let’s go over them!
Current WordPress image compression market
Image compression seems to be a “cheap business” venture for many plugin developers. Simply copy whatever open-source image compression algorithm out there and sell it at a monthly/yearly subscription. It’s all the rage and for as long as you’re helping users, everyone will be happy. The service is easy enough to implement and despite the abundance of image compression plugins out there, the market is still “under-served” (many sites still not optimizing their images).
The only turnoff for me is that many of the compression plugins act like they’re the best when the numbers show me that they aren’t. I’m extremely against gimmicky marketing and roll my eyes when I see another copycat plugin on there. Being that I speed-optimize WordPress sites for hundreds of clients every month, it’s my business to know which image compression truly is the best.
First choice – ShortPixel (PAID, but free for 100/month)
Better compression rates, offers WebP format, offers GLOSSY format (high quality compression for photographers), good pricing. This is my default go-to if you need serious compression. Try their (free) compression test.
Another high-end image plugin that was formerly the first place. High quality and fair pricing.
Some compression settings may be better than ShortPixel. Very easy to use. From the creators of the highly-acclaimed WP Rocket cache plugin.
I’m starting to hate it. Several client sites running slow with it on! 8/24/18
What about the others?
EWWW, WP Smush, Kraken, etc…. they are not as good IMO. You get uglier images with artifacts and/or the image size is not as small. Ugly UI and also difficult to use. Some are also bloated. With that said, some clients actually like them!
EWWW – leaves settings/items in your database when you install.
Are you someone that believes in always minifying HTML, CSS, JS?
There’s a whole website speed cult now that believes everything must be minified…or else you’re an idiot. I didn’t know this could be such a hot topic but it appears some people will argue vehemently with my stance on minification. Some of them are actually developers; the others are just clients parroting those developers.
It’s ok! This guide isn’t for the detractors…it’s for the clients who just want to know what I do and why I do it. (Secretly…I think it’s a stupid post that shouldn’t need to be written but people keep asking me whyyyyyyyyy.)
The BENEFIT of minifying files
Smaller files transfer faster than larger files!
If you don’t know, minification makes website files smaller by removing unnecessary characters like line-breaks, spaces, comments, and other things. It can reduce your HTML, CSS, or JS file sizes by a good 20% without affecting it’s function in any way. It’s known as one of the easiest no-brainer tactics for optimizing your site speed.
And as we all know…smaller files send faster. That’s especially nice if you have visitors on limited bandwidth (like via mobile devices).
So then why don’t I do it?
The COST of minifying files
Minifying files requires server load.
The server has to spend some CPU processing power to minify those files. So now you gotta think…
If files are PRE-minified before being requested, they are sent right away in minified (decreased) file sizes.
If files are NOT minified before being requested, then they have to be minified first before they can be sent out.
That little distinction there can make all the difference. Let’s do some analogies.
Pretend you’re wearing a backpack and need to run 50 feet.
Is it faster to put down the backpack and then run the 50 feet?
Or is it faster to just run the 50 feet with the backpack on?
Now…what if instead of a backpack, you were carrying a fridge?
Or…what if instead of 50 feet, it was 500 feet?
You see what I’m saying? It really depends on the situation. Ideally, there would be no extra weight being carried and all files were already PRE-minified before they are requested.
WHEN to minify
The real world use doesn’t always reflect simple blanket theories. It’s full of variables:
How strong is your server?
How many pages does your site have?
How much traffic do you have?
How often do you update content?
How much HTML/CSS/JS do you have?
What are you minifying? HTML or CSS or JS? Or all?
Is yourserver doing the minification or a CDN?
Don’t you worry, I’ll break it down into tiny OCD bits for you.
How server strength affects minification…
The weaker your server, the less processing load you want to put on it. Use that precious CPU power for something else, like processing dynamic php and making DB queries.
If you really want to minify still:
Let your CDN (like Cloudflare) do all the minification work.
Pre-minify your files ahead of time. (Usually done with a caching mechanism.)
How your number of pages affects minification…
If you have only a few pages (like say 20 or even 50 pages, heck, even 300-500 is manageable)…it shouldn’t be too much problem pre-minifying everything ahead of time.
The problem is when you have say 1-2 thousand pages. Are those are going to be pre-cached and pre-minified? Because if not, that means a good chunk of those pages will be minified only when visited by real users. Users who will now have to wait just an extra fraction of a second for the server to generate those minified files.
How your traffic size affects minification…
We already know the best case scenario is if you pre-minified everything already. But let’s say you have a big site that minifies on the fly. Well, if you have few visitors…it’s gonna suck for them, because it’ll seem like they always get slowed page loads because of waiting for the server to minify.
But…if you have lots of traffic…say thousands of hits per day, only the first visitor to each page will hit a slow page load and the rest of them will benefit from the minified files that the first visitor initiated. From this explanation, you would minification is always recommended on high traffic sites.
Except only…
How your content update intervals affect minification.
Lol, this rabbit hole never ends! If you don’t update content very often and don’t make changes, you theoretically can have the files minified just once and they stay like that forever.
But if you DO update content very often and your cache mechanism keeps clearing the minified files…then that means your server is constantly re-minifying those files and can be under more burden if you have many visitors requesting uncached/un-minified assets.
All this isn’t a big deal if you have a site with few pages, but certainly something to consider when you have tons of pages. Your server barely finishes minifying a portion of the files and then *boom* content update triggers a cache purge and the server has to re-minify from scratch again.
A real-world analogy would be like…pretend you took forever to cut your grass, that by the time you’re barely halfway down, that the part you cut already grew back.
Or pretend you took forever to make your bed that by the time you’re finished, it’s time for bed already.
How the size of your HTML/CSS/JS affects minification…
This is another factor. The thing is if your files are already lean, they won’t benefit much from this extra effort. Like no noticeable gain whatsoever.
But on the other hand, if they’re so huge and bloated…I’m not so sure minifying is a great idea either. Because yeah, you’re saving space but at the same time the user has to wait that much longer for larger files to minify. Weird catch-22, I know.
Typical HTML, CSS, and JS size below:
LEAN sites – usually 50kb for HTML, and 100kb total for CSS and JS.
BLOATED sites – 200-300kb for HTML, and 300kb to 1mb for CSS and JS.
What are you minifying? HTML or CSS or JS? Or all of them?
If it isn’t obvious, I recommend you not minifying anything that isn’t even that big to begin with. If you have a 50kb HTML page…minifying that only saves like 10kb…that’s nothing compared to the 300kb header image.
When it comes to CSS and JS, you focus only on the critical assets. That is…the CSS and JS that are used to render your site. And especially anything that renders objects above-the-fold. All that other junk that loads in the footer…they don’t matter at all because your visitor doesn’t actually perceive their load time.
And if you do render footer CSS/JS, then you’re being silly because you’re slowing down delivery of critical assets for things users don’t perceive.
“But what about those page scores recommending minification?”
Those tools are mostly generic recommendations that don’t apply to every scenario. Go ahead and listen to them if you want. You’ll certainly get a higher score, but the score itself doesn’t guarantee faster load or better SEO or whatever other junk you’ve been told.
HOW to minify
Minification strategies for LEAN sites:
A lean site to me is anything with under 100kb of HTML, and under 100kb of CSS and JS combined.
Use a cache plugin with preload option. And let the cache plugin do the minification.
You could also not even bother with minify as you won’t even notice the difference. There are probably other assets and things loading on your site that could be speed optimized with more noticeable results.
Minification strategies for BIG sites but LOW traffic:
A “big site” is to me a site with over 1000 pages.
Low traffic is anything less than 20,000 hits/month.
If your site is big but lean and you don’t update content often, use cache plugin to minify and preload your cache.
If you do update content often, try not minifying your html and do it only for CSS and JS.
Minification strategies for HIGH TRAFFIC sites:
Feel free to turn it for HTML, CSS, and JS…just know that initial visitors will hit uncached pages and see slower loads.
If you’re updating your content often, maybe you can minify only CSS and JS but not HTML.
If you do update your content often (everyday) and you have many pages, I recommend to use Autoptimize to do your CSS and JS minification. This way those minified CSS and JS won’t be purged every time you update your content.
NOTE: if you’re using Autoptimize to minify CSS and JS, don’t enable the minify options from your cache plugin.
Minification strategies for BLOATED sites:
Use Autoptimize to minify CSS and JS.
For HTML, you can minify if you have very few pages and/or don’t update your content often.
If you have many pages and update content often…I probably wouldn’t minify HTML.
MY tactic for minification:
I never do it from my server or cache plugin.
I only do it from CDN. Most CDN’s all have CSS and JS minification. For the CDN’s that proxy the HTML content (like Cloudflare and QUIC.cloud), you can minify the HTML as well through their servers.
This is great since it saves your servers the trouble.
But CDN does come with some proxy delay…so if you don’t need a CDN (you have local traffic), you might be better off not using one.
What about CSS/JS merging?
I hate merging CSS/JS. Having one combined 300kb CSS/JS (instead of 400kb of uncombined and un-minified CSS/JS) might actually make your site appear to load slower. How?
If your CSS is loaded in parts (separate files), the browser can process each piece immediately after it downloads. Critical CSS used for the actual HTML can therefore load faster.
If your CSS is loaded in one massive chunk, the browser can’t process anything until the entire CSS is downloaded. This delays critical CSS since it has to wait for all CSS to load.
So why is this merging topic a big deal? It’s because many caching mechanisms won’t minify your CSS/JS unless you enable the merge option. And that’s where you have the extra variables to factor in.
Should you use critical CSS? (I mostly hate critical CSS tactics as well.)
The safe answer is not to use critical CSS unless you know what you’re doing.
It’s probably best if you learned CSS and refactor the code yourself. I don’t believe in doing automated critical CSS optimization.
Don’t know which minification strategy to use?
The safest way is not to even mess with it. If your site is bloated as heck, you’ll probably notice much more of a difference optimizing other areas than to waste your time with minification.
Just so you know, minification only speeds up the user’s very first visit. After that visit, the CSS and JS are already browser-cached and won’t even be downloaded again.
Ultimately, you’re just gonna have to test it for yourself. Don’t trust what anyone says. Not even me. Be your own scientist!
From the guy who doesn’t use SEO plugins…comes a list of his supposedly “best” SEO plugins.
Read this for what it’s worth. Just a mixed bunch of passing first hand experiences, along with second hand engagements on client sites.
I am far from an “expert” SEO plugin user. But you guys keep asking for my opinion so here goes!
1. The SEO Framework
I like their features, UI, and overall vibe the best. Just the right amount of features for devs and none of the newbie stuff for people with crap sites and crap themes.
I loved what this plugin used to be…before Syed Balkhi touched it. AIO SEO is now acquired under his umbrella companies and everything he touches loses its soul. I’m sure it’s worth it but no thanks.
Here goes more stuff I don’t use personally, and only deal with occasionally on client sites.
SEOPress – seems like a nice brand. I haven’t tried it much. I did hear some people complaining about it making a mess out of the database and lots of unnecessary entries in there (even for small sites).
Slim SEO – super lean one with a good community vibe. But not many users like the others
RankMath – wildly popular and many people like it. I do like its modular approach, but I feel it’s kinda bloated (high autoloads). Also kind of buggy sometimes or has random issues that break a site.
YOAST – the biggest SEO plugin out there in terms of user base (resulting from their heavy marketing and backroom partnerships). I think it’s a safe bet if you don’t know what you’re doing. But its vibe feels like a dinosaur to me. They were one of the most hated WP brands in the past many years. Their blogs can be helpful for newbies learning about SEO.
Ultimately…what makes a good SEO plugin for me is that it has only the features you need and nothing else.
Newbies need more features and handholding descriptions. It’s easier for them to handle all SEO from one plugin.
Devs need a cleaner/clutter-free SEO plugin that doesn’t conflict with their custom-designed site handling SEO functions in several places (whether in theme or other task-specific plugins).
The best cache plugins to speed up your WordPress sites and where I would use them!
The plugins are listed in order of what I would recommend for most people to try from first to last. In my personal use case, I love LiteSpeed Cache the most for my high-traffic sites (best performance, features, reliability) and then use Swift Performance Lite or WP Performance for smaller sites. Swift Pro and WP Rocket are nice for clients (and bigger sites) who can pay and need something better than a free plugin.
Honestly the best cache plugin out there. Tons of feature, enterprise-grade performance and reliability. (It’s my favorite.)
Only drawback is you need LiteSpeed or OpenLiteSpeed server to use its caching features.
Best for sites with many pages and high traffic. I don’t recommend for sites with little traffic (below 10K hits/month). Small sites are better with WPP or Swift since they can precache.
Simple to use and great documentation. Still good amount of features, and very reliable.
If Swift (FREE) and WP Performance doesn’t work for you and you’re not on LiteSpeed servers, WP Rocket is a solid choice.
WP Rocket is good for all sites.
Only reason why some people don’t like WP Rocket is the cost or lack of granular features. Depending on the user, it’s ease-of-use can be a pro or a con.
My favorite WordPress plugins (and also HIGHLY RECOMMENDED by experienced WordPress developers). All these plugins are clean-coded, super-fast, and best in class. I’ve also included thoughts on others that I don’t like…just so you have some context.
Gutenberg blocks:
GenerateBlocks – my favorite basic one
Qubely – is probably my favorite fancy one.
Stackable – also nice but I’ve heard about bugs and coding issues.
Kioken – looks nice
Content:
WP Show Posts – allows you to show posts anywhere. You can choose filters to decide which posts are shown, and then also options on how they are displayed. Very lean and when combined with other plugins, are great for getting rid of pagebuilder reliance. 🙂
Lightweight Grid Columns – let’s you create columns, however many you want, whichever size you want. So that you can push your page layout around without having to use a pagebuilder! Genius!
Smart Content Filter – great way for users to filters posts on busy pages.
WP Performance – awesome free cache plugin. Solid, reliable, many features, amazing UI, and super unique simple way of granularly excluding/disabling optimizations.
SWIFT Performance – Lite version is best free cache plugin, paid version is the fastest full-featured cache plugin out there.
LiteSpeed Cache – incredible free cache plugin with many features, but only works on LiteSpeed servers. This is actually the best cache plugin if you have thousands of pages or many MANY visits (like millions).
WP Rocket – another fast (premium) cache plugin. easy to use, not recommended for NGINX.
Simple Cache – fastest plugin for my VPS with REDIS object cache enabled. This is recommended if you’ve done all manual optimizations possible.
Metaslider (free/paid) or Smart Slider 3 (free/paid) – are the best. Metaslider is good for super simply minimal sliders. SS can do fancier things like dynamic height or showing different sliders on mobile, also more features (embedding video, changing button images, etc). Soliloquy used to be great/lightweight but has now been surpassed. Whatever you do, avoid Slider Revolution (REV Slider).
WP Featherlight – simple jquery for lightbox. I use this (and ONLY THIS) along with default Gutenberg for building image galleries.
WP Featherlight Disabled – my even more lightweight fork of the original WP Featherlight. (Only loads featherlight CSS/JS on pages you allow.)
Meow Gallery – if you want a full-featured gallery, use this instead of the bloated NextGEN, FooGallery, Envira, etc.
WP Offload Media – beautiful plugin by the respected Delicious Brains. Offloads your media files elsewhere so you can save space on your web server.
Database tools & optimization:
Advanced Database Cleaner – incredible for tidying up your DB. (I like this much better than WP Optimize.)
editor – great for editing your database from WordPress instead of via cPanel/phpmyadmin (BE CAREFUL!)
WP Migrate DB – easiest way to move databases and also do string rewrites. Pro version has more useful dev features.
Better Search Replace – (formerly) my favorite database editor by Delicious Brains. Has a great “test run” feature. I use it to fix URL’s for migration or https purposes. I love that you can specify which tables. But I now do all this with the new Migrate DB.
Backup:
BackWPup – awesome free plugin that does FULL backups and even remote to S3! Yes, FREE! (my favorite)
WPVivid – another awesome FREE full-featured backup plugin. Has extra convenient clone/staging features that BackWPup doesn’t have but can be buggy for larger sites.
UpDraft – very popular, get it for offsite backup feature. I hate the free version but the pro version is nicer, comprehensive.
BackUpWordPress – my favorite free backup plugin for local backups. Works well, clean/quiet interface.
BackupBuddy – other people like it. I think it’s really annoying with many distracting screens.
Forms:
Fluent Forms – now my #1 favorite form plugin for both FREE and PAID. Easier to use in some ways and nicer design and extra features. See my review.
Caldera – my former default. Free and works great. No bloat. I hate that it picks up a lot of spam. But it’s already abandoned now, and the team is focusing on their main commercial offering Ninja Forms.
Contact Form 7 – I hate how it loads on every page.
Migration:
Use these for moving sites or pushing from live to staging environment and vice versa.
All-in-One WP Migration – my favorite, popular and works. Free version has 500MB limit and won’t export/import from remote destinations (S3/Gdrive/etc). TIP: you can circumvent size limit by excluding “wp-content” during export; just manually compress and extract it using cPanel’s “File Manager”.
Duplicator – great for migrating/clone sites but also works for backups. Popular among developers. May feel too technical for newbies.
Migrate Guru – easy to use and free…can move huge sites and handle URL rewrite for you. Only issue is it misses non-WP directories and doesn’t always work. If you’re not a pro and need something that’s ALWAYS 100% reliable, stick to AIO Migration or do things manually.
WordPress SEO Plugins:
SEO Framework – my favorite. Clean and bloat-free. Most simple and doesn’t try to do everything for your site. SEO only!
Yoast SEO – they responded to complaints and improved UI, faster, cleaner, and less bloat. Still annoying nag screens and I still prefer the others.
WordPress Redirection Plugins:
Htaccess – not a plugin but is the most recommended method!
Safe Redirect Manager – the best one! Enterprise grade, high quality code, super fast redirects with the least speed impact.
Redirection – hell no! Drives me crazy that so many people use this. It slows your website down by 1-3 seconds. You’re better off just copying the redirects to your htaccess!
Using SEO redirect function – also a “no” for me.
WordPress Membership Plugins:
MemberPress – best membership plugin out there. I’ve tried many and this one has all the features I needed, easy and fun to use. Also great pricing that doesn’t overcharge you for necessary add-ons. See my review. I’ve also made MemberPress add-on plugins.
WooMemberships/WooSubscriptions – great if you want to integrate with WooCommerce. Overkill if you don’t.
Easy Digital Downloads – great plugin and very friendly (industry standard for selling digital products), but a little pricey. Many basic features are add-ons cost $$$.
MemberMouse – I hate it. Expensive and hard to work with (design & coding), also loads many scripts and slows down your site.
Shopify – works great, looks great. Totally worth the monthly price so you don’t spend thousands developing on WordPress/WooCommerce. Cheapest plan is $9 or $15 if you want to use it with WordPress.
Email:
FluentSMTP – new email plugin that has more features and works well. Another miracle job by WPManageNinja team!
WP Mail SMTP – my favorite email plugin. Works better than my old favorite “Post SMTP Mailer”.
Here are the best Gutenberg block plugins to redesign your WordPress site!
Want to replace your bloated pagebuilder?
Scared you won’t be able to do fancy layouts?
Scared you can’t keep your existing design?
Scared that Gutenberg blocks are too hard to use?
Well, you’re in luck!
There is so much Gutenberg development nowadays and tons of 3rd-party extensions available. It blows me away how fast G-blocks are evolving.
I’ve played with all the best ones and will now share my favorites with you. They are EASY to use (very low learning curve), also in my opinion more flexible than pagebuilders and much more lightweight than pagebuilders.
Intro to Gutenberg blocks
The new WordPress editor builds content in blocks.
Previously, you were mostly typing into a text box and attaching images/embeds for media. And then for other special functionality on the page, you either had to add shortcodes or use a custom page template or hack widgets into your pages.
With Gutenberg, everything is added in blocks. Do you want text? That’s a block. Do you want images? That’s a block. But there are many more possible block options than just text and images. Just about all plugin functionality nowadays can be added via a Gutenberg block.
What about if you wanted fancy layouts? No need to code a custom template, you can build it yourself using “layout blocks” that added multiple-column layouts and other special layouts, into which you would add other content blocks.
Really cool, right?
Distinguishing between SINGLE-PURPOSE BLOCKS and BLOCK LIBRARIES
I use these made-up terms to help categorize the different block plugins out there. Gutenberg block plugins are just like regular WordPress plugins. Some do just one thing. Others do many things.
Ideally, you want to install as few plugins as possible to keep your site as light as possible. It’s probably better to have only one block library plugin per site that can do most of what you need. And then for any other specific design or function, you can install a single-purpose block for that. This keeps the bloats down and also does not clutter your site with so many darn blocks and plugins.
Make sense?
Distinguishing between MINIMAL library vs PRE-STYLED library.
Here go some more made-up terms. Some of the Gutenberg block libraries out there have tons of blocks (for every design and widget function). They look really polished and probably great for someone switching from a pagebuilder and don’t want to start with a plain design. Other G-block libraries look more plain and simple. They’re better for building from scratch when you have your own style or maybe want to code things in yourself.
Which one is better for you? Depends….if you have zero technical ability and want something that looks professional without any effort, start with the pre-styled libraries. They’re almost like full pagebuilders in the amount of pre-designed options available for you. Just plug and play!
But if you know how to code and want to do really customized non-generic layouts, then you’ll prefer a more minimal library that’s more like a blank canvas for you to style things out exactly as you like. Both options can be fast, both can look nice. It’s just a matter of what feels easier or more freedom to you.
Personally, I think the plain ones are better for my use. Cleaner, more lightweight. But really, you should be fine with any…either will be cleaner and leaner than a pagebuilder. If you don’t know what you’re doing…maybe you should start with the pre-styled ones. Heck, you can have multiple block libraries installed and they’ll still be lighter than your pagebuilder.
Newb questions…that I’m tired of hearing.
Do Gutenberg blocks/builders slow down your website?
No! They are so much better than the old pagebuilder way. Gutenbergs are so much more native to WordPress, load faster and use fewer assets to do so.
Which is the best Gutenberg block plugin?
You decide. Try them all and see which one has the blocks and pre-styled designs you use most.
Can you install more than one Gutenberg block plugin without slowing down your site?
Yes. Having 5 Gutenberg block libraries is still faster than one pagebuilder.
For single-use Gutenberg blocks, you can mix and match multiple with no problem.
For Gutenberg block libraries, it’s ideal to have only one block library per page. But even if you used elements of multiple together, you’ll still be ok.
Top 5 MINIMAL Gutenberg block libraries
These are my favorites because all I really need are just container and layout options. I don’t need actual block widgets or block functions since I get them from my plugins already. And for extra styling or design, I can code them myself. These libraries won’t overwhelm your editor with tons of unused block options.
The qualities I look for most in these blocks are spacing and layout options (multi-columns, different layouts with text and images, displaying posts). If there’s extra widget functionality, that can be nice if it saves me from having to install an extra plugin but that’s a slippery slope…for me, most plugins end up having too much rather than too little.
Perfect balance of containers and common layouts for you to put stuff inside. Great for doing business sites, comes with posts grid, pricing, accordion, and other common blocks. There’s also prebuilt templates as well so you don’t start from total scratch. I think this is the perfect Goldilocks option if you want something minimal but don’t want to start from scratch.
In case you didn’t know, the development team behind this are closely related to StudioPress and Genesis theme (my favorite developers theme). It’s no wonder at all that I would like it.
Many useful pagebuilder blocks but unstyled. Has counter, testimonials, layout summary (TOC), tabs and accordions, and many more. Great for recreating all your pagebuilder layouts AND get their little widget icons and functions as well. I think the generic name is horrible…maybe great for SEO but terrible for branding. They should have called it “JoomBlocks”.
Kind of funny background on JoomUnited, they are also Joomla developers (Joomla was the former popular CMS before WordPress took over), and have a solid history of making quality plugins for both WordPress and Joomla. I’ve seen and enjoyed their other work as well.
From the maker of GeneratePress (one of my favorite themes). This is the Gutenberg block library I use the most as it’s super lean and minimal. All it has is CONTAINER, GRID, HEADLINE, and BUTTONS. And all I mostly only use the container and grid blocks. The rest I build by hand. But that’s because I build many custom sites and know how to code things in the way I like.
I think it’ll be too minimal for most people and not conducive to helping newbies create polished layouts. But if you want to do things in the most clean and minimal way…I seriously think you can do nearly everything with only the container and grid blocks alone. Whatever other widget functions can come from your other plugins.
Notes from actual use:
It’s just too minimal for quick use. If you want to stay super lean and style things from scratch, it’s great. But otherwise, you should start with another library if you’re new to Gutenberg.
Button spacing can get real annoying. This is partly to do with default WP core button styling as well.
Has different multi-column layout options. Good if you have many little cards for arranging text and images around each other. It’s not for me but many people doing pagebuilder-style layouts but don’t want the extra-styling might like this.
Appears abandoned and dwindling user base (only 200+ active installs).
Made by the same company behind the Astra theme. It was just ok for me, feels like another me-too plugin from BSF. Has the typical widget blocks. Perhaps might be nice if you already have Astra theme and want to stay in the same eco-system. Otherwise, I highly suggest skipping this one and going straight to the next section.
NOTE: ehhh…I don’t like all the inline styles. I’ll be looking to replace this #5 spot asap.
Top 5 PRE-STYLED Gutenberg block libraries
I think this is where the fun begins for most of you…and honestly, even for me as well. The block libraries listed here are more than just the usual standard container blocks and common widgets. They have many more widget options (sliders, counters, timeline, table of contents, tabs/accordions, pricing tables) and on and on and on. And they also have prebuilt templates for you to import.
If you’re coming from a pagebuilder and loved the pagebuilder experience, you should definitely start with these. They have many options that already look nice and tons of widgets for you to choose from. They’re a lot of fun, look great and surprisingly easy to use. What I care most about the block libraries here is that they stay manageable and don’t overwhelm you with their options.
Oh man, there is gonna be a pagebuilder war starting in the Gutenberg blocks world and Qubely is the first ruler as far as I can see.
This thing looks great! So polished, everything about the plugin is so nice. Feels premium and yet I’m surprised at what you get for free. They also have a PRO plan too which I think is totally worth it if you want the extra features. Do you wanna know I like them?…I put my email in their newsletter! (Which I never ever do!)
When I first wrote this guide, I had Gutentor (the current #3) as being the best pre-styled Gutenberg blocks library but Qubely is easily miles ahead once you compare them side-by-side. Qubely has the right balance of many helpful widgets but not so many that you have 4 tabs worth (like Gutentor).
The prebuilt designs are the most polished of any block library that I see. You can compare both Qubely and Gutentor’s website for yourself and you’ll see that Qubely feels like a better development company and with better design.
My affiliate link for Qubely Pro. (They still have LIFETIME plans now.)
Ouch, this is so painful and straight-up disrespectful to put them at #2. Because everything about them screams first place. The blocks look great. The designs are awesome. They also have PRO plan that unlocks many more sexy designs. Also too, check out their Stackable showcase (really awesome designs at the bottom, just look!).
They got everything you need. Many block options. Many predesign templates to choose from. So why are they not #1? I felt that Qubely gave you slightly more in the free version. Qubely has a few extra widgets (like table-of-contents, timeline, image comparison) which look great and weren’t included in Stackable. The only unique advantages I can think of for Stackable is a much more active Facebook group and they seem to be featured more than Qubely. Gun to the head, I feel Stackable might be a better development team as well.
Ultimately, both of them could be either first or second place. You really can’t go wrong. Everything about them is top class. Try both and see which one you like better. Then go buy their pro plan.
UPDATE – Stackable is officially my #1 pick considering all their recent improvements, and also in combination with Qubely’s announcement that they weren’t making enough money to support Qubely development for the long term.
My affiliate link for Stackable Pro (No lifetime plan available.)
This is basically a full-on pagebuilder but in Gutenberg. If you ever wanted all your pagebuilder layouts and many predesigned templates and hundreds of widget options…this is the one! I feel like it has more widget options than any other Gutenberg block library.
While I don’t like having more Gutenberg block tabs, I do appreciate that they organized their blocks into Elements, Module, Posts, and Widget. (Hmmm…why didn’t they make all those words plural?) In any case, I think some people will feel it’s overkill. Others will love all the options it has. (I also hope they go away from the generic plugin name.)
Absolutely fantastic for replacing complicated pagebuilder layouts. Has dividers, menus, pricing tables, carousels, collages, media layouts. This one is super fun with the shape dividers (put in a CSS class and use image as the background, hehe). Tons of options and still very lightweight. Just FYI, Godaddy didn’t built it…they simply acquired it. Let’s hope it stays amazing.
Notes from actual use:
I really wanted to like this one, but it was a little buggy at times. Some blocks broke and had to be rebuilt.
It has many useful blocks but some blocks don’t have all the options like others. For example their container blocks don’t have so many margin and padding options like GenerateBlocks and KadenceBlocks.
I did really like their accordion, and probably the only thing I would use on some sites.
Brand new to the scene and already I think it’s deserving of the #3 spot. I only list it here at #5 because I want to see how it matures. First off, Kioken aims to be the best pagebuilder replacement and looking at the feature-set, I’d have to say I’m very impressed.
Kioken can do a handful of things that other blocks can’t. Vertical text and animations (I think many newbies are gonna love this). I think they’re following design trends pretty well. The designs look very polished. Here’s a showcase site built with Kioken.
If there’s any cons, it’s that they’re still really new and the site design library doesn’t have many options. Also they don’t have as many block widget options like the other libraries. But it’s still a solid choice and especially if you like their design style. I think their PRO version is worth checking out if you like the free one.
This one is also a lot of fun and very underrated. It has many unique blocks like progress bar, content timeline, even CPT block (wow). Also has a template library so you can import prebuilt layouts. So why isn’t this one ranked higher? It’s not that it isn’t great, it’s that the others have so much more polish. But I can also see certain scenarios where you might prefer this one. It’s got lots of widgets and un-styled (so you can style them yourself).
Plugin was closed on WP repo (may be reinstated soon), but you can still get it from their website.
Block libraries I didn’t like
These are the ones you can skip. I felt they were missing too many key functions and/or didn’t offer enough unique functionality to make them worth the install.
Advanced Gutenberg Blocks (maximebj) – a random collection of blocks that do such specific functions you probably won’t use more than 2 or 3 of them if even that much. I also don’t like that it failed to open sometimes (on my bloated test site). (Closed. No longer available.)
BlockyPage – nothing wrong with it. Feels like a copycat of other G-block plugins except only two minor differences. I don’t like that it takes over the full-width of your editor header area, but do like that it added buttons for desktop, tablet, mobile view. (Appears abandoned.)
Gutenberg Blocks and Template Library (Otter) – meh. The collection of blocks was too specific for my needs and their template library import didn’t work. Maybe the library didn’t work because I had 10 other G-block libraries enabled but still…I wasn’t compelled to diagnose it. I’m also not a fan of how it takes over the top of every page editor. (Getting popular. 100K downloads.)
Kadence Blocks – arghhh, so close. I wanted to like them as a clean DIY block library but it’s missing some essential blocks like the Container block (if not for that alone, it could have replaced GenerateBlocks pretty easily). It’s still worth checking out but I think the others are better and will cover more use cases.
Ultimate Blocks – feels like a collection of widgets, doesn’t have anything for building content layouts. I liked the countdown and “how-to” block but those alone are not enough to justify using it.
A word to the Gutenberg naysayers
I know some people are terrified of losing their way of WordPress and don’t want to switch to Gutenberg. Many of them have argued with me or even tried to show me links of the Gutenberg plugin getting tons of reviews.
My message is “don’t worry”.
Gutenberg is improving so rapidly, I can’t even keep up with it. It has opened the door for so many more ways of creating, designing, and editing content in WordPress sites.
It’s not only the future of WordPress (it’s already the current state of WordPress). Maybe you don’t like how that sounds but actually what it means is that Gutenberg blocks will keep improving and competing with each other to take as much market share as possible. You will have more power, freedom, and flexibility than ever before…AND…your site will be so much leaner than with a pagebuilder.
Total blocking time is caused by long tasks (over 50ms) that block the main thread.
For WordPress sites, total blocking time is usually caused by unoptimized JavaScript and CSS (often from plugins, page builders, or third-party code) as well as fonts, animations, and images.
Optimizing JavaScript is a good place to start which you can use defer, delay, and asset unloading plugins to do. But if you want to improve TBT at the source, take a look at your JavaScript files and learn which elements on your site are causing high total blocking time.
1. Find Elements Causing High Blocking Time
GTmetrix Waterfall – brown bars represent blocking time.
Chrome Dev Tools – the Performance tab in Chrome Dev Tools shows total blocking time.
Third-Party Code – blocking time of third-party code can be directly measured in PageSpeed Insights. Often, this is from Google Fonts, Analytics, Tag Manager, advertisements, and videos.
Long Main-Thread Tasks – Google lists “minimize main-thread work” as one of the biggest factors of total blocking time. Find your worst main-thread contributors in PageSpeed Insights.
What Is A Good Total Blocking Time?
0–300
Fast
300-600
Average
Over 600
Slow
2. Defer JavaScript
Deferring JavaScript improves total blocking time by eliminating render-blocking resources.
WP Rocket and other cache plugins might let you “load JavaScript deferred” but Autoptimize and Async JavaScript do a better job (they fixed all but one render-blocking resource for me).
Install Autoptimize and enable optimize (and aggregate) CSS and JavaScript code.
Next, install the Async JavaScript plugin, head to the settings, and click “apply defer.”
This should disable “minify CSS and JavaScript” in your cache plugin and let Autoptimize handle it. Retest your website for render-blocking resources and ideally, your scores will be improved.
3. Delay JavaScript
Delaying JavaScript can also improve total blocking time.
This is usually done using the Flying Scripts plugin or WP Rocket’s delay JavaScript execution setting. It will delay JavaScript until user interaction which makes your initial load time faster.
If you’re using Flying Scripts or another method, you can copy WP Rocket’s list of scripts that are delayed and use that as a baseline. You may also consider delaying //cdnjs.cloudflare.com and other non-critical JavaScript in your PageSpeed Insights and GTmetrix Waterfall report.
4. Test Combining CSS And JavaScript
Combining CSS and JavaScript can increase or decrease total block time.
Try enabling and disabling this (usually in your cache plugin) and test the results of both. WP Johnny says that smaller websites should usually combine while larger sites usually shouldn’t.
5. Remove Unused JavaScript
Removing unused JavaScript can significantly lower total blocking time.
Choose An Asset Unloading Plugin
Asset CleanUp and Perfmatters are popular plugins for unloading assets. I use Perfmatters on my WordPress site since the UI/UX is much better. However, Asset CleanUp is free and the Pro Version lets you unload custom CSS while Perfmatters (and Asset CleanUp free version) do not.
Enable The Test Mode And Script Manager
If using Asset CleanUp, enable test mode so you can test unloading assets without breaking your site. If using Perfmatters, enable the script manager in the settings. Perfmatters doesn’t have a test mode, so create a staging site or check your site for errors after unloading assets.
Remove Unused JavaScript Where It’s Not Being Used
Edit a page or post and view all scripts (and styles) loading on the page. If a script or style is being loaded when it’s not being used on the page, you can disable it. You can disable it on the current URL, use regex, or disable it everywhere but current URL, pages, or posts. You will need to do this for multiple pages/posts on your site where different assets/plugins are being loaded.
Examples:
Disable unused CSS/JS in Elementor and other page builders.
Disable social sharing plugin everywhere but posts.
Disable slider/lightbox plugins except content where they’re used.
Disable WooCommerce scripts and styles on non-eCommerce content.
6. Minify CSS And Generate Critical CSS
Most cache plugins have an option to minify CSS, minify JavaScript, and use critical CSS (optimize CSS delivery in WP Rocket). All can help improve total blocking time in WordPress.
However, both can result in errors.
Minification errors are easy to fix (find the problematic files in your source code and exclude them from minification).
Optimize CSS delivery errors may require a few extra steps:
Search “rocket-critical-css” in your source code to make sure it’s working.
If it doesn’t appear, regenerate critical CSS in WP Rocket and page builders (if applicable).
Download the combined, purified, and minified CSS.
Paste the CSS code in the “fallback critical CSS” field.
Exclude files from CSS delivery using WP Rocket’s helper plugin.
Disable optimize CSS delivery on individual pages/posts if needed.
If neither of these work, you can try Gijo Varghese’s FlyingPress plugin.
7. Optimize Third-Party Scripts
Reducing impact of third-party code is the first thing Google recommends to improve total blocking time.
Open this report in PageSpeed Insights to see which third-party code is blocking the main thread as well as its blocking time. Third-party code is anything that loads from external websites (Google Analytics, Tag Manager, advertisements, social networks, Hotjar, others).
Once you know which scripts cause high blocking times, optimize them:
Delay JavaScript from third-party scripts.
Host Gravatars locally using WP User Avatar.
Reserve space for ads and delay the JavaScript.
Host Google Fonts and Google Analytics locally.
Use a lightweight social sharing plugin like Grow Social.
Lazy load videos and replace iframes with a preview image.
Host Facebook Pixel locally in WP Rocket’s add-on settings.
Prefetch third-party domains (here’s a list of common domains).
Take a screenshot of a Google Map and link the image to driving directions.
8. Host Fonts Locally And Preload Them
Fonts can increase total blocking time and it’s always faster to host them locally.
Host Fonts Locally – download your fonts directly from the Google Fonts website (while being minimal with families/weights), convert them to WOFF2 format using a tool like Transfonter, and add them to your CSS. Alternatively, you can also use the OMGF plugin to host fonts locally.
Preload Fonts – preloading fonts can be done manually or using WP Rocket and Perfmatters. Google may recommend preloading some fonts in your preload key requests report, or you can find your font files in the GTmetrix Waterfall “Fonts” section. Copy the URLs and preload them.
9. Fix 4xx And 5xx Errors In GTmetrix Waterfall
If you have red errors in your GTmetrix Waterfall chart, it means there’s an error loading the request. As you can see, it adds quite a bit of blocking time and wait time. Fix this immediately!
10. Remove Heavy Plugins And Page Builders
Some page builders add lots of extra CSS and JavaScript to your site.
Elementor and Divi were two of the slowest page builders in speed tests. In Facebook Groups, there is also a large trend of people moving to Gutenberg, Oxygen Builder, and GeneratePress.
If you don’t want to remove your page builder, you can still do the following:
Disable unused Elementor features using Asset CleanUp or Perfmatters (step #5).
Test your speed when adding extra plugins for page builders (Ultimate Addons, etc).
If you’re using additional plugins for page builders, disable modules you’re not using.
Enable Optimized DOM Output and Improved Asset Loading in Elementor settings.
Hard code your header, menu, footer, and blog sidebar so it doesn’t use page builders.
Avoid running heavy page builders on top of cheap, shared hosting with low CPU limits.
11. Test Total Blocking Time Without Animations
Animations can look nice, but they’re definitely not good for speed.
They can increase both total blocking time and cumulative layout shift. Google recommends using the CSS transform property which lets you use animations without causing layout shifts. Otherwise, you may want to try removing animations and retesting your total blocking time.
Compress images – ShortPixel is a solid image optimization plugin. PageSpeed Insights uses an 85% compression level in their tests – so that’s what I recommend setting it at.
Properly size images – avoid huge images and resize them to correct dimensions. For example, my blog width is 680 pixels (with) so I crop my blog images to those dimensions.
Serve images from a CDN – serve images (and other assets) from your CDN URL. Often, this isn’t enabled when setting CDNs and you’ll need a CDN rewrite (e.g. in Perfmatters).
Specify image dimensions – add a width and height attribute to the image’s HTML. Same thing as WP Rocket’s settings for “add missing image dimensions” which does it for you.
Serve important images in WebP format – next-gen format images and faster than JPEG/PNG. I would at least convert your critical images (logo, sidebar images, etc). ShortPixel and WebP Media Converter are top choices for converting images to WebP.
Once you’re ready, run your WordPress site through Lighthouse, PageSpeed Insights, or GTmetrix and check your total blocking time. Hopefully, it’s under 300ms like Google wants.
Frequently Asked Questions
How do I reduce total blocking time in WordPress?
The most effective way to reduce total blocking time in WordPress is to optimize JavaScript files (including third-party code). Defer, delay, minify, and remove unused JavaScript to cut down on your blocking times.
How do I reduce total blocking time using WP Rocket?
To reduce blocking time using WP Rocket, delay non-critical JavaScript, load JavaScript deferred, and make sure optimized CSS delivery is working properly. Minifying CSS, JavaScript, and preloading fonts can also reduce blocking time.
How do I reduce total blocking time on mobile?
Check files with long main-thread blocking times in your mobile speed report and optimize those specifically. Avoid hamburger menus and complex designs on mobile. Remove sliders and heavy plugins from mobile that aren’t absolutely needed. Keep it simple.
How can I improve total blocking time in Elementor?
Elementor adds a lot of CSS and JavaScript which can increase total block times. Try disabling Elementor assets using an asset unloading plugin. Avoid animations if possible and enable optimized DOM output and improved asset loading in your Elementor settings.
Let’s settle this “best cache plugin” thing once and for all.
Your WordPress cache plugin depends on which host you use. On a LiteSpeed server, LiteSpeed Cache is the way to go. On SiteGround, use SG Optimizer. In most other instances, I recommend WP Rocket. Otherwise, if you’re not willing to spend money on WP Rocket, W3 Total Cache or WP Fastest Cache. And I would stay away from NitroPack (blackhat), Swift, and Cloudways Breeze.
In Facebook polls, WP Rocket is usually rated #1 cache plugin. LiteSpeed Cache is usually not since LiteSpeed servers are relatively new and not enough people have moved to a LiteSpeed host like NameHero or A2 Hosting. Give it time and LiteSpeed Cache may overtake WP Rocket.
When I Googled “best WordPress cache plugins” I didn’t agree with any of the other lists. Where are LiteSpeed Cache and SG Optimizer? Why didn’t they mention NitroPack is blackhat?
Hopefully, this list gives you more clarification.
I’m putting LiteSpeed Cache as the #1 cache plugin even over WP Rocket. It uses server-level caching (faster than file-based caching by WP Rocket) and has extensive settings which allow for much better control of speed settings, but does mean it’s slightly more complicated to setup.
The catch is that you need to use a LiteSpeed server to use this plugin. That’s not a bad thing considering LiteSpeed outperforms Apache and is generally one of the fastest types of servers. But that also means you might have to move to a LiteSpeed host like NameHero or A2 Hosting.
QUIC.cloud was also developed specifically to work with LiteSpeed. It’s a free, highly performant CDN I recommend over Cloudflare, StackPath, and RocketCDN (also StackPath). QUIC.cloud is easy to setup with LiteSpeed cache once you request a domain key, activate the CDN, and set it up using a CNAME record.
2. WP Rocket
WP Rocket is the runner-up behind LiteSpeed Cache.
This is mainly because it uses file-based caching (slower than LiteSpeed Cache’s server-level caching). The settings are “easy” but they don’t give you as much control as LiteSpeed Cache since it doesn’t have as many features. I use WP Rocket on my own site only because I’m not using a LiteSpeed server (I’m using Cloudways Vultr HF). Otherwise, I would be using LiteSpeed.
FlyingPress was developed by Giji Varghese from WP Speed Matters.
Gijo has a strong following in his Facebook Group who uses this plugin as well as Gijo’s other speed plugins which are highly rated on WordPress, so people had somewhat high expectations.
During the first release, there were quite a few bugs that Gijo has been sorting out. However, tons of people reported getting even better results than WP Rocket and even LiteSpeed Cache.
The settings aren’t difficult to configure and everything is pretty straightforward: you have a setting for cache, CSS, JavaScript, fonts, images, videos, iframes, CDN, and database cleanup.
SG Optimizer is a great cache plugin, but I don’t recommend SiteGround.
Their TTFB has gotten slower and they’ve become quite the unethical company: banning accounts in countries that don’t make them enough money, becoming admins of Facebook Groups so they can moderate what people say about them, and using their TOS (section 9) to threaten affiliates who write bad reviews about them. The bad form of reputation management.
Before I left SiteGround in 2019, I gave their team tips to improve SG Optimizer which they implemented. They added things like heartbeat control, browser resource hints (prefetch, preload, preconnect), database cleanup, and other features. After the update, it made sense to remove WP Rocket (what most people were previously using) and use SG Optimizer instead.
I would only use W3 Total Cache if you’re looking for a free alternative to WP Rocket and you’re not using LiteSpeed or SiteGround.
However, it’s complicated to setup for the average user. It wasn’t actively maintained until recently which makes you question how much the developer will continue to release updates.
Even with extensive settings, W3 Total Cache lacks features like browser resource hints, database cleanup, heartbeat control, and other things most cache plugins have. So you would need to install a few extra plugins (or add them manually) if you want to get these optimizations.
I would only use W3 Total Cache if you’re looking for a free alternative to WP Rocket and you’re not using LiteSpeed or SiteGround.
However, it’s complicated to setup for the average user. It wasn’t actively maintained until recently which makes you question how much the developer will continue to release updates.
Even with extensive settings, W3 Total Cache lacks features like browser resource hints, database cleanup, heartbeat control, and other things most cache plugins have. So you would need to install a few extra plugins (or add them manually) if you want to get these optimizations.
WP Super Cache is a cache plugin developed by Automattic.
The settings are divided into 2 main sections (simple and advanced) but otherwise, there are not enough settings where I would use this plugin myself. Advanced controls are just not there.
If you currently have WP Super Cache installed and it’s giving you good performance, by all means keep it. But I would lean towards one of the other highly rated cache plugins on the list.
While I use Cloudways for hosting, I’ll admit this is not a great cache plugin. Breeze has a history of breaking websites and causing issues as reported in reviews. Most people (including myself) use WP Rocket on Cloudways. Breeze settings are somewhat minimal and they need to make some major updates if they want to get better reviews and catch up with WP Rocket/LiteSpeed.
Swift Performance is one of the last on the list because of scam reports.
Many of their customers pay for the pro version but when they cancel, they still get billed. There have been numerous complaints of this which still exist as of writing this, and the developer seems to have done little about it. For this reason alone, I don’t recommend Swift.
Swift was once a very popular plugin in Facebook Groups. But after it blew up, it stopped getting recommended just a fast. While it does have lots of settings that look promising, the scam reports + poor support from developers make this plugin belong at the bottom of the list.
NitroPack is last because it cheats PageSpeed scores by moving elements off the main thread which many tests don’t report. While tests might not show it up, other tools like Chrome Dev Tools will. It’s basically hiding things from tests just to fulfill your need of getting “great” scores.
It will likely give you amazing scores in PageSpeed Insights, but it won’t actually make your site much faster. Plus, it can result in FOUC issues and is crazy-expensive. Totally not worth it IMO.
I haven’t tested the plugin myself but have seen numerous complaints about it being blackhat. I think it’s a shame Matthew Woodward wrote a great review and mentioned nothing about this.
Which Cache Plugin Is #1 In Facebook Polls?
WP Rocket has been rated the #1 cache plugin in Facebook polls for some time, but in a recent poll, LiteSpeed Cache was #1. This goes to show that once LiteSpeed servers catch on (and they probably will), it’s possible that LiteSpeed Cache will overtake WP Rocket as the #1 plugin.
Do You Agree?
Obviously, cache plugins and their speed results can vary on each website, but I at least suggest trying a few out and seeing which one works best for you.
This is triggered when the total page size is above 1,600 KiB. To pass this test, you need to reduce page size.
Large page size is often caused by unoptimized images, videos, third-party code, or heavy CSS and JavaScript files. It can also be from slow page builders (specifically Elementor and Divi) which add extra CSS, JavaScript, and div wrappers to every single page on your WordPress site.
PageSpeed Insights shows your largest files which is where you should be focusing your attention. Once you know these, reference the solutions in this guide (which are specific to WordPress sites) and you should be able to pass the avoid enormous network payloads test.
1. Identify The Cause Of Enormous Network Payloads
Use PageSpeed Insights to identify files causing enormous network payloads.
Pay attention to the file type (image, CSS, JS) and where the file is being served from (your domain, CDN, a third-party service).
Just by glimpsing at your report, you will know which files need to be optimized so you can narrow down the solution.
2. Avoid Enormous Images
Huge images can cause enormous network payloads.
These appear in the properly size images recommendation.
This simply means you need to resize images to smaller dimensions. I created a “cheat sheet” with image dimensions for my logo, blog, sidebar, and inner pages. That way, I know the exact dimensions images should be resized to before uploading them. Some image optimization plugins have resizing options, but it’s best to upload them with correct dimensions beforehand.
Adaptive image plugins can serve smaller images to mobile devices and improve mobile speed.
Lighthouse sets the compression level to 85% and flags images that would have a savings of 4KiB or higher.
ShortPixel and TinyPNG are popular options, or you can do this in Photoshop or GIMP. Try setting the compression level to 85% and you shouldn’t have errors for this item anymore.
You can convert images to WebP using ShortPixel, Imagify, and many other image optimization plugins for WordPress. If your plugin doesn’t support it, you can also use WebP Converter For Media. When selecting the conversion method, <picture> tag is usually the preferred method.
However, many speed-related sites like Kinsta and WP Rocket use SVGs for their high quality images (logo, background image, etc). SVGs don’t get flagged in Lighthouse and still produce high quality images similar to WebP. You may need to use an SVG support plugin to avoid errors.
5. Minify CSS + JavaScript
Most cache plugins have settings to minify CSS and JavaScript which removes unnecessary characters from your code (reducing the file size).
If enabling this gives you errors, you’ll need to find the problematic file(s) in your source code and exclude them from minification. Otherwise, make sure you’re minifying CSS and JavaScript.
6. Remove Slow Page Builders
Elementor and Divi add unnecessary CSS and JavaScript.
I was previously using Elementor and hired WP Johnny for his page builder removal services and it made a huge difference. Just by hard coding my header, footer, menu, and sidebar, my entire web vitals score shot up. Then he migrated my Elementor pages to Gutenberg which made an even bigger difference. I was averaging C scores and after doing this, I’m averaging A’s.
In Facebook Groups, there is a large trend of people migrating away from Elementor/Divi. Popular alternatives are Gutenberg, Oxygen, and GeneratePress.
Asset CleanUp and Perfmatters can trim the size of CSS and JavaScript.
They essentially provide you with a script manager to disable CSS/JS on pages where they don’t need to load. So if your contact form loads across your entire site, only load it on the contact page. Plugins for social sharing, sliders, rich snippets, live chat, and others can often be disabled on certain content. Perfmatters vs. Asset CleanUp, but I use Perfmatters since the UI/UX is better. However, Asset CleanUp Pro can disable custom CSS.
As mentioned previously, Elementor and Divi can add lots of CSS and JavaScript to your site. Some files might be able to be disabled such as elementor-sticky, dialog, share-link, swiper, animations, icons, and wp-block-library if you don’t use these features. Elementor also released Optimized Dom Output and Improved Asset Loading which can help reduce network payloads.
8. Optimize Google Fonts
Use the GTmetrix Waterfall chart to see how long your fonts take to load. They can slow especially if you’re loading multiple font families, weights, and they’re not hosted locally.
Be very minimal with font families, weights, icons.
Use browser resource hints (preload, preconnect, prefetch).
Avoid font plugins and serving fonts from any type of plugin.
Add font-display: swap to ensure text remains visible during webfont load.
9. Optimize Third-Party Code
When trying to avoid enormous network payloads, you may notice files are being loaded from a third-party site.
These can flag additional PageSpeed Insights items such as reducing third-party code. Below are common examples of third-party code and common solutions to optimize them. Some items are easy to optimize (hosting fonts and analytics locally) while others (AdSense and GTM) are not.
Google Fonts – host locally instead of serving them from //fonts.gstatic.com. Also take advantage of browser resource hints (preload, preconnect, prefetch).
Google Maps – take a screenshot of the map and link it to driving directions.
Google Analytics – host locally using WP Rocket or Flying Analytics. If using Perfmatters, use a smaller tracking code (minimal, minimal inline, or analytics.js) and disable display features to prevent a second HTTP request to Doubleclick.
Google AdSense – lazy load and delay JavaScript in WP Rocket or Flying Scripts.
Google Tag Manager – delay in WP Rocket or Flying Scripts and clean up tags.
Facebook Pixel – hosting it locally using WP Rocket is the only way I know of.
YouTube – lazy load, replace iframes with preview images, and delay JavaScript.
Social Media – use Grow by Mediavine which was the fastest social sharing plugin in WP Rocket’s test, avoid social media widgets (e.g. Facebook Like boxes).
Gravatars – delay Gravatars and use a local Gravatar image with WP User Avatar (my blog comments show an example of a custom Gravatar image I use).
Each plugin works a little differently. WP Rocket delays JavaScript until user interaction (e.g. mouse scroll, click). Flying Script sets a timeout period in seconds until the JavaScript is loaded.
This won’t help avoid enormous network payloads since you’re just delaying JavaScript (not optimizing it) but it can improve your site’s initial load time and potentially, your web vital scores. This is especially true if you delay AdSense, comments, and heavy third-party code.
Below is the default list of JavaScript WP Rocket delays. If you have other non-critical JavaScript that can be delayed (check your GTmetrix Waterfall report), try delaying that too.
Query Monitor has a “queries by components” tab which shows your slowest loading plugins.
WP Hive is a Chrome Extension that adds a little section when searching the WordPress repository that shows whether a plugin has an impact on memory usage or PageSpeed Insights.
Otherwise, eliminating unnecessary plugins and replacing high CPU plugins with lightweight plugins is an ongoing process that can take time, but can prevent enormous network payloads.
12. Use An Efficient Caching Plugin
WP Rocket and LiteSpeed Cache are the gold standards for cache plugins.
If you’re using a LiteSpeed Server, use LiteSpeed Cache. Otherwise, I would personally use WP Rocket for nearly all other cases (with the exception of SG Optimizer on SiteGround, but I don’t recommend their hosting as they have a slow TTFB).
Which cache plugin you’re using and how you configure the settings has a large impact on your web vital scores. Make sure you test each setting (specifically the file optimization tab in WP Rocket) to see how each setting impacts scores and load times.
13. Avoid Enormous Payloads With WP Rocket
WP Rocket says they can help avoid enormous payloads with:
Browser caching
Minify CSS
Minify JavaScript
Delay JavaScript Execution
Lazy Load for images and iframes
You’ll want to enable these in your WP Rocket settings.
14. Take Advantage Of Server-Side Caching
Most cloud hosts have server-side caching built-in to their dashboards.
Redis, Memcached, and Varnish are all types of caching that can reduce network payloads. I use Cloudways and have Redis enabled which is a popular, efficient caching option. SiteGround has NGINX-based delivery which is available in Site Tools, and Kinsta has its own caching as well.
Server-side caching is faster than file-based caching done by the cache plugin. Take advantage of it.
15. Reduce Number Of Elements On The Page
Reducing the number of elements on your pages will reduce page size and network payloads.
In order to create great User Experience (UX), websites should always load fast. I mean immediately! It’s really tough to achieve instant results. AMP is one of the ways Google is trying to speed up the entire internet. But there’re simply so many steps we need to achieve in order to achieve speed. For every web design projects, loading speed is one of the top priorities for Krome.
We’ve always been crazy about pushing every single byte out of the way so that our sites can be loaded at lightning speed. Cloudflare is probably one of the coolest tools you can use to push up the speed limits.
One of the most annoying speed optimisations is Time to First Byte (TTFB). It’s really hard to reduce such stuffs. So, one of the ways is to use Cloudflare’s Worker.
For some of us, though it might sound good, it doesn’t make much sense until we see a practical example.
To be blunt, most articles on the web written about reducing waiting TTFB are complete garbage and written by content writers who have no technical or speed optimization experience and are simply parroting what everyone else says online.
In this article, we’ll share the troubleshooting steps and recommendations we’ve created after optimizing 100’s of WordPress sites.
What is TTFB?
TTFB stands for time to first byte. To put it simply, this is a measurement of how long the browser has to wait before receiving its first byte of data from the server. The longer it takes to get that data, the longer it takes to display your page. A common misconception is that this is calculated after DNS lookup times, however, the original calculation of waiting TTFB in networking always includes network latency. This involves a 3-step process and delays and latency can occur anywhere in between, adding up to your total TTFB.
Reduce server response time waiting (TTFB)
Another demo from Lighthouse Audit, the Opportunities section of your Lighthouse report reports Time to First Byte, the time that it takes for a user’s browser to receive the first byte of page content:
What Is Server Response Time?
Server response time is a broad measure of how responsive a server is. It represents the period between the user’s request and the first byte that the web browser receives from the server (time to the first byte).
Most blogs and web articles state that TTFB doesn’t really matter, but it does. Lower server response time improves website performance and therefore allows for a better user experience. Lower TTFB is always better.
What Is a Good TTFB?
Server response time highly depends on geography – for a WordPress site, we expect to see a good TTFB sit in the 0.1-0.2 second range for visitors in the country or continent the site is hosted in and 0.2-0.5 seconds internationally.
Google guidelines note that anything in the 200-600 ms range means good TTFB, but honestly, if it’s higher than 500 ms that indicates there’s some work to do.
How To Reduce TTFB or Server Response Time Step by Step Guide
1. Use Fast DNS Hosting
The speed and quality of your DNS hosting have a huge impact on your TTFB. Fast DNS hosting can help you reduce server response times.
We typically recommend Cloudflare as your DNS host. Cloudflare is usually one of the top 3 fastest DNS hosts worldwide, ranked by dnsperf.com.
If you can’t use Cloudflare, our next suggestion is the DigitalOcean DNS hosting. It’s also fast, reliable and has a simple to use interface.
If you’re DIYing a DNS hosting move be mindful that it’s absolutely critical that every single DNS record is copied from the source of the original DNS host and moved across to the new host. Missing even one record can potentially break your IT infrastructure.
2. Use Page Caching in WordPress
You pretty much can’t run a WordPress site without Page Caching. With Page Caching in place, pages are pre-built before the visitor hits the website.
All the PHP processing and database lookups required to generate the HTML file are all done in advance and stored in the page cache. When the visitor hits the website, the server provides the HTML file immediately, so the user experiences a faster site and the load on the server is dramatically reduced.
Typically, it’ll take 1-4 seconds to generate a page from scratch whereas a cached page is available in a few hundred milliseconds (0.2-0.5 seconds). Without some form of page caching the TTFB will roughly match the page generation time so you’ll see the TTFB sit in that 1-4 second range.
WP Rocket is one of the best caching plugins on the market. It includes lots of excellent speed optimization features and is the plugin we use and recommend.
Note that some hosts come with built-in caching features. In some cases, caching features are installed but they’re either not working or are simply not enabled. If you’re using a managed WordPress host then this is worth looking at as a troubleshooting step.
Object caching is another type of caching that will help improve the TTFB of busy sites or database heavy sites too.
3. Use Good Hosting Close to Your Visitors
Ideally you want your hosting as close to the bulk of your visitors as possible. For most small businesses we’ll typically recommend Cloudways or Siteground but there are several other hosts we recommend on our Fastest WordPress Hosting page.
4. Use Edge Caching
Edge caching can reduce most of the impact of geography on site speed and TTFB and if you’re serving a global audience we recommend using it.
With edge aching in place, let’s say you are hosting your site in the US, and someone from Australia visits it. Most of the site will be loaded from the CDN server. Entire pages are cached on the CDN server called edge node.
We typically recommend Cloudflare’s APO service, which is available for $5/month.
Cloudflare’s Argo service can help reduce TTFB even further.
5. Confirm if the High TTFB is only on the Homepage or on All Pages?
Check if the TTFB issues are only present on the homepage or all pages. You can do this by testing the homepage and other pages on the site from different locations a few times. Make sure that you’re testing the correct URL. Sometimes the problem is simply the use of a wrong variation of the URL. It might be missing “www” at the front, or it’s testing HTTP instead of HTTPS and it’s the redirect causing a high TTFB.
If only the homepage is problematic, the issue might be caused by some plugin, or something else running on that page that slows it down.
6. Make Sure You Are Using HTTPS for HTTP2 protocol support
HTTP2 protocol was released in 2015, but some hosts still don’t support it. HTTP2 speeds up the communication between the browser and the hosting server dramatically.
7. Make Sure There Are No Issues in Cloudflare With Your SSL Certificate
If you’re using Cloudflare, and you have an SSL certificate, make sure that the encryption setting is set to FULL under the SSL settings. Having it set to flexible will cause poor TTFB timing.
When you’re in Cloudflare, another thing to make sure is that you’re using A records in the DNS hosting settings instead of CNAME or Alias records. Using a CNAME or ALIAS record will result in the DNS system having to do a second lookup to find the IP address. Sometimes it happens that the DNS hosting is pointing to an old IP address that still works, but is routed to a new IP address. So, it’s a good call to double-check the IP address to ensure it’s correct too.
8. Check the .htaccess File For Stuff That Shouldn’t Be There
Duplicate and excessive code in your htaccess file can absolutely cause a high time to first byte.
Often when someone manually adds speed optimization code to the htaccess file AND then installs a caching plugin (such as WP Rocket) on top of that there will end up being duplicate caching code in htaccess.
This will inevitably cause issues with TTFB and overall site speed.
Also, if your htaccess file includes some weird rules or you have hundreds of thousands of lines in there that can be a problem. In a scenario where you have thousands of redirects, it’s worth looking at moving those into a redirect plugin which will eliminate the impact on TTFB. NOTE that these redirects might work slower if they are in the plugin since they would be processed by PHP and not the htaccess file.
9. Check the Server Load and the Storage Space on the Server
Another factor that might be increasing your TTFB and bringing your site speed down is a lack of storage space on your hosting plan or server. Not having enough space to curate stuff such as log files or caching files will cause things to slow down.
There are some memory issues related to that as well because if your site is using a reasonable amount of RAM and overflowing into virtual memory, lack of free space can break how virtual memory works.
General server load can be an issue too so make sure your hosting has some CPU buffer and isn’t working at 100% load all the time.
10. Disable Jetpack’s Site Accelerator Plugin (Formerly Photon)
Some optimization features, particularly the image optimization plugin called Site Accelerator by Jetpack (former Photon), definitely cause TTFB issues. We urge you to disable it and then run a few speed tests and find out if this was your issue.
There’s better image optimization plugins than Jetpack – we typically recommend ShortPixel and Cloudflare, because the combination of these two should be way faster than Jetpack’s Site Accelerator. This article breaks down how we use Shortpixel.
11. Make Sure That Page Caching Is Actually Working
Sometimes, page caching might not be working because of permission issues on the caching folder. The folder might also contain old corrupt data and garbage that could be causing problems. Deleting the cache folder is an easy way to fix this.
You’ll find the caching folder under /wp-content/cache
Simply delete the /cache folder
**MAKE SURE you DO NOT delete the WP content folder itself.
The /cache folder is auto-created by caching plugins so you should see it reappear almost immediately after deleting it.
12. Run Query Monitor to Identify Any Errors
Query Monitor is a plugin that can help identify errors and other issues such as long database lookups that hurt your TTFB.
Install the plugin and navigate to the homepage while logged in as a WordPress admin and it’ll show red or yellow in the admin toolbar if there are errors happening under the bonnet.
13. Use the Highest Version of PHP the Site Supports
Each new version of PHP is faster than the one before it. Version 8 of PHP has just been released in March of 2021. Most hosts don’t support it yet, but versions 7.4 and 7.3 are available.
Using the highest version of PHP your site supports will help your site speed. If you’re running a really old version like 5.6 this will likely hurt your TTFB.
There’s a plugin called WP Engine that serves as a compatibility checker for PHP server support. You simply install it and run the test. If something fails the test, you manually look up that plugin or theme or whatever it is and see if its developer supports PHP 7. In most cases it does, so it’s worth checking.
14. Make Sure You Don’t Have 404s on the Page
Sometimes, 404 errors can cause TTFB issues downstream especially if the file is referenced high up in the HTML or CSS. Checking and resolving 404 errors *might* in some cases fix a TTFB problem.
15. Disable Javascript and CSS Minification Combining
Content around the web almost always tells you to minify and combine CSS and JS to fix TTFB issues – this is 100% wrong and does absolutely zero for TTFB. On the contrary, combining those tools or minifying them with a plugin can even cause an increase in server response times.
We recommend that if you have CSS minified or combined with JS, try disabling them and run a speed test. In some cases, JS and CSS minification and combining can cause a TTFB problem especially if there is a 404 related to one of those files.
Database Size and Storage Engines
A lot of people online will tell you to optimize your database . If your database is too big, that’s an issue, but realistically speaking, most WordPress databases are not bigger than a few hundred MB. Databases as big as 5, 10, or 20 GB, are considered huge and indeed problematic. But let’s focus on what matters here, and that’s choosing the right storage engine for your database. WordPress uses a MySQL database, and there are two storage engines available: InnoDB and MyISAM.
To illustrate the difference between the two, we should imagine your database as a Google or Excel spreadsheet. MyISAM protocol would only enable editing of one of those sheets or tabs at a time, which means that that tab is locked while being edited. So from the database perspective: users are visiting the site and WordPress is trying to write things to the database. One of these operations has to be put on hold because only one can go on at the time. This means that the table is locked, operations start to queue up, and it all results in things slowing down.
On the other hand, InnoDB doesn’t lock tabs. Locking can only happen on a row-level, so only one person can edit a row on the sheet or table at once. This is rarely a problem since it’s not very common that multiple rows are being edited at the same time.
There are different ways to convert from MyISAM to InnoDB, but we use a plugin from ServeBolt optimizer, which changes the storage engine on all database tables.
16. Check the Server Logs- Apache & PHP
If you are still troubleshooting, then you should probably start looking at the log files and realize what’s happening under the bonnet. Query Monitor should help you solve most of the errors, but still there might be some things happening at the lower level of the hosting and causing issues.
17. Check WP-Config.php for duplicate lines or conflicting directives
One fairly common problem we see similar to the .htaccess problem is duplicate code or conflicting directives in the wp-config.php file.
Here’s a perfect example of a site that had previously used Nitropack and had asked us to switch them to WPRocket & Cloudflare APO. The site had 4 cache directives turning it off and on and off and on which was chewing up CPU cycles on the hosting. The TTFB was sitting in the 1-2 second range. Removing 3 of the lines so the last line from WPRocket was the only line in there solved the issue.
Similar issues can also occur if you duplicate other lines in this file, for example duplicate sets of cache salt keys.
What Doesn’t Work
As we said before, minifying or combining will not bring any improvement to your TTFB or site performance in general. Also, remember not to listen to nonsense tips that tell you to mess with WordPress heartbeat, because that doesn’t do anything. In fact, it can break things. We also noted before that cleaning the database will not do anything either, so just check storage engines instead.
Want It Fixed For You?
We’ve optimized over 100’s of WordPress sites and can help make yours load lightning fast too! If you’re looking for someone to do this for you, complete the form on our homepage and one of the team will review your site and tell you what’s doable in terms of site speed.
WebP is a modern format for serving images faster than ever. If you are using WordPress, you can easily serve all images in WebP with some basic tweaks.
Most Browsers support WebP
According to Caniuse data, WebP is currently supported in 91% browsers include Apple Safari,Google Chrome, Opera, Mozilla Firefox, Microsoft Edge and Android browsers.
You can still serve JPEG/PNG as fallback for unsupported browser.
Major Benefits of using WebP format Image
In comparison to the size of normal JPG or PNG image, same dimension image WebP can serve in small bytes. Hence, Images will load faster.
Serving Quality Images in few bytes, dramatically save bandwidth.
Keep your website updated with latest trend. Don’t loss conversation due to bull-cart slow loading issue.
WebP is recommended by Google Developers. Helps you in passing “serve images in next-gen format” recommendation of Google PageSpeed Insight.
This is how you can serve WebP for a WordPress site.
Use WebP Express Plugin in NGINX
Install & Activate WebP Express, free plugin. A huge thanks to Dev.
Operation mode: Varied image responses.
Scope: Upload only.
Run Bulk Convert
For Apache users, no config requires as .htaccess does all magics.
NGINX server user need to modify configuration file with root access.
For better organization of code, I would recommend placing first inside /etc/nginx/ directory with name webp.conf then include in the main server block.
Enter below command
cd /etc/nginx/ && nano webp.conf
Paste below code using right click inside nano editor in SSH Terminal.
ShortPixel plugin can help in bulk image optimization with WebP conversion and serving as per Browser support. The best part this plugin does processing on their server so it won’t slow down your site.
If you’re Apache web server user you can use .htaccess rewriting. That’s simple.
In case of NGINX you can use below rewriting rule with the help of hosting support
This plugin is supported with WP Rocket cache plugin as well.
First, add this block before the server directive:
location ~* ^(/wp-content/.+)\.(png|jpe?g)$ {
    set $base $1;
    set $webp_uri $base$webp_suffix;
    set $webp_old_uri $base.$2$webp_suffix;
    set $root "<<FULL PATH OF wp-content PARENT>>";
    root $root;
    add_header Vary Accept;
    if ( !-f $root$webp_uri ) {
        add_header X_WebP_SP_Miss $root$webp_uri;
    }
    try_files $webp_uri $webp_old_uri $uri =404;
}
Placement matters. So add it carefully.
Manual method
This section is for information purposes only.
Step 1 : Adding WebP format in HTML Document
First, you need to convert your all images in WebP and along with your previous image format as the fall-back. There is some plugin like Optimus which can do this job automatically. But, I will show an another easy to do this manually.
Now, Your HTML document is ready to serve images in WebP format. Step 2 : Configure server settings Just one more step, you need to configure some Apache Webserver settings via .htacccess so browser and web server can treat it properly like all other images.
Your Web Hosting server may don’t know from which mime type this kind of format images they need to serve. So must add proper mime type. Also, it would be worth to setup expiry header for caching.
# Serve Images with correct Mime Type
AddType image/webp .webp

# Setup Cache
ExpiresActive On
ExpiresByType image/webp A2592000
Kindly note: WordPress by default do not support uploading of WebP format image. You may get the error “This file type is unfortunately not allowed for security reasons” while uploading .webp images.
So, must fix this issue by adding this code in your theme functions.php It would be helpful in case if you will upload your images directly from WordPress Dashboard > Media option.
function webp_upload_mimes( $existing_mimes ) {
	// add webp to the list of mime types
	$existing_mimes['webp'] = 'image/webp';

	// return the array back to the function with our added mime type
	return $existing_mimes;
}
add_filter( 'mime_types', 'webp_upload_mimes' );
Done.
If you need any help, please write to me at prospeedguy@gmail.com. It would be my pleasure to help you.
Further readings If you are curious to learn more about WebP, please refer these links.