Category: CDN

  • Cloudflare settings guide (best performance)

    Configure your Cloudflare account for the best website performance (full explanations provided).

    If you’ve ever wondered what settings to choose or why someone would chance from the default options, this guide will explain it all for you. (QUICK NOTE: all you need is the FREE plan.)

    UICK Cloudflare settings guide

    Leave everything on default and check/change the following settings:

    • DNS – if enabling proxy, do it only for your domain name and WWW record. Can also be for subdomain as well if it leads to a website. Don’t enable proxy for your control panel or anything that points to an external server.
    • SSL/TLS > SSL – set to “Full”.
    • SSL/TLS > Always Use HTTPS – ON.
    • Automatic HTTPS Rewrites – ON, unless you have some things that still need HTTP.
    • Speed > Auto Minify – check all 3 (JS, CSS, HTML).
    • Speed > Brotli – ON.
    • Speed > Rocket Loader – leave it OFF.

    DETAILED Cloudflare settings guide

    Overview:

    • Under Attack Mode – usually off. Only enable if you’re getting hacked with tons of fake/bad traffic.
    • Development Mode – enable if you’re constantly making design/styling changes to your site. It allows you to see the most recent version, otherwise you might see a cached (outdated) version of your site.
    • Domain Registration – use if you registered domains with them.
    • Active Subscriptions – choose which plan you want. The FREE is all I ever use.
    • API (Zone ID & Account ID) – copy this somewhere as you may have to paste it into your plugins later.
    • Pause Cloudflare on Site – I typically don’t use this. If I want to disable Cloudflare, I check off the proxy (to grey cloud) from the DNS page.
    • Remove Site from Cloudflare – self explanatory.

    Analytics:

    How to read this and deciding whether it’s better to have it on vs off.

    • Traffic – see your traffic, bandwidth usage, how many users and their location.
    • Security – see how many times you’ve been hacked, where they come from, which crawlers/bots.
    • Performance – it only shows if you have Argo service enabled.
    • DNS – shows how many DNS queries get made.
    • Workers – shows if you’re using any workers.

    DNS:

    • Shows DNS records – up to you to know what you should have and not have.
    • Enable/disable proxy – click the cloud icon to enable proxy (ORANGE) or disable proxy (GREY). The proxy features are the security and performance features. Basically decides whether all the settings you put on the different pages will take effect or not. REMINDER: disable proxy when generating SSL from your web server or webhosting control panel, then can turn it back on afterwards.
    • TTL – when having proxy off, I recommend a higher TTL so that your DNS info is cached. Or lower TTL when migrating so that your DNS record changes take effect sooner. This is helpful to migrate without downtimes.
    • Custom Nameservers – I never bother with this.
    • DNSSEC – I never use this.
    • CNAME flattening – I never mess with it.

    SSL/TLS:

    • SSL – I use “Full” because it uses SSL but isn’t strict about it. I don’t use the “Full (strict)” setting because I hear it increases your SSL handshake times, slowing down every request.
    • Edge Certificates – you are fine with the free shared options. Totally fine, you get a secure padlock and all that. But if for whatever reason, you don’t want a shared certificate…you can purchase business plan ($20/month) to upload a custom certificate or just pay $5/month and get a dedicated certificate from Cloudflare. If you don’t know what any of this means, you are fine with the free one!
    • Custom Hostnames – I don’t use.
    • Origin Certificates – this sounds like such a giant hassle when your web server probably already has free Let’s Encrypt certificates. I don’t waste any time with this.
    • Always Use HTTPS – put to ON.
    • HTTP Strict Transport Security (HSTS) – I don’t use this. Yes, it theoretically adds better security and speed by enforcing HTTPS on your site but it’s a giant risk if SSL renewal fails for whatever reason (it won’t allow users to visit your without a proper SSL in place). For that reason, I think it’s much much safer off. The busier and more 3rd-party assets you have on your site, the more this might be a risk to use. Then again, it’s not a risk if you know what you’re doing.
    • Authenticated Origin Pulls – forces visitors to go through Cloudflare proxy instead of bypassing it. But requires extra configuration at your web server. I don’t use it.
    • Minimum TLS version – leave this on the lowest setting for maximum compatibility with most browsers. Only raise it if you need your website to be compliant with certain security requirements for specific industries (health, legal, government, etc).
    • Opportunistic Encryption – leave it ON. (It allows TLS for other protocols like HTTP/2.)
    • Onion Routing – leave it ON. Protects privacy of Tor network users.
    • TLS 1.3 – leave it ON for best security/performance.
    • Automatic HTTPS rewrites – leave it ON, unless you have some items that only work on HTTP.
    • Disable Universal SSL – only used if you’re planning to have dedicated or custom SSL certificates.

    Firewall:

    • Overview > Firewall Event – look at the visitors that got blocked (or challenged) by Cloudflare’s security proxy. You can also filter the list to look for certain traffic.
    • Managed Rules – enable web application firewall (requires paid service), see explanations of Cloudflares DOS protection.
    • Firewall Rules – can create custom rules to block, challenge, or allow specific traffic. I never use much as default Cloudflare rules along with my webserver security has worked just fine.
    • Tools > IP Access Rules – allow/block/challenge traffic via IP. This is the place to whitelist your IP if you get challenged a lot from your own site for whatever reason.
    • Tools > Rate Limiting – I don’t use it and I think it costs money. It blocks IP’s based on (defined) usage pattern.
    • Tools > User Agent Blocking – block certain browsers or applications from accessing your site.
    • Tools > Zone Lockdown – limits certain URLs on your site to only the IP’s that you allow. Most commonly used for “admin” or other protected areas of your site.

    Access:

    • Manage access to applications – I don’t use this at all.

    Speed:

    • Image Resizing – paid service. Not necessary when you have image plugins already.
    • Enhanced HTTP/2 Prioritization – enable if you have the paid plan.
    • TCP Turbo – enable if you have the paid plans.
    • Auto Minify – check all (JS/CSS/HTML). I love to do this from Cloudflare (using their servers) rather than from my site plugins (which uses resources from my own web server).
    • Polish – paid service, but I’m not sure if you’ll like their exact image optimization settings.
    • AMP Real URL – for AMP users only. Uses your URL instead of Googles. I think it makes sense to enable, no?
    • Railgun – really cool service that really does speed up your site. But it often breaks site style/functionality. Test carefully or if you want to be safe, just don’t use it.
    • Brotli – leave it ON to benefit from superior Brotli compression.
    • Mirage (BETA) – I don’t have the paid plan but it’s worth a try if you have the paid plan.
    • Rocket Loader – I feel this often breaks sites and isn’t worth risking.
    • Mobile Redirect – use this if you need it. It’s a nice service since these redirects would be faster from a Cloudflare proxy than from a website plugin.
    • Prefetching URLs From HTTP Headers – you should enable it if you have the paid service.

    Caching:

    • Purge Cache – can purge your Cloudflare cache from here, if you didn’t already do it from the Overview page or even from a website plugin. Useful for when you make changes to your site (or assets) but Cloudflare is still caching the old version.
    • Caching Level – I recommend standard since it’s the safest one that can cache assets with or without query strings.
    • Browser Cache Expiration – the default 4-hour setting works fine. But if your site doesn’t change its assets often, picking a longer time (2-8 days) would be better for repeat visitors. I probably wouldn’t go too far above that since any changes might take that much longer to refresh in your user’s browsers.
    • Always Online – leaving it ON sounds good.
    • Development Mode – temporarily disables the proxy so you can see changes in real time. Don’t forget to purge cache after you re-enable since this feature doesn’t do it.
    • Enable Query String Sort – very clever feature that’s extremely beneficial for ecommerce sites caching HTML (via page rule). Allows Cloudflare to cache multiple URLs with same-but-misordered query strings as the same page (since they ARE the same). Great for when you want to cache product-filtering pages so that it doesn’t require exhaustive database lookups on your origin server. Can also be used for other types of pages that alter content depending on the query string.

    Workers:

    • This is so freaken cool but I don’t use this at all right now and it shouldn’t concern you at the moment. It’s pretty much advanced stuff you can toy with later when you got lots and lots of time.

    Page Rules:

    • There are a million guides out there of what (and what not) to put here. If you want to be safe, don’t mess with it. Or play at your own risk.

    Network:

    • HTTP/2 – turn it ON if you have the option to.
    • HTTP/3 with QUIC (BETA) – I signed up for the waitlist and still waiting. Yes, HTTP/3 is all that and a bag of chips. You should get it as soon as you can.
    • IPv6 Compatibility – turn it ON if you can.
    • WebSockets – leave it ON.
    • Psuedo IPv4 – leave it OFF, unless you need it on.
    • IP Geolocation – leave it ON. It allows your server to track country location of visitors coming through Cloudflare’s proxy. Can be useful for content-filtering or security-filtering purposes.
    • Maximum Upload Size – left on 100MB for free plans.
    • Response Buffering – not available for free plans. Speeds up delivery of many small files.
    • True-Client-IP Header – not available for free plan. When enabled, Cloudflare includes yet another header (more convenient for servers) containing the original client IP. Helpful for reporting, content-filtering, or security purposes.

    Traffic:

    • Argo – Cloudflare premium routing service. Speeds up your DNS times. Many people don’t feel it’s worth it for the price you pay. Probably makes more sense for really large companies.
    • Argo Tunnel – used to quickly expose any applications or your network directly to the internet without configuring DNS records or firewall/router.
    • Load Balancing – can use Cloudflare’s paid load balancing service. It seems pretty cheap to me considering the complexity of their infrastructure, but I never tried it.

    Stream:

    • I don’t know about you but I think their pricing is expensive, although could be more convenient than setting up S3 and Cloudfront and all that. If you’re doing a membership site, just stick to Vimeo PRO.

    Custom Pages:

    • Being able to customize all the error pages that are shown to visitors sounds cool, but I don’t need it.

    Apps:

    • Oh, I pretty much salivated at the idea of playing with this page. It’s so cool to see many widely-used applications that can be now be integrated with your site through Cloudflare rather than through a WordPress plugin. Why is this such a big deal? It means those plugins will be processed and loaded through Cloudflare’s servers rather than yours. More speed and less load on your server…HOORAY!

    Scrap Shield:

    • Email Address Obfuscation – hahaha, man they thought of everything! Yes, leave it ON (so bots don’t collect your email off your website).
    • Server-side Excludes – one of those ‘good-to-know’ features that I’ll probably never use. Really cool that Cloudflare can exclude desired content from “bad visitors”. I leave it ON but haven’t bothered to exclude anything.
    • Hotlink Protection – it’s OFF by default and for good reason. Usually, people don’t mind having their web images linked to and shared by other sites. Part of the reason may be because they don’t want their images “stolen” but more likely, they just don’t want their web-server to take extra load. But that really isn’t such a concern when your static assets are now server by Cloudflare’s servers. I know I prefer having my content exposed and freely shared all over!

  • WordPress Plugin and Cloudflare Worker

    WordPress Plugin and Cloudflare Worker

    In order to create great User Experience (UX), websites should always load fast. I mean immediately! It’s really tough to achieve instant results. AMP is one of the ways Google is trying to speed up the entire internet. But there’re simply so many steps we need to achieve in order to achieve speed. For every web design projects, loading speed is one of the top priorities for Krome.

    We’ve always been crazy about pushing every single byte out of the way so that our sites can be loaded at lightning speed. Cloudflare is probably one of the coolest tools you can use to push up the speed limits.

    One of the most annoying speed optimisations is Time to First Byte (TTFB). It’s really hard to reduce such stuffs. So, one of the ways is to use Cloudflare’s Worker. 

    For some of us, though it might sound good, it doesn’t make much sense until we see a practical example.

    Time needed: 15 minutes.

    Here are some simple steps to get it setup fast

    1. Install Cloudflare Page Cache WordPress Plugin
    2. Go to Cloudflare > WorkersClick ‘Launch Editor’

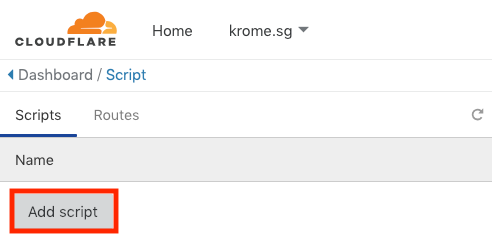
    3. Click ‘Add Script’

    4. Give a name

    (any name)

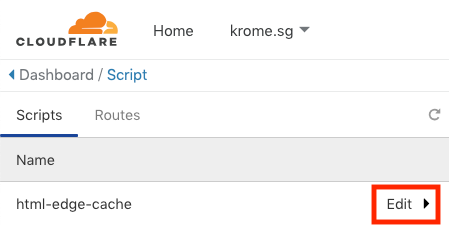
    5. Click ‘Edit’

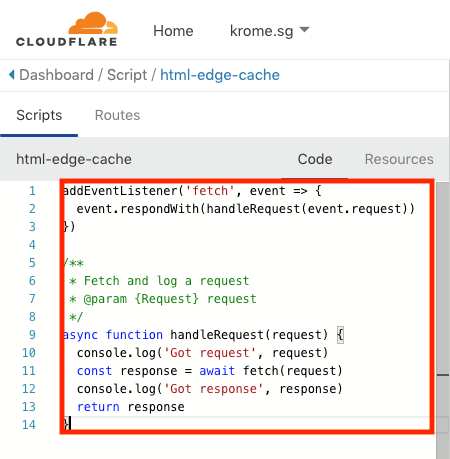
    6. Delete all existing code

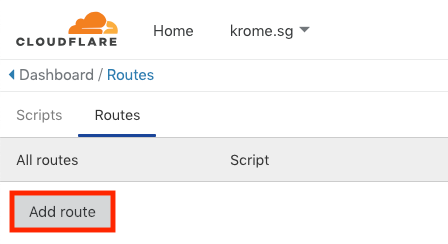
    7. Add ‘Route’

    Copy codes from https://raw.githubusercontent.com/cloudflare/worker-examples/master/examples/edge-cache-html/edge-cache-html.js

    Paste Workers codes

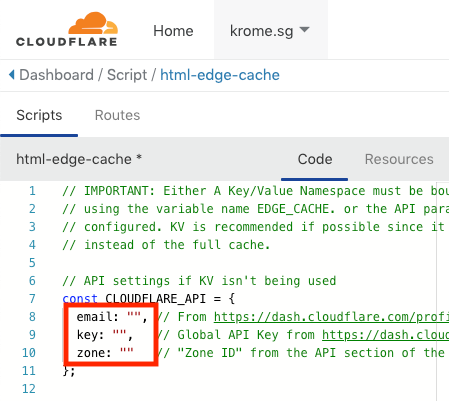
    Edit codes with your Cloudflare credentials

    email: “”, // From https://dash.cloudflare.com/profile
    key: “”,   // Global API Key from https://dash.cloudflare.com/profile
    zone: “”   // “Zone ID” from the API section of the dashboard overview page https://dash.cloudflare.com/

    8. Add ‘Route’

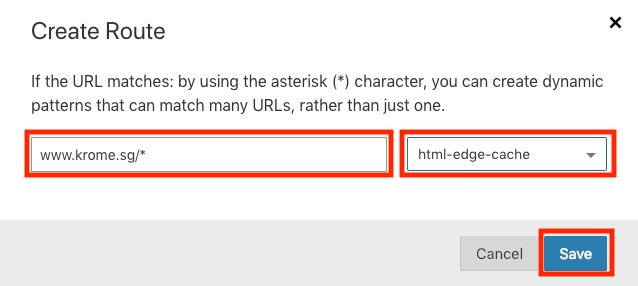
    9. Create Route

    Enter your website URL. I used an * (also known as wildcard) so that it applies to all my webpages.

    Click on the dropdown and select your script

    10. Click ‘Save’

    All Done!

  • How To Reduce Server Response Time Waiting (TTFB)

    How To Reduce Server Response Time Waiting (TTFB)

    To be blunt, most articles on the web written about reducing waiting TTFB are complete garbage and written by content writers who have no technical or speed optimization experience and are simply parroting what everyone else says online.

    In this article, we’ll share the troubleshooting steps and recommendations we’ve created after optimizing 100’s of WordPress sites.

    What is TTFB?

    TTFB stands for time to first byte. To put it simply, this is a measurement of how long the browser has to wait before receiving its first byte of data from the server. The longer it takes to get that data, the longer it takes to display your page. A common misconception is that this is calculated after DNS lookup times, however, the original calculation of waiting TTFB in networking always includes network latency. This involves a 3-step process and delays and latency can occur anywhere in between, adding up to your total TTFB.

    Reduce server response time waiting (TTFB)

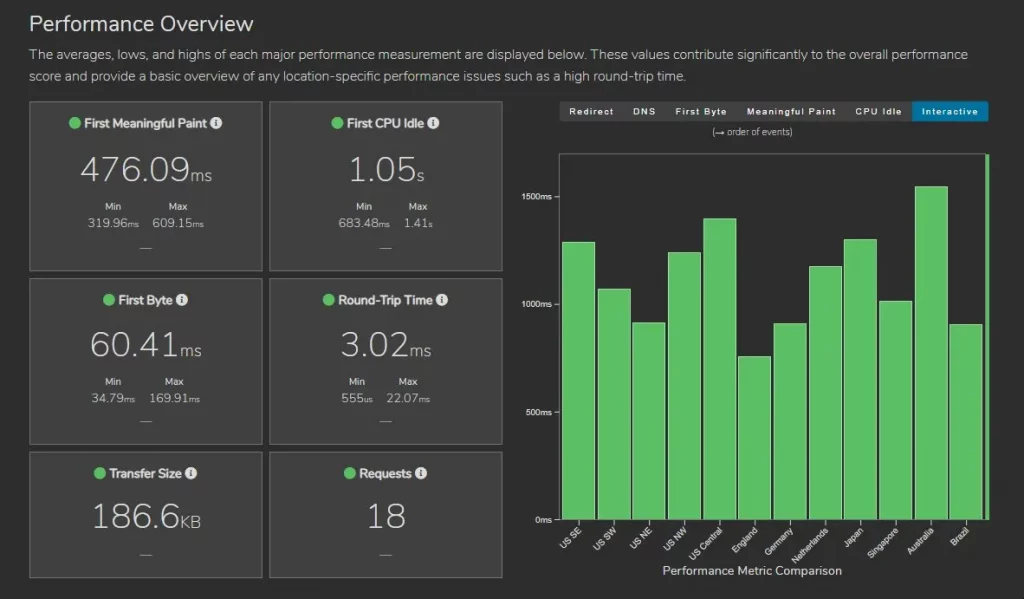
    Another demo from Lighthouse Audit, the Opportunities section of your Lighthouse report reports Time to First Byte, the time that it takes for a user’s browser to receive the first byte of page content:

    What Is Server Response Time?

    Server response time is a broad measure of how responsive a server is. It represents the period between the user’s request and the first byte that the web browser receives from the server (time to the first byte).

    Most blogs and web articles state that TTFB doesn’t really matter, but it does. Lower server response time improves website performance and therefore allows for a better user experience. Lower TTFB is always better.

    What Is a Good TTFB?

    Server response time highly depends on geography – for a WordPress site, we expect to see a good TTFB sit in the 0.1-0.2 second range for visitors in the country or continent the site is hosted in and 0.2-0.5 seconds internationally.

    Google guidelines note that anything in the 200-600 ms range means good TTFB, but honestly, if it’s higher than 500 ms that indicates there’s some work to do.

    How To Reduce TTFB or Server Response Time Step by Step Guide

    1. Use Fast DNS Hosting

    The speed and quality of your DNS hosting have a huge impact on your TTFB. Fast DNS hosting can help you reduce server response times. 

    We typically recommend Cloudflare as your DNS host. Cloudflare is usually one of the top 3 fastest DNS hosts worldwide, ranked by dnsperf.com. 

    If you can’t use Cloudflare, our next suggestion is the DigitalOcean DNS hosting. It’s also fast, reliable and has a simple to use interface.

    If you’re DIYing a DNS hosting move be mindful that it’s absolutely critical that every single DNS record is copied from the source of the original DNS host and moved across to the new host. Missing even one record can potentially break your IT infrastructure.

    2. Use Page Caching in WordPress

    You pretty much can’t run a WordPress site without Page Caching. With Page Caching in place, pages are pre-built before the visitor hits the website.

    All the PHP processing and database lookups required to generate the HTML file are all done in advance and stored in the page cache. When the visitor hits the website, the server provides the HTML file immediately, so the user experiences a faster site and the load on the server is dramatically reduced.

    Typically, it’ll take 1-4 seconds to generate a page from scratch whereas a cached page is available in a few hundred milliseconds (0.2-0.5 seconds). Without some form of page caching the TTFB will roughly match the page generation time so you’ll see the TTFB sit in that 1-4 second range.

    WP Rocket is one of the best caching plugins on the market. It includes lots of excellent speed optimization features and is the plugin we use and recommend.

    Note that some hosts come with built-in caching features. In some cases, caching features are installed but they’re either not working or are simply not enabled. If you’re using a managed WordPress host then this is worth looking at as a troubleshooting step.

    Object caching is another type of caching that will help improve the TTFB of busy sites or database heavy sites too.

    3. Use Good Hosting Close to Your Visitors

    Ideally you want your hosting as close to the bulk of your visitors as possible. For most small businesses we’ll typically recommend Cloudways or Siteground but there are several other hosts we recommend on our Fastest WordPress Hosting page.

    4. Use Edge Caching

    Edge caching can reduce most of the impact of geography on site speed and TTFB and if you’re serving a global audience we recommend using it.

    With edge aching in place, let’s say you are hosting your site in the US, and someone from Australia visits it. Most of the site will be loaded from the CDN server. Entire pages are cached on the CDN server called edge node. 

    We typically recommend Cloudflare’s APO service, which is available for $5/month. 

    Cloudflare’s Argo service can help reduce TTFB even further.

    5. Confirm if the High TTFB is only on the Homepage or on All Pages?

    Check if the TTFB issues are only present on the homepage or all pages. You can do this by testing the homepage and other pages on the site from different locations a few times. Make sure that you’re testing the correct URL. Sometimes the problem is simply the use of a wrong variation of the URL. It might be missing “www” at the front, or it’s testing HTTP instead of HTTPS and it’s the redirect causing a high TTFB.

    If only the homepage is problematic, the issue might be caused by some plugin, or something else running on that page that slows it down. 

    6. Make Sure You Are Using HTTPS for HTTP2 protocol support

    HTTP2 protocol was released in 2015, but some hosts still don’t support it. HTTP2 speeds up the communication between the browser and the hosting server dramatically. 

    7. Make Sure There Are No Issues in Cloudflare With Your SSL Certificate

    If you’re using Cloudflare, and you have an SSL certificate, make sure that the encryption setting is set to FULL under the SSL settings. Having it set to flexible will cause poor TTFB timing.

    When you’re in Cloudflare, another thing to make sure is that you’re using A records in the DNS hosting settings instead of CNAME or Alias records. Using a CNAME or ALIAS record will result in the DNS system having to do a second lookup to find the IP address. Sometimes it happens that the DNS hosting is pointing to an old IP address that still works, but is routed to a new IP address. So, it’s a good call to double-check the IP address to ensure it’s correct too.

    8. Check the .htaccess File For Stuff That Shouldn’t Be There

    Duplicate and excessive code in your htaccess file can absolutely cause a high time to first byte.

    Often when someone manually adds speed optimization code to the htaccess file AND then installs a caching plugin (such as WP Rocket) on top of that there will end up being duplicate caching code in htaccess. 

    This will inevitably cause issues with TTFB and overall site speed.

    Also, if your htaccess file includes some weird rules or you have hundreds of thousands of lines in there that can be a problem. In a scenario where you have thousands of redirects, it’s worth looking at moving those into a redirect plugin which will eliminate the impact on TTFB. NOTE that these redirects might work slower if they are in the plugin since they would be processed by PHP and not the htaccess file.

    9. Check the Server Load and the Storage Space on the Server

    Another factor that might be increasing your TTFB and bringing your site speed down is a lack of storage space on your hosting plan or server. Not having enough space to curate stuff such as log files or caching files will cause things to slow down. 

    There are some memory issues related to that as well because if your site is using a reasonable amount of RAM and overflowing into virtual memory, lack of free space can break how virtual memory works. 

    General server load can be an issue too so make sure your hosting has some CPU buffer and isn’t working at 100% load all the time.

    10. Disable Jetpack’s Site Accelerator Plugin (Formerly Photon)

    Some optimization features, particularly the image optimization plugin called Site Accelerator by Jetpack (former Photon), definitely cause TTFB issues. We urge you to disable it and then run a few speed tests and find out if this was your issue. 

    There’s better image optimization plugins than Jetpack – we typically recommend ShortPixel and Cloudflare, because the combination of these two should be way faster than Jetpack’s Site Accelerator. This article breaks down how we use Shortpixel.

    11. Make Sure That Page Caching Is Actually Working

    Sometimes, page caching might not be working because of permission issues on the caching folder. The folder might also contain old corrupt data and garbage that could be causing problems. Deleting the cache folder is an easy way to fix this. 

    You’ll find the caching folder under /wp-content/cache

    Simply delete the /cache folder 

    **MAKE SURE you DO NOT delete the WP content folder itself.

    The /cache folder is auto-created by caching plugins so you should see it reappear almost immediately after deleting it.

    12. Run Query Monitor to Identify Any Errors

    Query Monitor is a plugin that can help identify errors and other issues such as long database lookups that hurt your TTFB.

    Install the plugin and navigate to the homepage while logged in as a WordPress admin and it’ll show red or yellow in the admin toolbar if there are errors happening under the bonnet.

    13. Use the Highest Version of PHP the Site Supports

    Each new version of PHP is faster than the one before it. Version 8 of PHP has just been released in March of 2021. Most hosts don’t support it yet, but versions 7.4 and 7.3 are available. 

    Using the highest version of PHP your site supports will help your site speed. If you’re running a really old version like 5.6 this will likely hurt your TTFB.

    There’s a plugin called WP Engine that serves as a compatibility checker for PHP server support. You simply install it and run the test. If something fails the test, you manually look up that plugin or theme or whatever it is and see if its developer supports PHP 7. In most cases it does, so it’s worth checking.

    14. Make Sure You Don’t Have 404s on the Page

    Sometimes, 404 errors can cause TTFB issues downstream especially if the file is referenced high up in the HTML or CSS. Checking and resolving 404 errors *might* in some cases fix a TTFB problem.

    15. Disable Javascript and CSS Minification Combining

    Content around the web almost always tells you to minify and combine CSS and JS to fix TTFB issues – this is 100% wrong and does absolutely zero for TTFB. On the contrary, combining those tools or minifying them with a plugin can even cause an increase in server response times. 

    We recommend that if you have CSS minified or combined with JS, try disabling them and run a speed test. In some cases, JS and CSS minification and combining can cause a TTFB problem especially if there is a 404 related to one of those files.

    Database Size and Storage Engines

    A lot of people online will tell you to optimize your database . If your database is too big, that’s an issue, but realistically speaking, most WordPress databases are not bigger than a few hundred MB. Databases as big as 5, 10, or 20 GB, are considered huge and indeed problematic. But let’s focus on what matters here, and that’s choosing the right storage engine for your database. WordPress uses a MySQL database, and there are two storage engines available: InnoDB and MyISAM. 

    To illustrate the difference between the two, we should imagine your database as a Google or Excel spreadsheet. MyISAM protocol would only enable editing of one of those sheets or tabs at a time, which means that that tab is locked while being edited. So from the database perspective: users are visiting the site and WordPress is trying to write things to the database. One of these operations has to be put on hold because only one can go on at the time. This means that the table is locked, operations start to queue up, and it all results in things slowing down. 

    On the other hand, InnoDB doesn’t lock tabs. Locking can only happen on a row-level, so only one person can edit a row on the sheet or table at once. This is rarely a problem since it’s not very common that multiple rows are being edited at the same time.

    There are different ways to convert from MyISAM to InnoDB, but we use a plugin from ServeBolt optimizer, which changes the storage engine on all database tables.

    16. Check the Server Logs- Apache & PHP

    If you are still troubleshooting, then you should probably start looking at the log files and realize what’s happening under the bonnet. Query Monitor should help you solve most of the errors, but still there might be some things happening at the lower level of the hosting and causing issues. 

    17. Check WP-Config.php for duplicate lines or conflicting directives

    One fairly common problem we see similar to the .htaccess problem is duplicate code or conflicting directives in the wp-config.php file.

    Here’s a perfect example of a site that had previously used Nitropack and had asked us to switch them to WPRocket & Cloudflare APO. The site had 4 cache directives turning it off and on and off and on which was chewing up CPU cycles on the hosting. The TTFB was sitting in the 1-2 second range. Removing 3 of the lines so the last line from WPRocket was the only line in there solved the issue.

    Similar issues can also occur if you duplicate other lines in this file, for example duplicate sets of cache salt keys.

    What Doesn’t Work

    As we said before, minifying or combining will not bring any improvement to your TTFB or site performance in general. Also, remember not to listen to nonsense tips that tell you to mess with WordPress heartbeat, because that doesn’t do anything. In fact, it can break things. We also noted before that cleaning the database will not do anything either, so just check storage engines instead.

    Want It Fixed For You?

    We’ve optimized over 100’s of WordPress sites and can help make yours load lightning fast too! If you’re looking for someone to do this for you, complete the form on our homepage and one of the team will review your site and tell you what’s doable in terms of site speed.

  • How to Serve WebP Format Images in WordPress

    How to Serve WebP Format Images in WordPress

    WebP is a modern format for serving images faster than ever. If you are using WordPress, you can easily serve all images in WebP with some basic tweaks.

    Most Browsers support WebP

    • According to Caniuse data, WebP is currently supported in 91% browsers include Apple Safari, Google Chrome, Opera, Mozilla Firefox, Microsoft Edge and Android browsers.
    • You can still serve JPEG/PNG as fallback for unsupported browser.

    Major Benefits of using WebP format Image

    • In comparison to the size of normal JPG or PNG image, same dimension image WebP can serve in small bytes. Hence, Images will load faster.
    • Serving Quality Images in few bytes, dramatically save bandwidth.
    • Keep your website updated with latest trend. Don’t loss conversation due to bull-cart slow loading issue.
    • WebP is recommended by Google Developers. Helps you in passing “serve images in next-gen format” recommendation of Google PageSpeed Insight.

    This is how you can serve WebP for a WordPress site.

    Use WebP Express Plugin in NGINX

    • Install & Activate WebP Express, free plugin. A huge thanks to Dev.
    • Operation mode: Varied image responses.
    • Scope: Upload only.
    • Run Bulk Convert
    • For Apache users, no config requires as .htaccess does all magics.
    • NGINX server user need to modify configuration file with root access.

    For better organization of code, I would recommend placing first inside /etc/nginx/ directory with name webp.conf then include in the main server block.

    Enter below command

    cd /etc/nginx/ && nano webp.conf
    • Paste below code using right click inside nano editor in SSH Terminal.
    # WebP Express rules
    # --------------------
    location ~* ^/?wp-content/.*\.(png|jpe?g)$ {
      add_header Vary Accept;
      expires 365d;
      if ($http_accept !~* "webp"){
        break;
      }
      try_files
        /wp-content/webp-express/webp-images/doc-root/$uri.webp
        $uri.webp
        /wp-content/plugins/webp-express/wod/webp-on-demand.php?xsource=x$request_filename&wp-content=wp-content
        ;
    }
    
    # Route requests for non-existing webps to the converter
    location ~* ^/?wp-content/.*\.(png|jpe?g)\.webp$ {
        try_files
          $uri
          /wp-content/plugins/webp-express/wod/webp-realizer.php?wp-content=wp-content
          ;
    }
    # ------------------- (WebP Express rules ends here)
    
    • Press CTRL+O and Enter key to save.

    Now visit the main server block.

    cd /etc/nginx/sites-available && ls

    Highly recommend: Learn To instal WordPress at NGINX (In simple three steps)

    Edit your configuration file, and put include webp.conf; as shown below.

    # General
    server {
        listen         80;
        server_tokens off;
        return 301 https://$host$request_uri;
    }
    server {
    server_tokens off;
    root /var/www/html;
    index index.php index.html index.htm;
    server_name .abc.com;
    client_max_body_size 0;
    
        listen [::]:443 ssl http2 ipv6only=on;
        listen 443 ssl http2;
            ssl_protocols TLSv1.1 TLSv1.2 TLSv1.3;
            ssl_certificate /etc/comodo/cert.pem;
            ssl_certificate_key /etc/comodo/private.pem;
            ssl_prefer_server_ciphers on;
            ssl_session_cache   shared:SSL:20m;
            ssl_session_timeout 20m;
            ssl_ciphers 'TLS13+AESGCM+AES128:EECDH+AES128';
    
    error_page 404 /404.html;
    error_page 500 502 503 504 /50x.html;
    
    
    # WebP Express rule goes here
    
    include webp.conf;
    
    # WebP Rule end
    
    location / {
        try_files $uri $uri/ /index.php$is_args$args;
    }
    

    Reload or restart the NGINX.

    service nginx reload

    Things to note

    • If you use BunnyCDN, must enable Vary Cache.
    • Cloudflare doesn’t support Vary Cache. Try below alternative approach.

    Use WebP using Cloudflare CDN

    If you’re a Cloudflare Pro user you can simply enable WebP in one-click from Speed Tab.

    Serve WebP using BunnyCDN Optimizer

    BunnyCDN offers Optimizer services which comes with On-the-fly WebP serving solution. It’s one-click solution for $9.5/mo additional cost.

    Serve WebP using JetPack Plugin

    • Simply install and activate JetPack plugin
    • Enable the Site Accelerator.

    You may notice a downgrade in image quality that can be fixed using the below filter.

    add_filter('jetpack_photon_pre_args', 'jetpackme_custom_photon_compression' );
    function jetpackme_custom_photon_compression( $args ) {
        $args['quality'] = 100;
        $args['strip'] = 'all';
        return $args;
    }

    Serve WebP in NGINX using ShortPixel Plugin

    ShortPixel plugin can help in bulk image optimization with WebP conversion and serving as per Browser support. The best part this plugin does processing on their server so it won’t slow down your site.

    • If you’re Apache web server user you can use .htaccess rewriting. That’s simple.
    • In case of NGINX you can use below rewriting rule with the help of hosting support
    • This plugin is supported with WP Rocket cache plugin as well.

    First, add this block before the server directive:

    map $http_accept $webp_suffix {
        default "";
        "~*webp" ".webp";
    }

    Add this block inside the server directive:

    location ~* ^(/wp-content/.+)\.(png|jpe?g)$ {
        set $base $1;
        set $webp_uri $base$webp_suffix;
        set $webp_old_uri $base.$2$webp_suffix;
        set $root "<<FULL PATH OF wp-content PARENT>>";
        root $root;
        add_header Vary Accept;
        if ( !-f $root$webp_uri ) {
            add_header X_WebP_SP_Miss $root$webp_uri;
        }
        try_files $webp_uri $webp_old_uri $uri =404;
    }

    Placement matters. So add it carefully.


    Manual method

    This section is for information purposes only.

    Step 1 : Adding WebP format in HTML Document

    First, you need to convert your all images in WebP and along with your previous image format as the fall-back. There is  some plugin like Optimus which can do this job automatically. But, I will show an another easy to do this manually.

    1. Go to this website image.online-convert.com/convert-to-webp
    2. Paste your Image Link and click on convert. Your WebP format images will be downloaded.
    3. Now edit the raw HTML code where your normal Image is appearing.

    Let us say, in beginning, your Image HTML code was like this

    <img src="https://abc.com/wp-content/uploads/2016/09/webplogo.png" alt="abc" width="186" height="66" />

    You need to wrap above code with little more HTML markup.

    <picture>
    	<source srcset="https://abc.com/wp-content/uploads/2016/09/webplogo.webp" type="image/webp" />
    	<img src="https://abc.com/wp-content/uploads/2016/09/webplogo.png" alt="abc" width="186" height="66" />
    </picture>

    Now, Your HTML document is ready to serve images in WebP format.
    Step 2 : Configure server settings
    Just one more step, you need to configure some Apache Webserver settings via .htacccess so browser and web server can treat it properly like all other images.

    Your Web Hosting server may don’t know from which mime type this kind of format images they need to serve. So must add proper mime type. Also, it would be worth to setup expiry header for caching.

    # Serve Images with correct Mime Type
    AddType image/webp .webp
    
    # Setup Cache
    ExpiresActive On
    ExpiresByType image/webp A2592000

    Kindly note: WordPress by default do not support uploading of WebP format image. You may get the error “This file type is unfortunately not allowed for security reasons” while uploading .webp images.

    So, must fix this issue by adding this code in your theme functions.php It would be helpful in case if you will upload your images directly from WordPress Dashboard > Media option.

    function webp_upload_mimes( $existing_mimes ) {
    	// add webp to the list of mime types
    	$existing_mimes['webp'] = 'image/webp';
    
    	// return the array back to the function with our added mime type
    	return $existing_mimes;
    }
    add_filter( 'mime_types', 'webp_upload_mimes' );

    Done.

    If you need any help, please write to me at prospeedguy@gmail.com. It would be my pleasure to help you.

    Further readings
    If you are curious to learn more about WebP, please refer these links.

    Thanks.

  • How To Use Cookie-Free Domains with Cloudflare in WordPress- CDN

    How To Use Cookie-Free Domains with Cloudflare in WordPress- CDN

    Seeing “Use cookie-free domains” error at GTmetrix Yslow or Pingdom for your site?

    GTmetrix report

    Why use Cookie Free Domains?

    When the browser requests a static element and sends cookies with the request, the server ignores the cookies. These cookies are unnecessary network traffic. It increases page load time. Therefore, it is better to avoid cookies for static resources like CSS, JS, Images, etc. files. This is why speed test tools such as GTMetrix and Pingdom recommend to serve the static resources from a domain that doesn’t set cookies.

    Solutions

    • Use a CDN
    • Use Cloudflare only for DNS

    #1. Use a CDN to Serve Cookie-Free Content

    As unnecessary cookies can come from various sources such as Cloudflare, Analytics, top-level domain names and so on, it’s better to completely offload static resources to a CDN unique hostname.

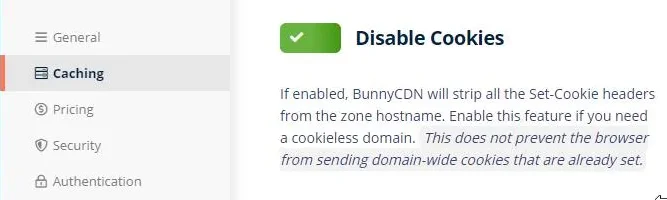
    • Use BunnyCDN to serve all static resources cookies-free.
    • Or, use Stackpath (Formerly known as MaxCDN), they support cookie-free domains.
    Strip all cookies with Stackpath CDN

    This method should work for site using top level (non-www) domain or www alias.

    Bonus tip: If you’re using Yoast SEO WordPress plugin, it would be best to update the image path in XML file. You can add the below snippet via Code Snippets plugin.

    function wpseo_cdn_filter( $uri ) {
    	return str_replace( 'https://example.com', 'https://example.stackpathcdn.com', $uri );
    }
    add_filter( 'wpseo_xml_sitemap_img_src', 'wpseo_cdn_filter' );

    #2. Use Cloudflare only for DNS

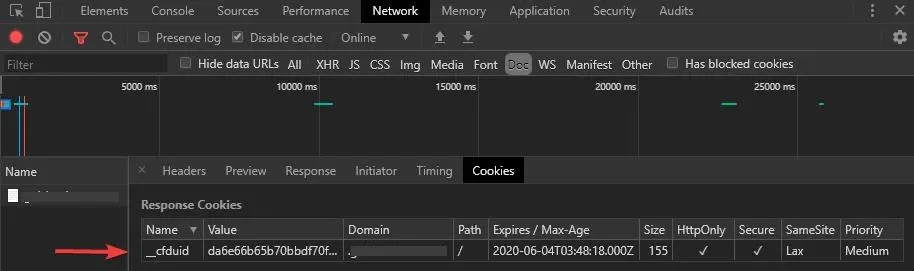
    Generally, you can’t serve cookie-free content while using its CDN (Reverse Proxy) services together. The way Cloudflare provide services, it must add a special cookie namely _cfduid with each HTTP request over whole domain.

    HTTP/1.1 200 OK
    Date: Thu, 26 Mar 2020 15:37:09 GMT
    Content-Type: image/vnd.microsoft.icon
    Content-Length: 0
    Connection: keep-alive
    Set-Cookie: __cfduid=d36b1934da000d3fbc11e5a8e13fccde11585237029; expires=Sat, 25-Apr-20 15:37:09 GMT; path=/; domain=.cloudflare.com; HttpOnly; SameSite=Lax; Secure
    Strict-Transport-Security: max-age=31536000; includeSubDomains; preload
    CF-Cache-Status: HIT
    Age: 4650
    Accept-Ranges: bytes
    Expect-CT: max-age=604800, report-uri="https://report-uri.cloudflare.com/cdn-cgi/beacon/expect-ct"
    X-Content-Type-Options: nosniff
    Server: cloudflare
    CF-RAY: 57a1f3878d3ad597-BOM
    alt-svc: h3-27=":443"; ma=86400, h3-25=":443"; ma=86400, h3-24=":443"; ma=86400, h3-23=":443"; ma=86400

    Solution: To eliminate __cfduid cookies, keep Cloudflare in DNS only mode or switch to Enterprise Plan that allow to remove but it would be costly. Alternatively, you can use Sucuri performance and security solution which doesn’t set cookies with each request.

    #3. Switch to Static WordPress

    This blog is live example a static WordPress site. It is hosted at BunnyCDN Cloud Storage. I am huge fan of their services and amazing support.

    Key facts

    • It helps serving pages without cookies.
    • The process require deep technical understanding of CDN, Caching Policy and end result is worth it.
    • I use Cloudflare only as DNS not proxy.
    • My all pages score 90+ at PageSpeed Insight
    • I use WordPress just as CMS in backend but end user interact with HTML pages.

    By converting WordPress to HTML you can make your website faster than 99% of the world.

    How to check either my domain/subdomain cookiesless or not?

    Check at Network Tab of Chrome Developer tool or using GTmetrix.

    Final words: I have tried my best to explain this tutorial to you. If you have any questions in mind, or couldn’t understand this tutorial at any part. Please feel free to write to me at prospeedguy@gmail.com. I would be happy to reply to your queries.

  • How To Speed Up & Optimize WordPress database connection

    Let’s Optimize WordPress database connection

    In this post, we’re going to break down and share how we optimize the WordPress database connection and database queries when working on site speed.
    A slow WordPress database connection or slow queries will typically manifest in areas in WordPress that aren’t cached like the WordPress backend, checkout pages in WooCommerce, or membership pages on a membership site.

    How To Speed Up & Optimize WordPress Database Queries

    There’s no magic when it comes to website speed optimization and speeding up the database end of WordPress is the same. Ultimately, the way in which you can speed up WordPress database connection & queries could be summarized as:

    1. Use better hosting;
    2. Use object caching powered by Redis or Memcached (memory based database caching);
    3. Reduce the load on the site and database;
    4. Configure the database in a best practices fashion.

    How to Speed Up WordPress Database Connection & Queries

    The recommendations below can be a bit technical, so if you have a question or need anything clarified, please post in the comments.

    1. Use a Good Host That Ideally Has Memcached or Redis Caching
      Having a high quality, reliable hosting provider that supports Memcached or Redis caching is of crucial importance. Memcached and Redis are types of memory caches that can be used for Object Caching – basically WordPress database caching.

    Redis is probably faster in most cases but Memcached is generally more widely available. These are applications installed on the server or hosting itself.

    How To Speed Up & Optimize WordPress Database Queries 2

    If you have a VPS that you’re in control of you should be able to install one of these apps on it.
    If you have a site that is heavy on database queries it’s worth looking at a host with object caching capability. Here’s three we regularly recommend that check this box:

    Siteground – Siteground is a solid mid-range host and they support Memcached and have a tutorial on how to configure it.
    Cloudways – has its VPS servers located in more than 60 places worldwide. These guys offer truly affordable hosting plans starting at $10/month. Cloudways supports both Memcached and Redis.
    *Kinsta – is a managed WordPress host and offers Redis as an addon option.

    1. Use Object Caching
      Object caching is a type of database caching that can dramatically speed up sites that have database heavy operations. Woocommerce checkout and cart operations, order management on the backend and almost everything that happens behind the logon on a membership site are all database heavy operations that will benefit from Object Caching.

    The object cache sits in front of the database and can answer previous database queries (if in the cache) without talking to the database.

    How To Speed Up & Optimize WordPress Database Queries 3

    Your host will need to support Redis or Memcached in order to use object caching and we typically use the Redis Object Cache plugin from Till Kruss inside WordPress to power the caching.

    Broadly, the steps to get this up and running are:

    Install Redis or Memcached or check with your host whether they support it;
    Add a cache salt key in wpconfig.php (important because without this, caches may jump between sites);
    Install and enable the Redis Object Cache plugin.

    1. Use the Highest Version of PHP the Site Supports
      PHP is the programming language WordPress is built on. New versions of PHP get released regularly (every 6-12 months), and each version is typically 10-30% faster than the previous version.

    Using the highest version of PHP that your site supports can dramatically speed up database-related operations.

    1. Reduce the Load by Using Page Caching
      You pretty much can’t run a WordPress site without Page Caching. With Page Caching in place, pages are pre-built before the visitor hits the website, which is a great way to speed up WordPress data queries.

    All the PHP processing and database lookups required to generate the HTML file are all done in advance and stored in the page cache. When the visitor hits the website the server provides the HTML file immediately so the user experiences a faster site and the load on the server is dramatically reduced. Typically it’ll take 1-4 seconds to generate a page from scratch whereas a cached page is available in a few hundred milliseconds (0.2-0.5 seconds)

    How To Speed Up & Optimize WordPress Database Queries 4

    WP Rocket is one of the best caching plugins on the market. It includes lots of prominent features, so it stands out as the plugin we highly recommend to everyone who wants to speed up WordPress data queries and improve their website’s performance.

    • 5. Reduce the Load by Using Cloudflare CDN

    Even if you are using a low-quality host, Cloudflare can greatly decrease your site’s load times even on the free plan.

    Cloudflare offers several speed optimizations and speed benefits such as:

    How To Speed Up & Optimize WordPress Database Queries 5

    Fast DNS (Domain Name System) hosting – Cloudflare is typically one of the fastest DNS hosts in the world, see https://dnsperf.com for real time rankings
    Security & Firewall even on the free plan Cloudflare can filter a lot of the garbage traffic hitting your site. There’s some custom rules we typically add to boost speed further, see this article.
    The $5/month plan includes Cloudflare’s APO service that does edge caching. With edge caching, entire pages from your site are stored on Cloudflare’s servers (aka “edge”) which removes most of the impact of geography on site speed AND can increase the volume of traffic your site can handle from 2-50x
    On the $20/month plan (which we recommend for bigger sites) Cloudflare also provides a full firewall, image optimization and bunch of other site speed optimizations.
    If you can’t use Cloudflare, at least use a CDN service (one that has image optimization built-in like Bunny CDN). CDN is very useful in speeding up the response of static assets such as CSS, JS, images, and fonts.

    1. Make Sure Your Database Is Using the Innodb Storage Engine for All Tables
      InnoDB and MyISAM are “storage engines” used by MySQL – essentially the format the database stores its database. MyISAM was a default table type until MySQL 5.5.5 was introduced in 2010. Innodb tables are faster than MyISAM so ensuring the tables are using the Innodb storage engine can dramatically speed up queries.

    MyISAM Table

    There are several differences between the two but in simple terms, MyISAM tables will lock a database table while it’s being written to. This means that on a busy site these database write operations start to queue and cause delays in processing which manifest as slower loading to the user.

    Think of the database table as an Excel spreadsheet where if one person has it open, another person can’t make any edits.

    Innodb tables only lock the row in the database table that’s being written to, so there’s little to no database queuing. It’s like using a shared Google Sheet that multiple users can work on at once.

    Converting from MyIsam tables to Innodb tables can give you a solid speed boost particularly in the backend and on higher traffic sites.

    InnoDB Table
    For most affiliate sites, the database will be a few hundred megabytes at most, so we use a plugin called Servebolt Optimizer (https://wordpress.org/plugins/servebolt-optimizer/ ) to do the conversion. If your database is over 1 GB in size, you might need to run the convert operation a couple of times.

    If the database is big, e.g. several GB, don’t do this during peak times, and probably not a good idea to do the conversion using this plugin as you’ll wind up knocking over the server for a reasonably long period of time. Better to do this at the database level itself in PHPMyAdmin and probably wise to get a developer to do this for you.

    1. Disable Any Plugins and Tools You’re Not Using
      Unused plugins and tools might be another reason for slow WordPress database queries, especially when it comes to older websites. Go through all plugins and tools your site uses, and delete or disable those that are no longer used.

    From a speed point of view, cutting the number of plugins should improve your site’s performance.

    1. Delete Expired Transients for Your Database
      The transients API in WordPress makes way for developers to store temporary information in the WordPress database and assign it an expiration time, after which it will be deleted. This eases server load and improves WordPress performance.

    Sometimes, transients expire or disappear before their set timeframe, or don’t have the expiring time. Old and expired transients can increase the site load and negatively influence its performance. There’s a number of different plugins that can delete expired transients, like WP Rocket as well as WP Optimize.

    1. Use the Query Monitor Plugin to Identify Database Hogs
      Query Monitor is a WordPress plugin that allows debugging WordPress’ slow database queries, hooks and actions, PHP errors, editor blocks, HTTP API calls, enqueued scripts and stylesheets, and more. It also helps you to efficiently find out if plugins, themes, or functions perform poorly. Query Monitor comes with some advanced features that are extremely useful with debugging Ajax calls, REST API calls, and user capability checks.

    Query monitor home page
    Installing the Query Monitor plugin and performing operations on the frontend and backend of the site will identify slow pages, large database queries and memory hogs.

    Query Monitor is free – https://wordpress.org/plugins/query-monitor/

    1. Update All Plugins to the Latest Versions
      This is yet another way to speed up WordPress data queries. Quite often older plugins have minor incompatibilities with the current WordPress version or PHP version being used. Usually these issues will appear in Query Monitor but occasionally not. Making sure all plugins are up to date can eliminate these problems.

    Pay special attention here to paid plugins that come from Themeforest/Envato or a third party where there may be several updates available but the plugin itself does not show any updates available.

    1. Analyze Server Logs to Identify Any Resources Getting Hammered
      Sometimes looking at server log files can help identify particular resources that are getting hammered or errors happening under the bonnet.

    Again the Query Monitor plugin will usually unearth errors that would show up in the server log but occasionally not.

    Often we find SEO crawlers hammer Woocommerce sites adding and removing thing to the cart and wishlist rapidly over the course of a few seconds chewing up a huge volume of server resources so blocking these crawlers can be useful. Likewise brute-force attacks on the WordPress backend login screen can have a similar effect.

    1. Reduce Load Further by Using Wordfence or Another Security Tool
      As per the previous point, using security tools can help reduce the volume of scrapers, crawlers and otherwise nefarious visitors chewing up server resources.

    Typically we recommend using the $20/month version of Cloudflare which has a true stateful firewall built into it so it can intelligently block traffic as well as the free version of Wordfence which will help reduce brute force attacks and anything that slips through Cloudflare.

    Further help….
    I hope you found this post useful. If you’re looking for help specifically with high database load, our Consult Services is probably the service that can help you. If you’re unsure, head to the homepage and submit a free site speed audit request.

    Want to go faster, rank higher in Google & get more customers?
    Sign up now and join 1000s of other subscribers and get cutting edge tactics & techniques we’ve learnt after optimizing 4000+ websites